Subsections of Configure Authway
Modules and Functionality
In this section, a more detailed description of the modules and functions in Authway is provided. We will also attempt to clarify factors to consider when defining the modules and functions needed.
Functions
A function is the smallest component to which permissions can be assigned and, therefore, is the one checked in the code to determine whether the user has the necessary permissions or not. A function should be very stable over time, essentially coming into existence when new functionality is developed and being removed simultaneously when the functionality is removed from the system. The determination of necessary functions is thus guided by the business requirements regarding which parts of the system users need to be able to assign different permissions to.
This also means that a function can vary widely in scope even within the same module/system. For some systems, only a single function representing the entire system is needed, but a more common starting point is to create one function per user interface view or per API. Often, it may be necessary to differentiate between the ability to read information in a view and the ability to manage the information. Examples of functions in Authway include, for instance:
- Read user
- Manage user
- Read groups
- Manage groups
Sometimes, the act of removal can be more sensitive than adding or modifying information. In such cases, additional functionality may be required, for example:
- Manage organization (owner)
- Remove organization (owner)
Within a view, there can also be other types of functions that are more sensitive. An example could be a search function that displays personal information, and if you add the capability to export the search results, it becomes more sensitive as it poses a risk of mishandling personal data. In such a scenario, one might consider having the following functions:
- Search individuals
- Export individuals
Another aspect that can impact the definition of functions is whether there are business rules associated with the organization. It is important to avoid moving business rules into Authway, as they belong in the system that has the rule. However, these rules may still need to influence which functions are defined. This is quite common in multi-tenant systems but also in other systems where organizational affiliation can play a significant role. An example could be the ability to administer properties in a real estate company, where a property manager has the right to update information about the properties they are responsible for, but not others. In this case, you might have functions like:
- Manage my properties
- Manage all properties
The definition of what “my” means is not specified here, as those rules exist in the business system. During organizational changes, these rules should only need to be updated in the business system, while the functions remain unchanged in Authway (possibly with the exception that you might want to update the description).
Administer functions
When creating functions, you give them a user-friendly name that is displayed in the administration interface, such as in group management. In the “Authorization” field, you specify the string against which the code verifies the permission, and this string must be unique. We recommend using the [Module].[Function] naming convention, for example, Security.ReadUser and Security.ManageUser. It’s also a good practice to create a constant in the code for each permission so that the string is defined in only one place.
A well-written description can help administrators understand the purpose of the function.
Functions that require owner permission must be saved first before adding owners who should have access. This is because the owner is granted access directly but after a check that the function requires owner permission. It also means that when assigning owner permission, you can press “Cancel” to close the dialog, provided no other changes that need saving have been made.
Owner-specific functions
In a multi-tenant system, there is sometimes a need to restrict access to a function to one or more specific owners. This could be for advanced features where there’s a need to view information from other owners, such as in a support organization. It could also involve a customer-specific report that belongs to the Report module.
If there are many functions that need to be specific to owners, it might be advisable to place them in a separate module, as modules are also assigned for each new owner.
The target audience for a function?
Often, the functions that a system contains are available both in a user interface and in an API, meaning that it is reasonable for both users and other systems to have access. However, there are functions that are clearly targeted either at users or systems. An example could be the ability to read an event stream for systems built on events. This is likely to be completely incomprehensible for users and practically never something a user would want to do, but another system is highly likely to need this capability. In Authway, it is possible to restrict where in the administration interface the functions are displayed by selecting a target audience.
Modules
Modules are a grouping of functions that are logically related in some way. A module can correspond to a system, but it is not uncommon to choose to divide a system into several modules. Here are some factors to consider when deciding to create modules:
- If there are different target audiences (e.g., internal users and external users), it may be a good reason to place functions in different modules.
- If there are specific owners who should have access to the functions, but there are still quite a few functions that are the same for these different owners, grouping these functions into a separate module may also be a good reason.
- A module can be set to online/offline during deployments, so it’s often appropriate for modules to match the unit being deployed.
- An API scope can only correspond to one module, meaning that if you want to require different scopes for calls to different APIs, these probably should be divided into separate modules.
The relation between modules, systems and APIs
Configure an Application
An application (client in OAuth language) that should use Authway to sign-in an end-user or to make system-to-system calls must be configured first. The configuration can be quite daunting, but Authway makes it easy to get started with the most important settings when creating a new application. For now, this guide will only contain the most important aspects of configuring different type of clients and it expects the reader to have read at least the Getting started documentation.
Before configuring a application, you need to decide what kind of application you have created (or shall create). The common ones are:
- Single Page Application (SPA) - Javascript
- Web Application - Server side
- Native Application - Mobile/Desktop
- Machine/Robot (or system-to-system)

All clients must have a client id and we recommend that you decide on a naming convention to follow. We typically use descriptive names with a namespace prefix where each prefix is separated with a dot (".").
Machine/Robot
The Machine/Robot template should be chosen when you have a scenario where a system (client) makes a call to a (resource) server. Authway supports both the classic system-to-system (client credentials) scenario, but also extends that scenario with support for External system. If you want to configure an External system you should read this instead.
For a more classic system-to-system scenario you typically only need to supply a client id and a name. Then on the details of the system you must create a secret (see below about client secrets).
Single Page Application (SPA) - Javascript
Even for a SPA it will be more secure to create a backend for frontend, so that sign-in can be performed as for a Web Application - Server side. The reason for this is that otherwise the access token will reside in the end-users browser and there are no really good way to protect a token in the browser. On the contrary the development around protection of browser cookies have now reached a maturity level that makes them a more secure option and then storing the access token only in the backend. The backend for frontend will typically work as a proxy to the real backend API and exchange the cookie to the access token when passing the call to the API. This will also remove the need to use CORS.
For a SPA you will typically have to configure a client id, client name and URLs for both CORS and redirections. Never create a secret for a SPA client, because if that secret should be used it must be send to the client browser and then it is not a secret anymore.
The CORS URL should be your domain name (incl port if not standard ports are used) without any slash ("/") in the end. The redirect URL must be the exact URL that your client send in the redirect_uri parameter.
On the “Basics” tab you can edit if PKCE is required or not depending on the support in your client implementation.
Web Application - Server side
Web Application should be chosen for all type of web applications that have some kind of backend that can trigger the sign-in flow. This is the most secure type of application for the web. For this scenario you will need to supply a client id, name and redirect URL. The redirect URL must be the exact URL that your client send in the redirect_uri parameter. Then on the details of the system you must create a secret (see below about client secrets).
On the “Basics” tab you can edit if PKCE is required or not depending on the support in your client implementation. If you want to allow the client to request refresh tokens this setting is also configured on the same tab.
Native Application - Mobile/Desktop
Native applications will more or less be configured like a Web Application with client id, name and redirect URL. In this case the redirect URL will not be on the http protocol, but rather something else that you interrupt in the client and continue the flow yourself in the application (instead of in a backend). As always with redirect URL:s it must be the exact URL that your client send in the redirect_uri parameter.
If you have the possibility to protect a client secret in a secure way we recommend that you create a client secret and use it. If you can’t, then there is no meaning in creating a client secret. In the “Basics” tab you can edit if a client secret is required or not.
Client Secrets
A secret can be created and administered on the “Secrets” tab of the client. When a new secret is created, it is displayed directly in the user interface and then it is important that it is copied and stored securely for the client. Authway will not be able to show the value of the secret again (in the same way that passwords cannot be displayed). This means that if the secret is lost, a new secret must be created. When a new secret is created, the old secret should be deleted or given an expiration date. The latter should be used if you want to change your secret in a controlled manner without getting any interruption.
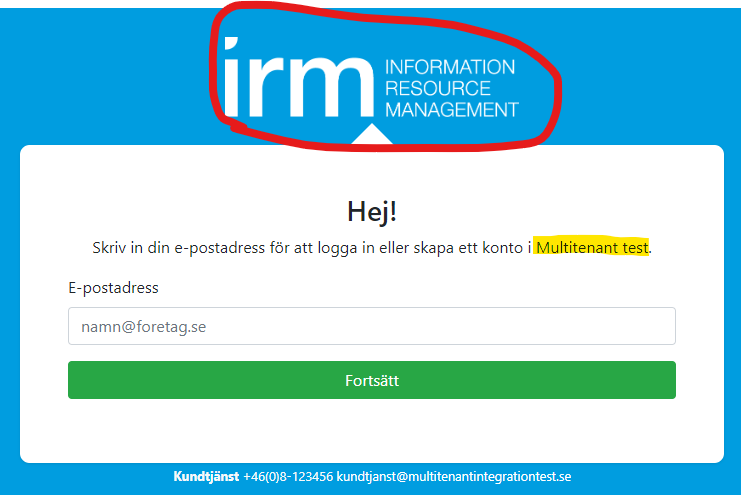
Customize UI for an Application
It is possible to make customization of the login UI per application in Authway. The name of the application is displayed in the text (marked yellow in the image below) and the Logo (marked red in the image below) can be set to any image file that is uploaded to the service.
It is also possible to add a custom stylesheet for the application (client), so fonts, colours and other visual aspects can be changed.
Limitations:
- The stylesheet and image must be uploaded to the Authway service. It is not possible to refer to files on other domains/web servers.
Configure an External System
An external system is a Authway unique concept to make it easier for an API to support both end-users and system-to-system consumption. An external system is both a default configured client, combined with a system user, which makes it possible to get typical user claims like name, email, tid and perm. This possibility makes it easy for the API, since it does not need to figure out if it is an end-user or a system that makes the call and handle them differently. Note that an External System can’t be added to a group so it can’t get any role claims.
It is important to understand that an External System belongs to a tenant, which most likely will have the affect that the API only will return information for that tenant (ie filtered by the tid claim).
Configure an External System
To create a new External System, click add and supply a name and an e-mail address. The same e-mail address can be used for many systems and it will not conflict with regular end-users e-mail address. We do recommend to use a non-personal e-mail because that address might be used by an API owner to inform about downtime, changes and so on.
Once the client has been created, it must have access to at least one functionality in order to be used. At the same time as it receives the right, it will also be assigned the scope that is connected to the module to which the selected functionality belongs.
The last step is then to create a secret.
For an existing client you can’t make many changes, but it is possible to change the e-mail address. The most common administrative task is to make changes to the permissions and in some cases create a new secret.
Secrets for an External System
A secret can be created under the “Actions” menu. When a new secret is created, it is displayed directly in the user interface and then it is important that it is copied and stored securely for the client. Authway will not be able to show the value of the secret again (in the same way that passwords cannot be displayed). This means that if the secret is lost, a new secret must be created. When a new secret is created, the old secret will be valid for 30 days, giving you time to change you configuration.
Advanced Configuration of the Client
It is possible to make changes to the client configuration by going to Configure -> Clients and flip the option to also show External Systems. This will list all External Systems that are configured for the tenant you administer. This makes it possible to change all settings for the client, like the type of tokens used, how long a token should be valid, change allowed scopes and so on.
Configure an API
To be able to protect an API, you need to configure two parts of the Authway service. Step 1 is to define an API scope and with that in place, step 2 is to define an API resource.
Configure an API Scope
A scope defines a logical API where you want to be able to give one or more clients the opportunity to use that API. This means that an application that wants to be able to call the API must request the scope when the token is requested at sign-in. This logical API can have one or more implementations (API resources), but usually a logical API is implemented by an API resource. For Authway, the scope needs to be defined in the same way in both test and production environments.
The naming of a scope should be lowercase (just as the standard identity scopes are) and if you want to distinguish between words, use a “_” between each word. For example Authway API scope is called “idp_auth_api”.
For an API scope, you specify all the claims that the API needs to be able to function, ie what information from the API needs the API to function properly.
There are possible situations for defining several API ranges to one API, such as that one would like to differentiate between a scope that only gives the client access to GET operations (read) and have another scope for the client to use PUT/POST/DELETE operations (updates). Our experience is that it should rarely be controlled per client, but rather by the user’s permissions (ie the user’s access to functionality). In general, we therefore recommend that you use a single API scope for your entire API (GET/PUT/POST/DELETE).
We recommend that an API Scope is associated with a module, so that the administration of External Systems automatically is assigned correct scopes.
Configure an API Resource
An API resource represents an implementation of an API scope. The API resource has a configuration for the site where the API is distributed too, which means that if several distributions of the API is made to different websites (addresses), several API resources should be configured. For the API resource, you specify which API scope the API implements.
We recommend that the API resource is given the same name as the API scope, and if this is done, the API scope is automatically connected to the resource when it is created. This can also be done manually, e.g. if the API implements more than one scope.
Secrets for an API Resource
If the API resource should be able to use OAuth/OpenId Connect APIs that are protected, a secret is required (corresponding to a user’s password). Examples of such use cases are is to use introspection to support reference tokens along with access tokens.
This secret can be created and administered on the “Secrets” tab of the API resource. When a new secret is created, it is displayed directly in the user interface and then it is important that it is copied and stored securely for the API. Authway will not be able to show the value of the secret again (in the same way that passwords cannot be displayed). This means that if the secret is lost, a new secret must be created. When a new secret is created, the old secret should be deleted or given an expiration date. The latter should be used if you want to change your secret in a controlled manner without getting any interruption.
Configure a Tenant
Every user belongs to a single organization, but a human being is allowed to be associated with multiple tenants by having a user account in each tenant. The user account is allowed to have the exact same credentials (for example the exact same username and password). To be able to add users, there must exist an organization to add them too. There is one build-in organization for private individuals, but for all customers, suppliers and partners that you want to allow access for you must create a tenant.
Considerations for Creating Tenants and Organizations
These are the possibilities and limitations that you should have in mind when deciding how you should add an organization to Authway:
- An user can belong to more than one tenant, ie the same username (and other credentials) can be used in multiple tenants. If the user uses exactly the same credentials, Authway will ask the user for which tenant he/she wants to sign-in. The user can only be signed in to one tenant at a time.
- An user can only belong to one organization in the organization tree.
- Modules can only be activated/deactivated for a tenant and not for any subsidiaries (and the same rule applies to functionalities that requires tenant permission). If you want different parts of the organization to have access to different modules, this indicates that you should configure them as different owners. At the same time, this can to some extent also be handled by creating different groups for different parts of the organization that are only assigned rights to the modules they are supposed to use, but if a strict separation is required where groups cannot be configured incorrectly, different tenants must be set up.
- Trusted domains are required to be unique per tenant, which will affect the possibility to configure auto-provision.
- It is possible to configure the exactly same external identity provider on multiple tenants, but in many cases the need to do this is an indication that the organization maybe should be a single tenant.
- An application (client) will always get the tid (tenant id) claim for a user, but it is also possible to get more organization information like the organization id a user belongs to.
Create a Tenant
You create new tenants under the Configure -> Tenant menu and the only required information is the name of an organization. The name must be unique over all tenants. It is possible to optionally add an organization identity and after creating the tenant you can add subsidiaries to the tenant.
Manage a Tenant
When the organizational structure of a tenant is defined there are mainly two things you want to manage:
- Modules: activate modules that users of the tenant should be allowed to access (authorization).
- Settings: make custom settings for authentication of users belonging to the tenant. This is done by editing, disabling och adding identity providers for the tenant.
To be able to make any changes of the identity providers for a tenant, you must first assign a unique URL name for the organization. This can often be a shorter version of the name, for example we use “priv” for the tenant “Private individuals”. The reason for this setting to be required is that it will be part of the URL:s when customizing identity providers.
Configuring Identity Providers
All configured identity providers for the service is visible in a list under settings. For each of the listed identity providers you can enable/disable the usage of the identity provider for this specific tenant. Depending on the specific identity provider more customization can be done.
A common configuration to do is to configure the Microsoft identity provider to only allow users from the organization’s Azure AD Tenant. To do this, select the Microsoft identity provider and click Edit. Paste the tenant id from Azure AD and optionally change the name, probably to something like the organization name (important that the user will understand that they will be able to use their existing Azure AD identity).
It is also possible to configure two levels of auto-provisioning of users for some of the identity providers. Check that the identity provider is allowed to automatically create users. By doing so you are enabling the first level that we call auto-link. This level still requires an administrator to manually add the user to the service, but it is not needed to send an invitation. Instead the user will be re-directed to the external identity provider when trying to sign-in and when returning the user will be auto-linked based on the username being the same in Authway and the external identity provider.
Authway can also create the user completely at sign-in and therefor removing all manual administration of users in Authway. To enable this, one or more trusted domains must be added in addition to allow the users to be automatically created. The sign-in process will match everything after “@” in the e-mail address (username) to see if there is an organization with auto-provision configured. If a match is found, the user is re-directed to the external identity provider and when returning the user is automatically created. If any piece of information is missing when creating the user, the user will be prompted for that information the first time, but not after the user creation is finished.
Delete a Tenant
It is always sad to see a customer, supplier or partner to leave, but when it happens it is important to remove the information from the system to be compliant with regulations such as GDPR. To delete a tenant you search for it, and click on the name to get to the details page. Under the Actions menu you’ll find the delete command if you have the necessary permission. Remember that deleting a tenant is an action that can not be undone.
Access Control With Modules
Access control with modules empowers you to manage and restrict user access at a tenant level for an application. By activating a module with a tenant, Authway enforce the requirement that users must be part of a tenant with the specific module activated in order to sign in to an application.
Here is how it works:
- Module set up: Start by defining a module that is a logic representation of an application. For the purpose of controlling access to the module on a tenant level, it is not necessary to configure any permissions and/or role templates.
- Module integration: Next, connect the module to an application in through application configuration. When you do this, Authway will automatically enforce access restrictions. Only users who belong to a tenant with the module enabled will be allowed to sign in. Users not meeting this criteria will be prevented from accessing the application.
- Tenant-Level Control: Configure which tenants should have access to the module, by activating the module for tenants that are allowed to use the application. Read more in “Configure a tenant”.
- User Experience: If a user is signed in but doesn’t have access to the required module, Authway will effectively log them out, preventing unauthorized access and maintaining the integrity of your access control system. In the same time it also allows the user to sign-in with other credentials that might have access to the application. For users that exists in multiple organisations, Authway will try to automatically choose organisation depending on access to the module, during sign-in.