Subsections of Developer guide
Create a User
An administrator can create users in Authway admin UI and we always recommend to evaluate if auto-provisioning is possible since that remove a lot of manual (and double) administration. There are also valid reasons to use our admin APIs to create users.
A user in Authway is actually two objects, a person object and a user object. A person can exists without a user, but a user always requires a person. Both objects exists in a tenant and a person can be assigned to a subsidary if needed. There are scenarios where only a person should be created, but focus will be on users in this document.
Since the person/user is bound to a specific tenant all API calls to them is required to include tenant information as explained in the Introduction to admin APIs.
API:s to create a person and a user
Since a user requires a person, the normal way of creating a user is through the POST Person API. In the post it is possible to pass parameters so that both the person and the user is created in a single call. It is not possible to set password or other credentials for a user, but instead a user should be invited (or auto-linking can be used).
Please don’t pass the Id (it is not required) if not absolutely necessary as explained in the “Introduction to admin APIs”.
Invite a user
When creating a user through the POST Person API, there are a flag that can be set if you want Authway to send an invitation to the user. When setting the flag to true, it is also possible to pass additional parameters that should be added to the invitation link. Additional parameters:
- clientId=[a client id]: The value of a registered application (client). When this parameter is passed the pages will use custom styles if that is registered for the client. The user will also be returned to URL registered on the client, when the account creation is completed.
- link=true: Triggers the flow where a invited user will have to sign-in or create a personal account that the organisation account will be linked to. Read more about linking of users.
It is also possible to get an invitation link through the API if you want to share the link through other mechanisms or if more control over the e-mail creation is needed.
An invitation link is valid for 24 hours by default, but this can be configured in your instance.
Events during creation of person and user
There will be multiple events during the process of creating a user.
During the API calls to POST Person:
- PersonCreated
- UserCreated
- Possibly UserRoleAdded if there are roles configured to be automatically added for new users.
When the user uses the invitation link and completes the registration:
- UserConfirmedEmail (or UserConfirmedPhoneNumber if user name is a phone number)
- UserSignInAssociated
- UserClaimAdded if the user is linked to a parent user when parameter
link=trueis used. Read more in Link users. - UserSignedIn
If a clientId parameter is included in the invitation link, the events will have metadata about the client (ClientId and ClientName); otherwise not.
Assign groups to a user
Normally it is also required to assign groups to the user so that the user will have permissions to do anything in the applications. Groups are assigned through the Group API. When adding groups it is possible to pass group id:s or group names, but it is not allowed to send a mix of both.
Subsections of Create a User
Link Users
Read about linked users so that you understand the concept and its limitations before continuing on this more developer focused documentation.
Create linked users
By invitation
Add query string parameter link=true to the invitation link will trigger a flow where the user must sign-in with (or create) a personal account which will do the linking automatically.
By API calls
To create users that should be linked you do the same as for a regular user. After the user is created, it is possible to link the user to a parent by POST users/{newly created user id}/link/{parent user id}.
Events during linking
A UserClaimAdded event is raised when a user is linked to a parent user. The event is raised to the child user (the same user that the link API was used for), which means that the AggregateId will have the value of the child user. The ClaimType will be “sub” and the ClaimValue will have the unique identifier of the parent user.
User sign-in
Authentication of the user must be performed by the Identity Provider (IdP) (in this case by Authway), where the user´s session or credentials will be checked. It is an application that wants to authenticate the user, that triggers the sign-in flow by using either the OpenId Connect protocol (OIDC) (preferred) or the SAML protocol (only available in Enterprise Edition and less preferred, but sometimes necessary). The application is called Client in OIDC and Service Provider (SP) in SAML. The authentication is done by a web browser, running on the user´s device, by redirecting the user to the IdP. How the users are authenticated is left up to the IdP to decide (even if the application can pass parameters affecting how that decision is done).
Considerations for different kind of applications
A server-based web application can choose to use OIDC or SAML.
Mobile applications running on platforms such as iOS and/or Android should use the system browser to re-direct the user for authentication. Embedded web views are not trusted, since there is nothing that prevents the app from snooping on the user password. User authentication must always be done in a trusted context that is separate from the app.
Single Page Applications (SPA) or other browser (JavaScript) applications should carefully choose how to handle authentication and we have a separate page with more details about this.
Choose OpenId Connect Flow
OIDC has flows designed for the different application types.
- Authorization code flow: This is the most used and the preferred flow, primarly used by server-base applications and native/mobile apps. Authentication is triggered by re-directing the user to the IdP, but when the user is returned only a code is passed back to the application through the user browser, never any token(s). Instead, the tokens are fetched by using a back-channel where the code is exchanged for the token(s). This is the most secure flow since the tokens are never exposed to the browser and it also makes it easy to authenticate the application (client). If possible, it also good to use this flow with PKCE.
- Implicit flow: Can be used by SPA or other JavaScript applications that don’t have a backend. Token(s) are send directly to the browser during re-direction of the user after a successful sign-in. Therefor this flow is less secure and as detailed in our article you should consider to use a Backend for Frontend (BFF).
- Hybrid flow: Rarely used nowdays and it is a combination of implicit and code flow.
SAML Authentication
Authway supports SAML authentication in the Enterprise edition, but is must be actively turned on by our support. Authway supports both Redirect and Post Bindings.
Subsections of User sign-in
Choose Authentication for a SPA
When building a SPA there are two alternatives (both uses OpenId Connect protocol) for how to authenticate the users. Traditionally the authentication have been triggered by the end users browser, which means that the tokens are returned to the end users browser and then the token(s) are typically stored on the client. The token are then used when making API calls to the backend.
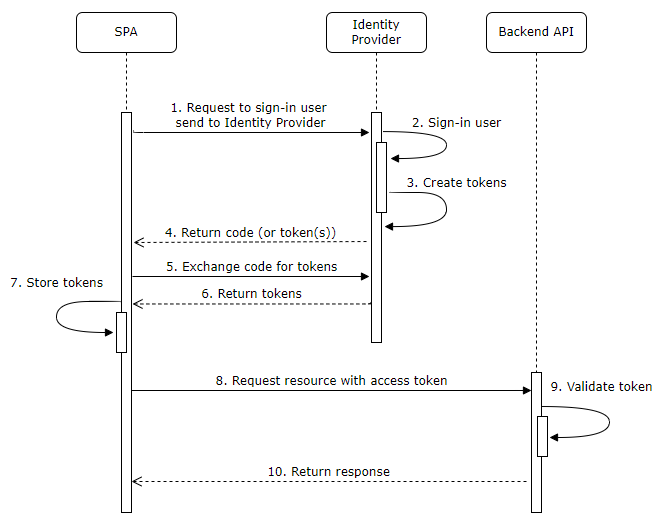
There are a couple of challenges with this and the biggest one is that there are no real secure way to protect the token in the end users browser (resulting in a larger attack vector). A smaller problem is that the client can’t use a secret against the Identity Provider (if a secret is required, it must be send to the browser and in that case it is not secret anymore).
During the last couple of years the protection and restrictions around cookies have improved a lot and a cookie is therefor a much safer way to handle an authenticated user today. This has evolved a pattern called Backend-for-frontend which makes it possible to use cookies in the end users browser instead of tokens. The backend-for-frontend is just a proxy to the backend API (for example implemented by using YARP, Ocelot or another solution) that identifies the user through the cookie and then exchange the cookie to the corresponding token that is stored on the sever side and finally passes the token to the backend API.
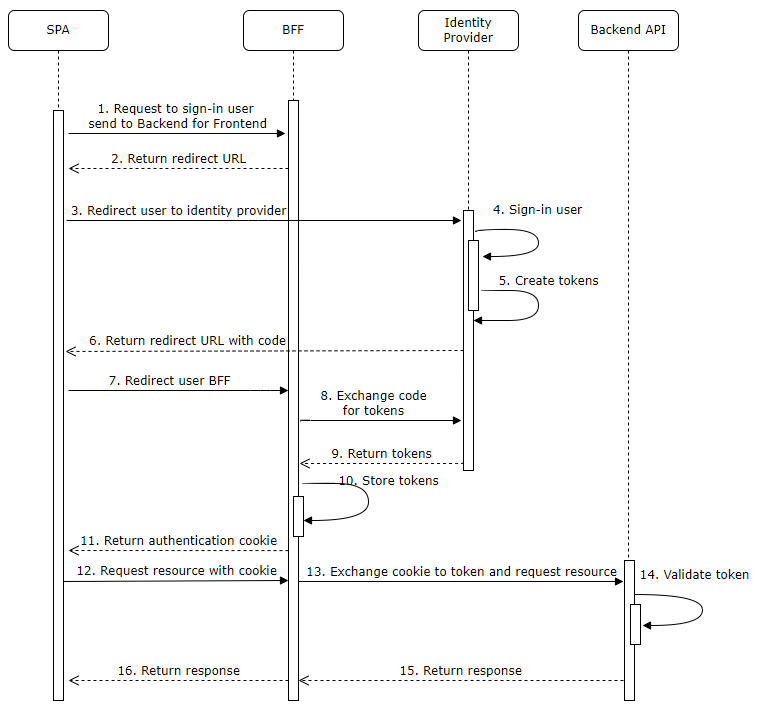
The result of this is that the token is securely stored on the server. To use this pattern, you will trigger the sign-in from the server (as in a traditional web application) instead of doing it from the client, for example before the SPA application is started. After the sign-in is completed the user is redirected (back) to the SPA client.
This is not just a more secure solution, but it is also easier in that it removes all CORS problems and it is typically easier to use refresh tokens on the server side than on the client.
OpenId Connect Authentication with Authorisation Code Flow
We strongly recommend the use of standardized and validated client libraries from you application code. Security is very difficult to get correct and this article will just show a simplified minimal implementation of the authentication of a user with OpenId Connect (OIDC), more in the purpose to educate the basics than showing production ready code.
Initiating user authentication
The application will initiate a user authentication by re-directing the browser to the authorization endpoint of the Identity Provider (IdP, in this case Authway). The re-direct must be an OIDC authentication request message. Here is an example of the re-direct by the application:
HTTP/1.1 302 Found
Location: https://YOURINSTANCE.irmciam.se/connect/authorize?
          client_id=YOUR_CLIENT_ID
          &redirect_uri=https%3A%2F%2Fclient.example.org%2Fcallback
          &response_type=code
          &scope=openid
          &state=YOUR_STATE
Explanation of the request parameters in the example:
- client_id: The application (Client) identifier in Authway. This identifier is created when the application is registered in Authway.
- redirect_uri: The callback URI where the application want to retrieve the authentication response. This URI is validated by Authway and it must be an exact match of a registered redirect URI.
- response_type: Set to
codeto indicate that it is the authorisation code flow that should be used. - scope: Used to specify the requested authorisation in OAuth.
openidindicates a request for OIDC authentication and a ID token. More scopes can be supplied to indicate what information should be included in the ID token. Read more about what claims are included in which scopes. - state: Value set by the application to keep state between the request and the callback.
There are more parameters that can be used.
At the Idp the user will be prompted to sign-in, if that is not already the case. After the Idp has successfully authenticated the user it will call the application redirect_uri with an authorization code (or an error code if Idp fails).
HTTP/1.1 302 Found
Location: https://client.example.org/callback?
          code=A_CODE_ISSUED_BY_IDP
          &state=YOUR_STATE
The application must validate the state parameter and if successful continue to exchange the code for the ID token.
Exchange code for ID token
The retrieved code is meaningless to the application and must be exchanged for an ID token by making a back-channel call to the Idp. By making this in a back-channel the client can be validated, so that the Idp is only revealing tokens to trusted applications, and the ID token is never exposed to the browser (which is more secure).
The code can be exchanged at the token endpoint:
POST /connect/token HTTP/1.1
Host: YOURINSTANCE.irmciam.se
Content-Type: application/x-www-form-urlencoded
Authorization: Basic czZCaGRSa3F0Mzo3RmpmcDBaQnIxS3REUmJuZlZkbUl3

grant_type=authorization_code
 &code=A_CODE_ISSUED_BY_IDP
 &redirect_uri=https%3A%2F%2Fclient.example.org%2Fcallback
Client ID and secret can be passed in the Authorization header or as client_id and client_secret parameters in the request body. The form-encoded parameters should include a repeated redirect_uri and the retreved code from the response after the successful authentication of the user.
If the Idp handles the request successfully it will return a JSON object with the ID token, an access token and optionally a refresh token together with expiration information.
HTTP/1.1 200 OK
Content-Type: application/json
Cache-Control: no-store
Pragma: no-cache

{
  "id_token": "A_JWT_TOKEN",
  "access_token": "AN_ACCESS_TOKEN",
  "token_type": "Bearer",
  "expires_in": 3600,
}
The ID token should be validated by the application before it is accepted.
The Authorisation Code Flow with PKCE
When using the Authorization Code Flow in public clients, such as single-page applications (SPAs) or mobile apps, it is strongly recommended to use PKCE (Proof Key for Code Exchange) to enhance security. PKCE mitigates the risk of an authorization code being intercepted and used by a malicious actor.
With PKCE, the client creates a code verifier and a code challenge before initiating the authorization request. These values are used to bind the authorization code to the specific client instance that requested it.
Here is an example of the re-direct by the application:
HTTP/1.1 302 Found
Location: https://YOURINSTANCE.irmciam.se/connect/authorize?
          client_id=YOUR_CLIENT_ID
          &redirect_uri=https%3A%2F%2Fclient.example.org%2Fcallback
          &response_type=code
          &scope=openid
          &state=YOUR_STATE
          &code_challenge=YOUR_CODE_CHALLENGE
          &code_challenge_method=S256
Explanation of the additional request parameters in the example:
- code_challenge: A derived value from the code verifier. It is created by applying the SHA256 hash algorithm to the code verifier and then Base64URL-encoding the result. This value is sent in the initial authorization request.
- code_challenge_method: Specifies the transformation method used to generate the code challenge. The recommended and most secure method is
S256. The plain method (plain) is also defined but should only be used if theS256method is not supported.
Exchange code for ID token with PKCE
When exchanging the code for the ID token must also be modified when PKCE is used. The client (application) must include the code_verifier that was used to generate the code_challange in the authorisation request.
The extended code that exchange the code at the token endpoint:
POST /connect/token HTTP/1.1
Host: YOURINSTANCE.irmciam.se
Content-Type: application/x-www-form-urlencoded

grant_type=authorization_code
 &code=A_CODE_ISSUED_BY_IDP
 &code_verifier=YOUR_CODE_VERIFIER
 &client_id=YOUR_CLIENT_ID
 &redirect_uri=https%3A%2F%2Fclient.example.org%2Fcallback
Note that the this request does not pass any Authorization header, because a public client can’t securely store a client secret, since their code and configuration can be accessed by the user. This is the reason why PKCE is used and strongly recommended for this type of clients, but can be used by confidential clients (such as traditional server-side web applications) too for improved security (together with the client secret).
Explanation of the additional parameter:
- client_id: The client id (the application (Client) identifier in Authway) is still required and is passed in the body.
- code_verifier: The original string generated by the client before the authorization request.
Authway verifies this value by re-computing the code challenge and comparing it with the one sent earlier. If they match, the token exchange succeeds.
Creating the Code Verifier and Code Challenge
Please use a tested and documented client library instead of relying on this code, which should only be used for extended understanding of how the PKCE flow works.
Before initiating the authorization request, the application must generate a code verifier and derive a code challenge from it.
-
code_verifier: A high-entropy cryptographic random string (43–128 characters) consisting of letters, digits, and the characters
-._~. -
code_challenge: A value derived from the
code_verifier, created by applying the SHA256 hash function and then Base64URL-encoding the result.
Here is an example of how to create these values in Node.js:
import crypto from "crypto";

// Generate a high-entropy random string as the code_verifier
const codeVerifier = crypto.randomBytes(64)
  .toString("base64")
  .replace(/\+/g, "-")
  .replace(/\//g, "_")
  .replace(/=+$/, "");

// Create the SHA256 hash of the code_verifier
const hash = crypto.createHash("sha256").update(codeVerifier).digest();

// Base64URL-encode the hash to get the code_challenge
const codeChallenge = hash
  .toString("base64")
  .replace(/\+/g, "-")
  .replace(/\//g, "_")
  .replace(/=+$/, "");

console.log("Code Verifier:", codeVerifier);
console.log("Code Challenge:", codeChallenge);
The code_verifier must be securely stored by the application (for example, in the session or local storage) so that it can later be included in the token request.
Samples
Here are some samples:
Subsections of OpenId Connect Authentication with Authorisation Code Flow
Authorization Endpoint Parameters
Request parameters
| Parameter | Required | Description |
|---|---|---|
| acr_values | No | Space seperated string with special requests from the client. See below. |
| client_id | Yes | The unique id of the requesting client. |
| code_challange | No, but required for client configured for PKCE. | The code challange for PKCE. |
| code_challenge_method | No, but required when code_challange is used. | “S256” indicates the challenge is hashed with SHA256 (recommended). “plain” indicates that the challenge is using plain text (not recommended). |
| login_hint | No | Hint of the username. Could be used if the client asks for username before redirecting. |
| login_hint_token | No | A non-standardized parameters to enable some extra single-sign-on scenarios. Previously this parameter was sso_token and it is still supported. |
| max_age | No | Specifies how much time (in seconds) that is allowed to been passed since user singed in. See Force re-authentication of user. |
| nonce | No, but required when response type is id_token |
A random string value used to mitigate replay attacks by associating the client session with the ID token. |
| prompt | No | “none”, “login”, “consent”, “select_account” or “create”. Indicates how the client wants that Authway handles the request. |
| redirect_uri | Yes | The callback URL the client wants to re-direct to. Must be pre-registered. |
| request | No | Instead of providing all parameters as individual query string parameters, it is possible to provide a subset or all them as a JWT. |
| request_uri | No | URL of a pre-packaged JWT containing request parameters. |
| response_mode | No | “query”, “fragment” or “form_post”. Indicates how the response should be returned. |
| response_type | Yes | Defines which flow to use (code, id_token, token, or a combination). |
| scope | Yes | A space separated string of scopes that the client wants access to. |
| state | Recommended | A random value that will be passed back to the client. Can be used to keep track of a session or to prevent unsolicited flows. |
| ui_locales | No | End-User’s preferred languages, represented as a space-separated list of language tag values, ordered by preference. For instance, the value “sv-SE en” represents a preference for Swedish as spoken in Sweden, then English (without a region designation). |
Note request and request_rui can’t be used to together.
acr_values parameters
The acr_values parameters are passed as “parameter:value” and if multiple parameters are passed they should be seperated with a space. For example:
tenant:priv idp:bankid| Parameter | Description |
|---|---|
| idp | The unique identifier of the sign-in method to use. See Control authentication method from the client. |
| tenant | The unique identifier of an owner (tenant) that the user must belong to. See Only allow users from specific tenant |
| impersonate | Trigger the flow to impersonate another user. See Impersonate a user. |
| mfa | Require the user to be authenticated with MFA. See Require MFA. |
Parameters for specific authentication methods
Swedish BankId
| Parameter | Required | Description |
|---|---|---|
| bankid_user_visible_data | No | Text displayed to the user during the authentication. Passed on to BankId without modification. |
| bankid_user_visible_data_format | No | The format of the text in bankid_user_visible_data parameter and can be plaintext (default) or simpleMarkdownV1. Passed on to BankId without modification. |
| bankid_call_initiator | No | Indicates if the user or your organization initiated the phone call (so only handled during a CIBA request). Valid values are user (default) or RP. Passed on to BankId without modification. |
Custom request parameters
It is possible for the client to pass additional parameters in the request. Thoose parameters will not be handled by the Authorization Server in any way, but they will be returned as is in the response.
If the client for example want to have a custom tag parameter in the response, it can be added to the request like this:
/connect/authorize?client_id=…&redirect_uri=mycallbackurl&response_type=..&scope=…&code_challenge=…&code_challenge_method=…&response_mode=…&nonce=…&state=…&tag=my_value
The response will then include the tag parameter unmodified (ordering of the parameters are not guaranteed):
mycallbackurl?code=…&scope=…&state=…&session_state=…&iss=…&tag=my_value
Default Claims Supported
This is the default claims supported by Authway, but custom support can be added for more/other claims in a customer instance. The scope that the claims belong to is also the default, but could differ for a specific customer.
| Scope | Claim | Description |
|---|---|---|
| openid | sub | A unique value identifying the user. |
| openid | tid | A unique value identifying the tenant the user belongs to. |
| profile | family_name | The surname of the user. For example “Doe”. |
| profile | given_name | The given name of the user. For example “Joe”. |
| profile | name | The full name of the user (given_name + ’ ’ + family_name). For example “Joe Doe”. |
| profile | preferred_username | The user name used during sign-in, most commonly the e-mail address. |
| profile | picture | A URL with a user picture taken from Gravatar or the initials if the user does not have a Gravatar picture. |
| The email address of the user. Could exists twice if the user has another e-mail registered on the person. | ||
| email_verified | True if the email address have been verified and it is always the same e-mail address used as user name that are confirmed (or not). | |
| secondary_emails | A JSON array with objects containing email and email_verified. Currently only available for users with linked accounts. |
|
| phone | phone_number | The phone number of the user. |
| phone | phone_number_verified | True if the phone number have been verified; otherwise False. |
| org | orgid | The unique identifier for the organisation the user belongs to. Will be the same as tid for users belonging to the mother organisation, but could be different for users belonging to a subsidiary. |
| org | orgin | The organisation number identifying the organisation, if the value exists. |
| org | company_name | The name of the organisation. |
| org | may_login | A JSON array with objects containing information about alternative organisations that the user can sing-in to. This is available for users with linked accounts. Read more. |
| roles | role | The name of the group the user belongs to. Zero, one or more claims of this type could exists depending on the number of groups the user belongs to. |
| perms | perm | The unique identifier of a permission that the user have. Zero, one or more claims of this type could exists depending on the number of permissions the user got. |
Protocol claims
| Claim | Description |
|---|---|
| amr | The authentication used when the user signed in. The value would be pwd for password or external for an external identity provider (idp). More than one amr claim can exists. For example if multi-factor authentication is used there will be an amr claim with the mfa value. |
| idp | The identity provider used when amr is external or local if the user used a password to sign-in. |
| auth_time | The time the user authenticated. Could be used to evaluate if a re-authentication is required. |
There are more protocol claims, but those are the most commonly used claims by developers themselves.
Special claims
Impersonated users
If a user is impersonated there will be an act claim with a serialized json structure with standard claims from the original user performing the impersonation. For example:
"act": {
   "oid":"d5542f98-8a6f-6d2a-cda0-39fc52ae2b58",
   "sub":"295A0000-E969-E6E6-3826-08DB0DD1E036",
   "tid":"a27446b6-795e-4ccc-1da6-39fc52ae2b37"
}
If impersonation is used there will also be a second amr claim with the value imp (for impersonate).
Linked accounts
If linked account are used the sub claim will have the same value for all linked accounts (that is the definition of linked accounts) which means that it is not unique over all tenants anymore. In that case a oid claim (object id) is also issued with a true unique identifier over all tenants.
For linked accounts the a may_login claim is also issued for org scope, which contains a serialized JSON array with information about other organisations that the user could switch to. For example:
"may_login": {
   [{
      "oid":"d5542f98-8a6f-6d2a-cda0-39fc52ae2b58",
      "tid":"ffffffff-ffff-ffff-ffff-ffffffffffff",
      "companyname": "Privatpersoner"
   }]
}
OpenId Connect Authentication with .NET
To log in a user according to this guide, you must have configured an application (client) as a web application (server).
To log in a user, you use the OpenID Connect support available in .NET. This guide will show how it’s done in .NET 10, but for the most part, the process is similar regardless of the framework version.
Add the NuGet package for OpenID Connect:
<ItemGroup>
  <PackageReference Include="Duende.IdentityModel" Version="8.0.0" />
  <PackageReference Include="Microsoft.AspNetCore.Authentication.OpenIdConnect" Version="10.0.3" />
</ItemGroup>
Here is also support for Duende.IdentityModel, which has several useful classes when working with OpenID Connect and claims.
Configure OpenID Connect and Cookies so that the application uses the IdP to identify users (in Startup.ConfigureServices):
services.AddAuthentication(options =>
{
    options.DefaultScheme = "Cookies";
    options.DefaultChallengeScheme = "oidc";
})
.AddCookie("Cookies")
.AddOpenIdConnect("oidc", options =>
{
    options.Authority = "https://environment-company.irmciam.se/";

    options.ClientId = "Company.ApplicationId";
    options.ClientSecret = "supertopsecret";
    options.ResponseType = "code";
    options.SaveTokens = true;
    options.MapInboundClaims = false;
});
In the project template, authentication is not enabled by default, a line must also be added in Startup.Configure (before UseAuthorization):
app.UseAuthentication();
app.UseAuthorization();
To trigger the login, there needs to be one or more protected pages. This can be configured in many different ways and is well-documented by Microsoft. For this example, we make a simple modification to the HomeController by adding the Authorize attribute, which forces the user to log in immediately.
[Authorize]
public class HomeController : Controller
Now you can test the application, and assuming everything is configured in the IdP, you should land directly on the IdP’s login page. After the login is completed, you will be redirected back to the application.
With the above configuration, User.Identity.Name may not display anything. This is because, for compatibility reasons, Microsoft reads the wrong claim, and the code must specify which claim to use instead. Make the following change to the options for the OpenID Connect configuration (which also sets the correct role claim):
...
options.SaveTokens = true;

options.TokenValidationParameters = new Microsoft.IdentityModel.Tokens.TokenValidationParameters
{
    NameClaimType = JwtClaimTypes.Name, //JwtClaimTypes.PreferredUserName, eller vad du önskar
    RoleClaimType = JwtClaimTypes.Role
};
JwtClaimTypes is part of the IdentityModel package that we added to the project file in the first step above.
To see which claims and other relevant information are available, you can add the following to a Razor view:
    <h2>Claims</h2>

    <dl>
        @foreach (var claim in User.Claims)
        {
            <dt>@claim.Type</dt>
            <dd>@claim.Value</dd>
        }
    </dl>

    <h2>Properties</h2>

    <dl>
        @foreach (var prop in (await Context.AuthenticateAsync()).Properties.Items)
        {
            <dt>@prop.Key</dt>
            <dd>@prop.Value</dd>
        }
    </dl>
What you quickly notice on a page displaying the user’s claims is that there are only a few claims compared to those available in the IdP. To get more claims, additional configuration is needed. All this configuration is also done in the AddOpenIdConnect call from above.
To retrieve more claims, you need to specify that more claims should be fetched from the UserInfo endpoint:
options.GetClaimsFromUserInfoEndpoint = true;In OpenID Connect, the client (the application) requests which scopes it wants. Each scope is associated with one or more claims (this configuration is in the IdP). Common standard scopes include:
- openid (must be requested).
- profile (contains profile information for the user, such as name, picture, web pages, etc.).
- email (contains email and whether the email address is verified).
- phone (contains phone number and whether the number is verified, but this is not used by the IdP today).
- address (contains address information, but is not used by the IdP today).
- org (contains organizational information for users belonging to an organization; this is a custom scope for the IdP).
Microsoft’s default configuration of OpenID Connect automatically adds openid and profile, but if you want to include the user’s email, you need to add that scope to the configuration:
//Begär de scopes (gruppering av claims) som önskas
//options.Scope.Add("openid"); //Default by Microsoft
//options.Scope.Add("profile"); //Default by Microsoft
options.Scope.Add("email");
options.Scope.Add("org"); //IRM Idp organisationsinformation
If you run the application with these settings, you will unfortunately still notice that several claims are missing. This is because Microsoft has a concept called ClaimActions, which means that only the claims for which there is a ClaimAction will be transferred to the ClaimsIdentity during login. Therefore, we need to add more actions:
options.ClaimActions.MapUniqueJsonKey(JwtClaimTypes.Picture, JwtClaimTypes.Picture);
options.ClaimActions.MapUniqueJsonKey(JwtClaimTypes.EmailVerified, JwtClaimTypes.EmailVerified);
options.ClaimActions.MapUniqueJsonKey(Constants.JwtClaimTypes.TenantId, Constants.JwtClaimTypes.TenantId); //IRM IdP tenant id
options.ClaimActions.MapUniqueJsonKey(Constants.JwtClaimTypes.OrganisationId, Constants.JwtClaimTypes.OrganisationId); // IRM IdP organization id (same as before if the person belongs to the parent company, but may be different)
options.ClaimActions.MapUniqueJsonKey(Constants.JwtClaimTypes.CompanyName, Constants.JwtClaimTypes.CompanyName);
Several of these claims are unique to the IdP, and for this, we have created our own Constants class in the project (also declared in IRM.dll):
public static class Constants
{
    public static class JwtClaimTypes
    {
        public static string TenantId = "tid";
        public static string OrganisationId = "orgin";
        public static string CompanyName = "companyname";
        public static string Permission = "perm";
    }
}
With this configuration, you will see many of the claims that the IdP can provide about a user. In IRM.AspNetCpre.Mvc, there is a convenient extension method to add scopes and typical claim actions so that the application can access the claims included in each scope:
options.AddScope(StandardScopes.OpenId); //Default added by Microsoft, but here, a mapping is also done for OwnerId/TenantId
options.AddScope(StandardScopes.Profile); //Default added by Microsoft, but here, mappings are also done for, for example, picture.
options.AddScope(StandardScopes.Email);
options.AddScope(CustomScopes.Roles);
options.AddScope(CustomScopes.Permission);
options.AddScope(CustomScopes.Organisation);
Since we have specified SaveTokens = true above, we can retrieve the access token to make calls to an API:
var accessToken = await HttpContext.GetTokenAsync("access_token");Note that if you retrieve many scopes and map many claims, it can result in a large number of claims, leading to a large cookie. In general, it’s good to keep the cookie size down, so this is something to consider. In AddCookie, there is an option to configure a SessionStore, allowing you to choose to store the content on the server instead, for example, in a distributed cache.
In IRM.AspNetCore.Mvc, there is a SessionStore that uses MemoryCache and/or DistributedCache if configured. Just call AddCacheSessionStore after AddCookie:
.AddCookie("Cookies", options =>
{
    options.Cookie.HttpOnly = true;
    options.Cookie.SameSite = SameSiteMode.Lax;
    options.Cookie.IsEssential = true;
}).AddCacheSessionStore()
OpenId Connect Authentication with Python (Authlib)
To log in a user according to this guide, you must have configured an application (client) as a web application (server).
To log in a user, you can use the OpenID Connect support available in Authlib.
from authlib.integrations.flask_client import OAuth

oauth = OAuth(app)
oauth.register(
    name="authway",
    client_id="client-id-from-portal",
    client_secret="client-secret-from-portal",
    server_metadata_url="https://environment-company.irmciam.se/.well-known/openid-configuration",
    client_kwargs={
        "scope": "openid profile email org"
    }
)

@app.route("/login")
def login():
    redirect_uri = url_for("callback", _external=True)
    return oauth.authway.authorize_redirect(
        redirect_uri,
        code_challange_method="S256"
    )

@app.route("/callback")
def callback():
    token = oauth.authway.authorize_access_token()
    id_token = token["id_token"]
    access_token = token["access_token"]

    userinfo = oauth.authway.userinfo()
    # userinfo includes claim (values) that are part of requested scopes
    return f"Hello {userinfo['given_name']}"
OpenId Connect Authentication with Node.js (openid-client)
To log in a user according to this guide, you must have configured an application (client) as a web application (server).
To log in a user, you can use the OpenID Connect support available in openid-client.
import express from "express";
import { Issuer, generators } from "openid-client";

const app = express();

// -----------------------------
// Discover OIDC Provider
// -----------------------------
(async () => {
  const issuer = await Issuer.discover(
    "https://environment-company.irmciam.se/.well-known/openid-configuration"
  );

  client = new issuer.Client({
    client_id: "client-id-from-portal",
    client_secret: "client-secret-from-portal",
    token_endpoint_auth_method: "client_secret_basic",
  });

  console.log("OIDC client initialized");
})();


// -----------------------------
// Login Endpoint
// -----------------------------
app.get("/", async (req, res) => {
  const code_verifier = generators.codeVerifier();
  const code_challenge = generators.codeChallenge(code_verifier);
  const state = generators.state();

  req.session.code_verifier = code_verifier;
  req.session.state = state;

  const authUrl = client.authorizationUrl({
    scope: "openid profile email org",
    response_type: "code",
    redirect_uri: "http://localhost:3000/callback",
    state,
    code_challenge,
    code_challenge_method: "S256",
  });

  res.redirect(authUrl);
});

// -----------------------------
// Callback Endpoint
// -----------------------------
app.get("/callback", async (req, res) => {
  try {
    const params = client.callbackParams(req);

    const tokenSet = await client.callback(
      "http://localhost:3000/callback",
      params,
      {
        state: req.session.state,
        code_verifier: req.session.code_verifier,
      }
    );

    const claims = tokenSet.claims();

    res.json({
      access_token: tokenSet.access_token,
      id_token: tokenSet.id_token,
      user: claims,
    });

  } catch (err) {
    console.error(err);
    res.status(500).send("Authentication failed");
  }
});
Protect user information from the IdP
There are several challenges when requesting many scopes when a user (or system) is logging in:
- The ticket can easily become a bit large, or especially the cookie can become large. It might sound strange, but it’s important to consider that when the cookie is saved, the user’s claims are stored, and often id_token, access_token, and possibly a refresh_token are also stored. This means that each claim can potentially exist two to three times in the cookie, and the size can quickly grow.
- The ticket can contain sensitive information, such as personal information obtained when requesting profile, email, and similar scopes. Where will the ticket be stored? If it is to be sent to a user’s device to be included in API calls, there are not many great ways to protect the ticket and thus the sensitive information.
What can be done to reduce the size and increase security?
Avoid, if possible, sending any token to the client
Since there are no really good ways to securely protect a token on the client, the safest method is not to send any token to the client at all. Today, the recommended approach is to use cookies from the client because cookies can be securely managed (set them to HttpOnly and Strict) in an effective manner.
The challenge with cookies arises when making calls to an API with a different address than the website because the cookie is only valid on the website itself. If the client needs to make requests to an API at a different address, there are two alternatives:
- Send the token to the client, but preferably use a reference token. However, try to avoid this option if possible.
- Transform your web solution into an API gateway for the underlying API. Ensure that all API calls are routed back to the website, acting as an API gateway. For calls that need to proceed to an underlying API, forward them accordingly. When forwarding the request, append the access token associated with the logged-in user. It is not necessary to write many lines of code for this if you use a tool like YARP or Ocelot (you can also read more here).
Use a reference token instead of a JWT for your access token
An access_token can be of two types: 1) a JWT or 2) a reference token. The type an application receives is configured in the Identity Provider (IdP). A JWT contains all claims and some additional information, while a reference token is just a reference to the actual ticket. However, the real ticket must be fetched by the API from the IdP. The advantage of a reference token is that it is very small, and even if someone obtains the ticket, it contains no information by itself. The drawback of reference tokens is that the API must be able to handle this type of token, and typically, one would want the API to handle both JWT and reference tokens. This is well-documented, and there is some existing code that already supports it (you can start reading after the first bullet list, which is roughly in the middle of the blog post).
Request fewer scopes
Never request more scopes than absolutely necessary is a good general rule, but there is support in the Identity Provider (IdP) to complement with additional scopes from the server/API afterward. Besides the advantage of reducing the ticket size and containing less sensitive information, it also means that each application doesn’t need to know in advance which scopes each API it calls requires. The most crucial aspect is perhaps that it allows an API to evolve over time without requiring changes to calling applications.
Therefore, we recommend only fetching openid, the API scopes for the APIs to be called, and possibly the offline scope if a refresh token is needed. If you choose to proceed this way, both the web application and the API will need logic to fetch additional scopes. Here is example code for retrieving claims for additional scopes:
public Task<List<Claim>> GetAuthorizationAsync(ClaimsPrincipal user, List<string> scopes)
{
    if (!user.Identity.IsAuthenticated)
        return Task.FromResult(new List<Claim>());

    const string formEncoded = "application/x-www-form-urlencoded";

    var userId = user.FindFirst("sub")?.Value;
    if (string.IsNullOrEmpty(userId)) //Ingen autentierad användare, åtminstone inte någon som vi kan hämta behörigheter, profile eller något annat för
        return Task.FromResult(new List<Claim>());

    var cacheKey = CreateCacheKey(userId, scopes);

    return _cache.GetOrCreateAsync(cacheKey, async entry =>
    {
        entry.AbsoluteExpirationRelativeToNow = TimeSpan.FromMinutes(_options.CacheLength);

        var clientId = _options.ApiName;
        var clientSecret = _options.ApiSecret;

        var arguments = new List<KeyValuePair<string, string>>
        {
            new KeyValuePair<string, string>("client_id", clientId),
            new KeyValuePair<string, string>("client_secret", clientSecret),
            new KeyValuePair<string, string>("user_id", userId),
            new KeyValuePair<string, string>("scopes", string.Join(" ", scopes))
        };

        using (var content = new FormUrlEncodedContent(arguments))
        using (var client = new HttpClient())
        {
            content.Headers.ContentType = new MediaTypeHeaderValue(formEncoded) { CharSet = "UTF-8" };
            client.DefaultRequestHeaders.TryAddWithoutValidation("Content-Type", formEncoded);

            using (var response = await client.PostAsync(_baseUri + "api/client/authorization", content).ConfigureAwait(false))
            {
                response.EnsureSuccessStatusCode();

                using (var stream = await response.Content.ReadAsStreamAsync().ConfigureAwait(false))
                using (var reader = new StreamReader(stream))
                {
                    stream.Position = 0;

                    var serverClaims = Serializer.Deserialize<List<Claim>>(new JsonTextReader(reader));
                    return serverClaims;
                }
            }

        }
    });

}
ApiName and ApiSecret are obtained when an API is configured in the Identity Provider (IdP). If it’s a web application, ClientId and ClientSecret can be sent instead. In the code above, _baseUri needs to be set to the URL of the Auth server.
This function can then be called from, for example, a ClaimsTransformation class.
This logic is also necessary when using the Client Credentials flow (External systems) to make calls to your APIs. Fundamentally, a ticket for a Client cannot contain any personal claims since it represents a system/application. However, the IdP has specific support called External systems, allowing an API not to distinguish between a user or a calling system, simplifying many aspects.
In IRM.AspNetCore.Authorization.Client, there is ready-to-use support that is easy to configure, achieving exactly this.
Store the cookie on the server instead of the client
In the call to AddCookie, there is the possibility to configure a SessionStore that allows saving the content of the cookie on the server instead, making the cookie itself just a reference. Here’s an example using IMemoryCache, but it can certainly be switched to IDistributedCache or some other type of storage.
public class MemoryCacheTicketStore : ITicketStore
{
    private readonly IMemoryCache _cache;
    private const string CacheKeyPrefix = "MemoryCacheTicketStore-";

    public MemoryCacheTicketStore(IMemoryCache cache)
    {
        _cache = cache ?? throw new ArgumentNullException(nameof(cache));
    }

    public async Task<string> StoreAsync(AuthenticationTicket ticket)
    {
        string key = await _backingTicketStore.StoreAsync(ticket);
        AddToCache(key, ticket);

        return key;
    }

    public async Task RenewAsync(string key, AuthenticationTicket ticket)
    {
        AddToCache(key, ticket);
    }

    private void AddToCache(string key, AuthenticationTicket ticket)
    {
        var options = new MemoryCacheEntryOptions
        {
            Priority = CacheItemPriority.NeverRemove
        };
        var expiresUtc = ticket.Properties.ExpiresUtc ?? DateTimeOffset.UtcNow.AddMinutes(20);
        options.SetAbsoluteExpiration(expiresUtc);

        _cache.Set(key, ticket, options);
    }

    public async Task<AuthenticationTicket> RetrieveAsync(string key)
    {
        _cache.TryGetValue(key, out AuthenticationTicket ticket);
        return ticket;
    }

    public async Task RemoveAsync(string key)
    {
        _cache.Remove(key);
    }
}
In IRM.AspNetCore.Authentication, there is ready-made support for using the cache as a session store:
AddCookie("Cookies", options =>
    {
        options.Cookie.HttpOnly = true;
        options.Cookie.SameSite = SameSiteMode.Strict;
        options.Cookie.IsEssential = true;
    }).AddCacheSessionStore();
Here, a primarily distributed cache will be used if configured, but the support falls back to MemoryCache if it is not available.
Only allow users from a specific tenant to sign in
In some situations, you might want to control that only users that belong to a specific tenant (organisation) are allowed to sign in. It can e.g. be that a module/system is only used by internal users or only private individuals, etc.
There are two possible solutions that can be used:
- Connect the application to a module in configuration. The modules are enabled for the organisations (tenants) that should be able to use them. If a user belonging to an organisation that does not have access to the module tries to access it, the sign-in will be prevented and the user informed that they don’t have access. This can be used for applications that uses OpenId Connect or SAML protocol.
- In code it is possible by sending “tenant:GUID” (or “tenant:shortname”) in OpenId Connect parameter
acr_values.
C# example
.AddOpenIdConnect(options =>
{
    //Other configuration not shown
    options.Events.OnRedirectToIdentityProvider = ctx =>
    {
        ctx.ProtocolMessage.AcrValues = "tenant:" + tenantId;

        return Task.CompletedTask;
    };
});
Control authentication method from the Client (application)
In some situations an application want to control how the user should be authenticated, for example require the user to use BankId to sign-in. This can be done in two ways:
- By configuration. Configure the client to only allow one authentication method and this will be the only choice possible for the user. This option is easiest if it should always be the same for all users. This option is supported for both OpenId Connect and SAML applications.
- Pass authentication method as argument in OpenId Connect
acr_Valuesparameter. This will allow the application to pass different values for different users/situations. - It is possible to pass arguments from a SAML application that requires or disables local sign-in. This is done by passing Password Protected Transport (
urn:oasis:names:tc:SAML:2.0:ac:classes:PasswordProtectedTransport) as requested authn context together with Exact as comparison to require local sign-in, or Better as comparison to disable local sign-in.
Pass authentication method in acr_values
To pass authentication method you should use “idp:schemename” where schemename is the authentication method, for example local (to only use local passwords) or bankid to use Swedish BankId (for instance where this is configured). Valid values is per tenant.
BankId
As stated above the application can pass bankid as a value for idp. This will result in a prompt where the user will have to choose to use BankId on same device or on another device. It is also possible for the application to pass bankid-samedevice to shortcut the prompt and take the user immediately to sign-in on same device; or bankid-otherdevice to use another device to sign-in.
C# example
.AddOpenIdConnect(options =>
{
    //Other configuration not shown
    options.Events.OnRedirectToIdentityProvider = ctx =>
    {
        ctx.ProtocolMessage.AcrValues = "idp:bankid";

        return Task.CompletedTask;
    };
});
Limitaitons of controlling authentication methods
It is important that the application only force specific authentication methods that all (valid) users can use.
Force re-authentication of a user
In some situations, you might want to force a user to log in again. One situation could be if sensitive data is to be changed.
We recommend that this is done by sending the OpenId Connect parameter prompt with the value login. The exact same behavior can be achieved by setting ForceAuthentication to true in a SAML application.
Another option is to use max_age with the value 0 (or another number to specify how long the time is accepted). Using this option will notify the user that the application requires a new login.
Example of using prompt
C# example
[HttpGet]
public IActionResult Reauthenticate()
{
    var properties = new AuthenticationProperties
    {
        RedirectUri = Url.ActionLink(nameof(Index))
    };
    properties.SetParameter<string>(OpenIdConnectParameterNames.Prompt, "login");
    return Challenge(properties);
}
By setting the parameter the OpenIdConnectHandler will automatically use the value.
Example of using max_age
C# example
[HttpGet]
public IActionResult Reauthenticate()
{
    var properties = new AuthenticationProperties
    {
        RedirectUri = Url.ActionLink(nameof(Index))
    };
    properties.SetParameter(OpenIdConnectParameterNames.MaxAge, TimeSpan.zero);
    return Challenge(properties);
}
By setting the parameter the OpenIdConnectHandler will automatically use the value.
Verify that the user has re-authenticated
It is possible to verify that the user have re-authenticated again by checking the auth_time claim.
C# example
var foundAuthTime = int.TryParse(User.FindFirst("auth_time")?.Value, out int authTime);

if (foundAuthTime && DateTimeOffset.UtcNow.ToUnixTimestamp() - authTime < MaxAgeAllowed)
{
}
else
{
}
Require MFA Authentication for a Client (application)
In some situations an application requires multi-factor authentication (mfa) for security reasons. This can be done in two ways:
- By configuration. Configure the client to require MFA and for what kind of accounts. This option is easiest if it should always be required for the client. This option is supported for both OpenId Connect and SAML applications.
- Pass
mfaas argument in OpenId Connectacr_Valuesparameter. This will allow the application to perform stepup authentication for specific actions.
Pass mfa method in acr_values
To pass authentication method you should simply add mfa as value in the acr_Values parameter.
C# example
.AddOpenIdConnect(options =>
{
    //Other configuration not shown
    options.Events.OnRedirectToIdentityProvider = ctx =>
    {
        ctx.ProtocolMessage.AcrValues = "mfa";

        return Task.CompletedTask;
    };
});
Impersonate (run as) a user
This is only supported for OpenId Connect protocol.
Authway has support for impersonation (or run as) of another user for users with special permissions. A typical scenario is for a support organization to be able to run as the user to be able to see exactly the same things as that user. This is a very powerful functionality that should be used with caution and thoughtfulness. At minimum the application need to implement a way to show that the user right now is not using the application as her/himself but as another user and how the actions taken with someone else’s identity must be logged in an appropriate way. Authway always logs information about who is impersonating someone else, so there is some traceability there and this is also shown in audit logs.
Pre-requisites for impersonation
An application must be configured to allow impersonation to be able to use the functionality.
-
There must be users that are granted the “Run as” or “Run as within my organisation” permission. These powerful permissions is not enabled for all tenants, so the first step is to enable it for the tenant that hosts support personal. Open “Security” module and look for “Run as” and/or “Run as within my organisation” functionalities. Open the functionality and add tenant permission. When this step is done, the functionality is available when setting permissions for a group (but only in selected tenant(s)).
-
Open the application (that has implemented support for impersonation) and turn on support for “Allow impersonate”.
Implement support for displaying that a user is running as someone else (impersonate)
The application can detect that the user is in “Run as” mode by checking if there are a amr claim with the value “imp” (for impersonate). In that case there will also be a act claim, which contains the claims that represent the original user (serialized as JSON):
{
   "sub": "5d9b6b01-c038-4b8d-bd98-ac9d7a3d0d4d",
   "name": "Bagarn Olsson",
   "tid": "e23dfa1b-bf65-4a04-ac7c-44d9b3edc1bc",
   "act": {
      "sub": "243a7798-11cc-4856-866b-834d1c4c8dff",
      "tid": "da9140ca-9759-45c7-ad3a-4bc7dafca0d1"
   }
}
It is possible for the application to control which claims should be in the act claim by sending the parameter claims in the call to the IdP and there list the claim types that are desired with a space. If no claims parameter is passed with, act will contain sub (Subject or unique identity of the user) and tid (tenant id or unique identity of the tenant, which may be the same or different from the user’s tid depending on who you run as). Remember to limit the number of claims as it affects the size of the login ticket.
Trigger an impersonate sign-in
There are two main options for triggering the impersonate sign-in flow:
- Send the unique identity (sub value) of the user to impersonate
- Let the user search and choose user to impersonate in Authway
- A username can be passed in the
login_hintparameter.
- A username can be passed in the
Both alternatives will use a custom acr_values parameter called impersonate.
Option 1: Send the unique identity (sub value) of the user to impersonate
This option requires that the application, triggering the impersonate sign-in flow, already knows the unique identity of the user that should be impersonated. Because of this, Option 2 might be easier to implement in most situations.
For this option the application sends impersonate:{sub} as acr_values.
C# Example
Add an Impersonate operation in a Controller:
[HttpGet]
public IActionResult Impersonate(string sub)
{
    var properties = new AuthenticationProperties
    {
        RedirectUri = "/"
    };
    properties.SetParameter(OpenIdConnectParameterNames.AcrValues, $"impersonate:{sub}");
    return Challenge(properties);
}
Handle RedirectToIdentityProvider event for the OpenIdConnectOptions so that the acr_values are send to Authway:
.AddOpenIdConnect(options =>
{
    //Other configuration not displayed
    options.ClaimActions.MapUniqueJsonKey(JwtClaimTypes.Actor, JwtClaimTypes.Actor);

    options.Events.OnRedirectToIdentityProvider = ctx =>
    {
        if (ctx.Properties.Parameters.ContainsKey(OpenIdConnectParameterNames.AcrValues))
        {
            ctx.ProtocolMessage.AcrValues = ctx.Properties.GetParameter<string>(OpenIdConnectParameterNames.AcrValues);
        }

        return Task.CompletedTask;
    };
});
Option 2: Let the user search and choose user to impersonate in Authway
This is easiest to implement, since the application does not need to know anything about users. The application will rather just trigger the impersonate sign-in flow with the value select_account for the impersonate parameter.
In this option it is also possible to pass the login_hint parameter with the value of a username. If Authway finds a unique user from that username the impersonation will happen automatically, otherwise a list of users matching the username will be presented so that the user can select which one to impersonate.
C# Example
Add an Impersonate operation in a Controller:
[HttpGet]
public IActionResult Impersonate()
{
    var properties = new AuthenticationProperties
    {
        RedirectUri = "/"
    };
    properties.SetParameter(OpenIdConnectParameterNames.AcrValues, "impersonate:select_account");
    return Challenge(properties);
}
In the same way as above, the event RedirectToIdentityProvider for the OpenIdConnectOptions should be handled so that the acr_values are send to Authway:
.AddOpenIdConnect(options =>
{
    //Other configuration not displayed
    options.ClaimActions.MapUniqueJsonKey(JwtClaimTypes.Actor, JwtClaimTypes.Actor);

    options.Events.OnRedirectToIdentityProvider = ctx =>
    {
        if (ctx.Properties.Parameters.ContainsKey(OpenIdConnectParameterNames.AcrValues))
        {
            ctx.ProtocolMessage.AcrValues = ctx.Properties.GetParameter<string>(OpenIdConnectParameterNames.AcrValues);
            //Request name claim (default is only sub and tid returned)
            if (ctx.ProtocolMessage.AcrValues.StartsWith("impersonate:"))
                ctx.ProtocolMessage.Parameters.Add("claims", "sub tid name");
        }

        return Task.CompletedTask;
    };
});
In this example the claims parameter is also send to request an extra claim (name) to be supplied in the act claim.
Revert an impersonate sign-in back to original user
When the user is done and want to return to her/himself again, the application should send impersonate: without value and then the user will be returned with tokens representing the original user (without act and amr claim with value “imp”).
It is also possible to directly run as yet another user by sending impersonate: select_account again (or one of the other options above). When doing so, Authway will first sign-out the current impersonation and then the original user will have to search for a new user to run as.
Force single-sign-on from a Client (Application)
This requires OpenId Connect protocol and it isn’t supported in Starter Edition.
There are scenarios where you might want to force a single-sign-on from a client, that has already identified the user. This requires a trust relation between the Identity Provider and the Client. The trust is established by using a shared secret (that must be protected and handled with care of course) and by configuring the client to be allowed to send a login hint token.
Scenario: Internal/on-prem system that identifies users through a local AD sign-in
If an on-prem system/application has identified the users without using the Identity Provider, but wants to open an application that uses the Identity Provider to identify users, the user will not get a single-sign-on experience (since the user isn’t signed in at the Identity Provider). This can be solved if the application can create a SSO token that can be verified the Identity Provider.
Scenario: Application that uses refresh tokens for a long time
Applications that keep the user signed in by using refresh tokens to refresh the sign-in can have a signed-in user that isn’t signed in, in the Identity Provider anymore. For example if the Identity Provider is configured to keep the user signed in for 10 days and the application is confiugred for sliding refresh tokens and using them to keep the user signed in for 20 days. When this application then redirects the user to another application, the user will not ge a singe-sign-on experience.
Force a single-sign-on between applications
Authway has a non-standard support where applications can pass a SSO token that is validated by the Identity Server to force a user to be signed in.
- Create a login hint token
- Redirect the user to the application according to section 4 (“Initiating Login from a Third Party”) in OpenId Connect core specification. The iss parameter is required and should be the address to the Identiy Provider. Pass the serialized SSO token in a non-standard parameter
login_hint_token(previously sso_token which is still supported). The login_hint_token must be passed on to the Identity Provider when the target application redirects the user to sign-in.
Step 2 can be completed in a non-standard way by making an agreement between the applications, as long as the login_hint_token is passed to the Identity Provider.
Limitations to be aware of
If a client passes another user, than the currently signed-in user (at the Identity Provider), the current user will be signed out at the Identity Provider, but this will not be a complete single-sign-out effecting applications until those are refreshed (because that isn’t possible to do during a sign-in).
The client must know the unique identifier of a user to be able to create the SSO token.
Client Initiated Backchannel Authentication (CIBA)
Client Initiated Backchannel Authentication (CIBA)
Authway supports Client Initiated Backchannel Authentication (also known as CIBA) as part of the Enterprise Edition.
In most OpenID Connect scenarios the user access a client (application) on the same device as they will sign-in with. CIBA is used when the user needs to sign-in on another device than the client is running on. Here are some scenarios where this can be useful:
- A call center agent wants to authenticate the caller.
- A bank teller wants to authenticate the customer in a bank branch.
- A user wants to authorize a payment they are making at a point of sale terminal.
Authway Support
There are documentation of what Authway supports regarding CIBA in the endpoint documentation.
Note: The use of CIBA ping mode requires that the endpoint to ping is pre-registered on the client.
Scenario: Authenticate a caller with Swedish BankId
When a user makes a phone call to customer service there are many reasons to identify the caller, so that customer service knows who they’re talking too.
Collect the callers social security number with 12 digits and pass it as login hint.
var personalIdentityNumber = "191212121212";
var bindingMessage = "Please identify yourself for better help in our customer service.";

var req = new BackchannelAuthenticationRequest()
{
    Address = "https://environment-company.irmciam.se/connect/ciba",
    ClientId = "ciba-client-id-from-portal",
    ClientSecret = "secret-from-portal",
    Scope = "openid",
    LoginHint = personalIdentityNumber,
    BindingMessage = bindingMessage
};

var client = new HttpClient();
var response = await client.RequestBackchannelAuthenticationAsync(req);

if (response.IsError) throw new Exception(response.Error);

Console.WriteLine($"Login Hint                  : {personalIdentityNumber}");
Console.WriteLine($"Binding Message             : {bindingMessage}");
Console.WriteLine($"Authentication Request Id   : {response.AuthenticationRequestId}");
Console.WriteLine($"Expires In                  : {response.ExpiresIn}");
Console.WriteLine($"Interval                    : {response.Interval}");
Console.WriteLine();

Console.WriteLine($"\nPress enter to start polling the token endpoint.");
Console.ReadLine();
The person won’t be notified, but instead Authway expects you to let the user know that they should start their BankId. When the user does so, the binding message is displayed in the app.
Meanwhile the user is performing the authentication the sales terminal will poll the token endpoint.
var client = new HttpClient();

while (true)
{
    var response = await client.RequestBackchannelAuthenticationTokenAsync(new BackchannelAuthenticationTokenRequest
    {
        Address = "https://environment-company.irmciam.se/connect/token",
        ClientId = "ciba-client-id-from-portal",
        ClientSecret = "secret-from-portal",
        AuthenticationRequestId = authorizeResponse.AuthenticationRequestId
    });

    if (response.IsError)
    {
        if (response.Error == OidcConstants.TokenErrors.AuthorizationPending || response.Error == OidcConstants.TokenErrors.SlowDown)
        {
            Console.WriteLine($"{response.Error}...waiting.");
            await Task.Delay(authorizeResponse.Interval.Value * 1000);
        }
        else
        {
            throw new Exception(response.Error);
        }
    }
    else
    {
        var accessToken = response.AccessToken;
        var identityToken = response.IdentityToken;

        //TODO: Verify the identity token against the caller
    }
}
If the user does not fullfil the identification in the BankId app or if the service is unable to match or auto-provision a user an access denied error will be returned.
Scenario: Authenticate the person picking up an order
When a person comes to a store for picking up an order that have been ordered online, the teller wants to make sure that the person is actually the same as the one who placed the order. The sale terminal therefor initiates a backchannel authentication by calling the CIBA endpoint.
(The sample uses Duende.IdentityModel to simplify the code.)
var username = "[email protected]";
var bindingMessage = "Please identify yourself to pick up your order at the Store.";

var req = new BackchannelAuthenticationRequest()
{
    Address = "https://environment-company.irmciam.se/connect/ciba",
    ClientId = "ciba-client-id-from-portal",
    ClientSecret = "secret-from-portal",
    Scope = "openid",
    LoginHint = username,
    BindingMessage = bindingMessage,
    RequestedExpiry = 200
};

var client = new HttpClient();
var response = await client.RequestBackchannelAuthenticationAsync(req);

if (response.IsError) throw new Exception(response.Error);

Console.WriteLine($"Login Hint                  : {username}");
Console.WriteLine($"Binding Message             : {bindingMessage}");
Console.WriteLine($"Authentication Request Id   : {response.AuthenticationRequestId}");
Console.WriteLine($"Expires In                  : {response.ExpiresIn}");
Console.WriteLine($"Interval                    : {response.Interval}");
Console.WriteLine();

Console.WriteLine($"\nPress enter to start polling the token endpoint.");
Console.ReadLine();
The person can be notified by an e-mail or the sales terminal could generate a QR code that will take the user to the https://environment-company.irmciam.se/idenitty/ciba?requestId={response.AuthenticationRequestId} endpoint. The endpoint will display short information to the person and ask him/her to accept (or deny) the authentication request.
Meanwhile the user is performing the authentication the sales terminal will poll the token endpoint.
var client = new HttpClient();

while (true)
{
    var response = await client.RequestBackchannelAuthenticationTokenAsync(new BackchannelAuthenticationTokenRequest
    {
        Address = "https://environment-company.irmciam.se/connect/token",
        ClientId = "ciba-client-id-from-portal",
        ClientSecret = "secret-from-portal",
        AuthenticationRequestId = authorizeResponse.AuthenticationRequestId
    });

    if (response.IsError)
    {
        if (response.Error == OidcConstants.TokenErrors.AuthorizationPending || response.Error == OidcConstants.TokenErrors.SlowDown)
        {
            Console.WriteLine($"{response.Error}...waiting.");
            await Task.Delay(authorizeResponse.Interval.Value * 1000);
        }
        else
        {
            throw new Exception(response.Error);
        }
    }
    else
    {
        var accessToken = response.AccessToken;
        var identityToken = response.IdentityToken;

        //TODO: Verify the identity token against the order
    }
}
Switch linked user
In scenarios where linked users are used there can be situation where an application want to trigger a switch to another of the linked users then the one currently using the application.
If the application requests the org scope during sign-in a may_login claim is included in the claims for users that have other linked users. The may_login claim is a JSON object with an array of users that are linked to the current user.
Example of a may_login claim
Here is an example with typical claims in a token for a user that has two linked child users to a parent user.
"sub": "dd41355c-95d9-4bf1-9c21-523b5b40f9f4",
"oid": "e4b8a6ff-cdb1-45f8-b255-8df7a09a9596",
"tid": "567c9683-4603-4279-9e53-ed77b060fe72",
"companyname": "Organisation A",

"may_login": [
    {
        "oid": "dd41355c-95d9-4bf1-9c21-523b5b40f9f4",
        "tid": "ffffffff-ffff-ffff-ffff-ffffffffffff",
        "companyname": "Privatpersoner"
    },
    {
        "oid": "4a7b708d-b7d3-4931-b3be-1d86e72214a5",
        "tid": "1b30a7a4-b271-493a-a315-d35e976f11cf",
        "companyname": "Organisation B"
    }
]
Explanation of thoose claims:
- The
subclaim will be the same for all users. This is the definition of a linked user. - The
oidclaim will only exist for users that have a different unique identifier in Authway, than thesubclaim. It will be emitted for child accounts, but not for the parent. - The
tidclaim identifies the current tenant id and the name of the organisation is incompanynameclaim. - The
may_logincontains two entries in the array and each entry has claims explained above. - The user in tenant “Privatpersoner” is the parent user. This can be concluded because the value of
oidis the same assubclaim. - There are no information about the users eventual permissions to the application in the
may_loginclaim. If that information is needed it can be requested through the admin APIs.
Trigger a switch to a specific user
To change the current user to one of the other two users that exists in the may_login claim can be done by passing either the tenant or the oid as parameter to the authorize endpoint.
The tenant id for the user is in the tid claim as explained above. So to switch to the user that belongs to “Organisation B” in the example above, the tenant id 1b30a7a4-b271-493a-a315-d35e976f11cf should be passed as explained in “Only allow users from a specific tenant to sign in”.
The other alternative is to pass the oid value as user_id parameter to the authorize endpoint. Here is an example where a typical re-direct to the autorize endpoint is extended with the user_id parameter with the value of oid claim from Organisation B in the example above:
https://YOURINSTANCE.irmciam.se/connect/authorize?
          client_id=YOUR_CLIENT_ID
          &redirect_uri=https%3A%2F%2Fclient.example.org%2Fcallback
          &response_type=code
          &scope=openid
          &state=YOUR_STATE
          &user_id=4a7b708d-b7d3-4931-b3be-1d86e72214a5
User sign-out
Depending on your situation, sign-out can be a more complicated matter than you first think. Below we describe three scenarios and in some cases also choices that can be made in each scenario.
Single-sign-out
Authway supports single-sign-out, which pretty much handles sign-out the same way as single-sign-on works. When an application triggers a sign-out, Authway will check which applications the user is singed in too, and try to sign the user out from each of the applications. Authway supports single-sign-out for both OpenId Connect (OIDC) and SAML protocols. There are two different ways to notify server-side client applications that the user has signed out and the most commonly supported way is to use a front-channel which works for both OIDC and SAML, but for OIDC we recommend back-channel if possible.
Front-channel sign-out for server-side applications
The front-channel sign-out notification is done via the browser and this the only method supported for SAML sign-out. To use front-channel sign-out, the application should register a single URL that should be invoked by Authway when a user sign-out. A call to this URL will typically be handled in a way that the application deletes the cookie that keeps track of the fact that the user is signed-in. The URL is called from a hidden iframe on the signed out page in Authway.
Please note that Front-channel sign-out is broken when browsers block third party cookies. This is because in most scenarios the application cookie won’t be passed and not deleted in the iframe, since it will be a third party cookie.
There are other drawbacks with front channel. It is restricted to a signed in user’s browser to perform the request for sign-out, which makes it impossible to handle scenarios where a user or an administrator wants to force a sign-out from everywhere (including from other devices). This why we recommend back-channel sign-out if possible.
OIDC Front-Channel Logout 1.0 specification
Back-channel sign-out for server-side applications
The back-channel sign-out notification is done through a server-to-server call, where Authway POST a logout (JWT) token to the registered back-channel URL. This is generally not supported out of the box in OIDC libraries so you’ll have to implement it yourself. It is important that the posted token is correctly validated.
OIDC Back-Channel Logout 1.0 specification
Sign-out for browser-based JavaScript applications
For browser-based applications it is not necessary to make any configuration in Authway, but the application must perform monitoring on the check_session_iframe, which is implemented by libraries that are compliant with the OIDC specification, for example oidc-client JavaScript library.
Only sign-out from the Application (but not from Authway or other applications)
There are valid scenarios where the user only want to sign-out from the current application and not a full single-sign-out. If this is a desired scenario the application shall not invoke the sign-out functionality, through OIDC or SAML, in Authway, but rather just remove the user session in the application (aka delete the sign-in cookie).
One problem with this solution is that when the user chooses to sign-in again it will happen automatically since the session is still alive in Authway. This can be confusing for users as it feels like they were not signed out. To counteract that experience, you can force the user to sign in again (se below), but then single-sign-on is instead lost for the application.
The best solution can sometimes be to let users choose if they should sign-out from the application only or if they want a full single-sign-out from all applications where there account is currently used.
Force new sign-in
Authway has support to force a user to make a new sign-in. This can be configured for the application or it can be triggered by passing parameters from the application. To configure the application to always require a new sign-in the “Users SSO time” should be set to a low value, like 5 seconds. The other alternative is to control from the application if a new sign-in should be required or not. When using the OIDC protocol this is done by passing parameter max-age=0 and for SAML this is done by setting ForceAuthentication.
Sign-out from application and Authway (but no other applications)
Another alternative is to sign-out from the application and Authway, but not registering front-channel or back-channel for any applications. When signing out in Authway all refresh tokens are invalidated which in many scenarios still will result in a situation where users are forced to sign-in again, for example all applications that uses access- and/or refresh-tokens. Applications that only uses Authway for authentication can often handle this without affecting the users.
Sign-out without showing Authway signed out page
Some applications prefer to show their own signed out page after a sign-out instead of Authway signed out page. This is challenging to fulfil while still supporting OIDC and SAML protocols correctly (aka the front-channel sign-out). Authway can be configured (requires setting on the instance done by IRM) for automatic re-direct which will re-direct the user back to the application when front-channel sign-out is done. If the applications that the user is signed in to, does not have any front-channel URLs registered the redirect will be performed without showing Authway signed out page.
Subsections of User sign-out
Trigger OpenId Connect Sign-out
An application (relying party) that want to initiate a single-sign-out will do that through the library used for OIDC. If the library doesn’t support sign-out this is possible to trigger from the application anyway by making a re-direct (HTTP GET) to a URL that will be something like this:
GET https://instance.irmciam.se/connect/endsession?
post_logout_redirect_uri={URL TO RETURN USER TO AFTER SIGN OUT}&id_token_hint={ID_TOKEN]&
state={OPTIONAL STATE RETURNED TO CLIENT}| Parameter | Requirement | Description |
|---|---|---|
post_logout_redirect_uri |
Recommended | The URL where the user will be re-directed after a completing the sign-out. If parameter isn’t supplied a generic signed out message is displayed. The URL must be registered in application configuration for the application in Authway. If an exact match isn’t found the parameter will be ignored and the user will not be redirected back to the application in any way. |
id_token_hint |
Recommended | Indication of the user that should be signed out. This is required for post_logout_redirect_uri to be considered. If it isn’t supplied the user might be prompted to sign-out (for security reasons). |
state |
Optional | State information that is returned to the client when the user is re-directed after the sign-out. For example you can store information about current user session or a re-direct URL that the user should be returned to within the application after being returned to the post_logout_redirect_uri. |
Full specification: OpenID Connect RP-Initiated Logout 1.0
C# example
In this example the application saves information about re-directing the user to Index action after a complete sign-out. We recommend that the local re-direct URL allows anonymous access, or otherwise a new sign-in will be triggered as a result of the sign-out and that will be a strange user experience.
public async Task SignOut()
{
    await HttpContext.SignOutAsync();

    string returnUrl = Url.Action(nameof(Index));
    await HttpContext.SignOutAsync(OpenIdConnectDefaults.AuthenticationScheme,
                new AuthenticationProperties { RedirectUri = returnUrl });
}
Handle OIDC back-channel notification
The URL registered in Authway for back-channel notification when a user signs out will receive an HTTP POST with a logout token (JWT). This JWT token must be correctly validated by checking at least these requirements:
- The token is signed by the keys published by Authway (can be found through metadata).
- The issuer should be the Authway instance (exact value for issuer is also available in metadata).
- The audience should be the client id of the application receiving the notification.
- A
subclaim that uniquely identifies the user should be present. - A
sidclaim should be present if the application settings is to include session index. - A
nonceclaim should be present. - A
eventsclaim should be present and it should contain ahttp://schemas.openid.net/event/backchannel-logoutevent.
By using the sub claim and optionally the sid the application should invalidate the user session. How this is done will differ depending on platform/application.
.NET Sample
A sample for .NET can be found here.
Access control
Subsections of Access control
Role-based access control
It’s common to use role-based access control, so even though it we recommend you to use permission-based access control, we will show what needs to be done for the application to check if a user belongs to a role (called group in Authway). To include the groups a user belongs to, you are required to add roles scope to your request.
HTTP/1.1 302 Found
Location: https://YOURINSTANCE.irmciam.se/connect/authorize?
          client_id=YOUR_CLIENT_ID
          &redirect_uri=https%3A%2F%2Fclient.example.org%2Fcallback
          &response_type=code
          &scope=openid roles
          &state=YOUR_STATE
When doing so you will recieve one role claim for each group the user belongs too.
Even though this is straightforward to start with, there are several challenges with the role-based model that often result in many changes related to access control. For many features, it is common that many groups should have access, leading to very large if-statements. In a multi-tenant system (like the IdP, where each customer, reseller, partner, your own organisation itself, etc., is its own tenant), it’s also challenging to guarantee the names of the groups. For this, there is a concept of built-in group in IdP that cannot be renamed, and this must be used for role-based access control.
Example of using role-based access control
C# example
To include the roles a user belongs to, an additional scope and a claim-action must be added to the AddOpenIdConnect configuration:
options.Scope.Add("roles"); //Authway groups
options.ClaimActions.MapJsonKey("role", "role");

options.MapInboundClaims = false;
options.TokenValidationParameters = new Microsoft.IdentityModel.Tokens.TokenValidationParameters
{
    NameClaimType = "name", //Or your preferred claim for the user name
    RoleClaimType = "role"
};
With this additional configuration, claims of the type “role” will be retrieved, and since we had set RoleClaimType to “role” above, it means that the standard ways to check role membership will now work:
if (User.IsInRole("admin"))
    ...
eller:
[Authorize(Roles = "admin")]Tips: IdentityModel is a package that has constants for many Claims which is a better way than using hardcoded strings as the examples above.
Permission-based access control
A system is built up of one or several functionalities. These functionalities are stable over time, meaning they exist as long as they are in the system, and they are never affected by organizational changes. Therefore, Authway has a concept of defining functionalities to which groups (or users) are granted access.
It is up to the system to define which functionalities need access control:
- The system is a single functionality, meaning you either use the system or you don’t. It can also sometimes be divided into the right to read or the right to create/update/delete (administer).
- One functionality per screen in the system.
- One functionality for individual buttons in the system. An example could be a report, where one might have access for viewing (equivalent to a screen), but additionally has an extra functionality in the form of Export, where the content of the report can be exported. This could be more sensitive and therefore something one might want to control access for. In this case, you set up a function for “View Report X” and a function for “Export Report X”.
Functionalities can be managed directly in the Authway UI (User Interface), provided one has access to the “Manage Modules” functionality.
To include the permissions a user has, you are required to add perms scope to your request.
HTTP/1.1 302 Found
Location: https://YOURINSTANCE.irmciam.se/connect/authorize?
          client_id=YOUR_CLIENT_ID
          &redirect_uri=https%3A%2F%2Fclient.example.org%2Fcallback
          &response_type=code
          &scope=openid perms
          &state=YOUR_STATE
When doing so you will recieve one perm claim for each functionality the user has access too.
Permission-based access control with .NET
Permission-based access control can be used just as easily in .NET as role-based access control. To enable this, we need to replace one of the build-in services and create an extension method. Below is example code for .NET how to implement permission-based access control.
To demonstrate how this can be used, we have defined a single functionality for an Example application, which is “Manage Order,” and we have given it the authorization name “Example.ManageOrder” in Authway. For this, we define the following additions in the Constants class:
public static class Constants
{
    public static class Permissions
    {
        public const string ManageOrder = "Example.ManageOrder";
    }
}
Now we need to expand/change which scopes are to be retrieved from the IdP and simultaneously define claim actions in the AddOpenIdConnect configuration:
options.Scope.Add("perms"); //Authway permissions
options.ClaimActions.MapJsonKey("perm", "perm"); //Authway permission claim
To make it easy to check if a user has authorization for a function in the system, for example, the following extension method can be created:
public static class PrincipalExtensions
{
    public static bool Authorize(this ClaimsPrincipal principal, string permission)
    {
        return principal.Identity.IsAuthenticated && principal.HasClaim(c => c.Type == "perm" && c.Value == permission);
    }
}
With the extension method in place we can easily show/hide the link to Manage order page (in _Layout.cshtml) based on the user’s access:
@if (User.Authorize(Constants.Permissions.ManageOrder))
{
<li class="nav-item">
    <a class="nav-link text-dark" asp-area="" asp-controller="Home" asp-action="ManageOrder">ManageOrder</a>
</li>
}
Certainly, we can check if a user has access in other code in the same way. However, it would be nice if we could use the Authorize attribute as well, so we could do something like this in our OrderController:
[Authorize(Constants.Permissions.ManageOrder)]
public IActionResult Index()
{
    return View();
}
In .NET Core/.NET 5 and later, Microsoft has finally realized that role-based access control might not be ideal and, as a result, introduced an authorization system based on policies (read more here: https://docs.microsoft.com/en-us/aspnet/core/security/authorization/policies). To make it super easy to use our permission-based access control, we will create a custom PolicyProvider that automatically generates a policy to check authorization for a functionality, assuming the application hasn’t already defined a policy with that name:
/// <summary>
/// A policy provider that translates a policy name to a required permission with the same name, if not
/// <see cref="DefaultAuthorizationPolicyProvider"/> already has provided a policy.
/// </summary>
public class PermissionAuthorizationPolicyProvider : DefaultAuthorizationPolicyProvider
{
    /// <summary>
    /// Creates a new instance of <see cref="PermissionAuthorizationPolicyProvider" />.
    /// </summary>
    /// <param name="options">The options used to configure this instance.</param>
    public PermissionAuthorizationPolicyProvider(IOptions<AuthorizationOptions> options) : base(options)
    {
    }

    /// <summary>Gets the default authorization policy or a permission based policy if no default is configured.</summary>
    /// <returns>The authorization policy.</returns>
    public override async Task<AuthorizationPolicy> GetPolicyAsync(string policyName)
    {
        var policy = await base.GetPolicyAsync(policyName);

        if (policy == null)
        {
            policy = new AuthorizationPolicyBuilder()
                .RequireAuthenticatedUser()
                .RequireClaim("perm", policyName)
                .Build();
        }

        return policy;
    }
}
Finally we need to tell .NET to use our PolicyProvider instead of DefaultAuthorizationPolicyProvider, and we do this like any other configuration in Startup.ConfigureServices:
public void ConfigureServices(IServiceCollection services)
{
    //Add policy provider that generates a policy for each permission (if a policy is not found)
    services.AddTransient<IAuthorizationPolicyProvider, PermissionAuthorizationPolicyProvider>();
}
With that configuration, we can now use the Authorize attribute as mentioned above.
Consume an API
Subsections of Consume an API
Machine-to-Machine (M2M) authentication
There are many scenarios where applications, such as CLIs, or Backend services, need to call other APIs and when these APIs requires an access token the application must be able to authenticate itself (if the call isn’t done on behalf of a user). The Client Credentials Flow (defined in OAuth 2.0) allows an application to exchange its credentials, commonly a Client ID and Client Secret for an access token.
Exchange Client Credentials for an Access Token
To exchange the client credentials for an access token the Token endpoint is used.
POST /connect/token HTTP/1.1
Host: YOURINSTANCE.irmciam.se
Content-Type: application/x-www-form-urlencoded

grant_type=client_credentials
 &client_id=THE_CLIENT_ID
 &client_secret=THE_CLIENT_SECRET
 &scope=THE_SCOPES_REQUIRED_TO_CALL_THE_API
C# Example
In this example code IdentityModel is used to simplify the code.
var client = new HttpClient();
var tokenRequest = new ClientCredentialsTokenRequest
{
     Address = "https://YOURINSTANCE.irmciam.se/connect/token",
     ClientId = "THE_CLIENT_ID",
     ClientSecret = "THE_CLIENT_SECRET",
     Scope = "THE_SCOPES_REQUIRED_TO_CALL_THE_API"
};

var response = await client.RequestClientCredentialsTokenAsync(tokenRequest);

if (response.IsError) throw new Exception(response.Error);

var token = response.AccessToken;
Use the Access Token
After retrieving the access token it should be added in the Authrozation HTTP header on all calls to the API:
Authorization: Bearer THE_ACCESS_TOKENThe token is typically valid for a while (in many scenarios 1 hour), so re-use the token in multiple calls instead of retrieving a new for each call. This is extra important when many calls are done, since this will otherwise cause unnecessary load on Authway.
Call an API
It is common for a system/API to need to call another API within the same organization. These APIs are often protected in the same way, requiring a Bearer token for the request to be allowed. A Bearer token is sent in the HTTP header Authorization: Authorization: Bearer [ACCESS TOKEN].
The first decision to make is what the Access Token you’re sending should represent: a user or a system. When sending a token on behalf of a user, it’s referred to as Delegation, while when the system makes the call, it follows the Trusted Subsystem pattern.
Delegation: Making a call on behalf of a user
Delegation can be handled in two different ways. One common approach is what is sometimes called “poor man’s delegation,” which involves simply sending the user’s token directly to the underlying API. The other option is for the system making the call to perform a “token exchange” (OAuth Token Exchange specification, RFC 8693).
Regardless of the chosen model, it is necessary for your web application/API to access the user’s token. To enable this, .NET needs to store the token, which is done with the following configuration code in Startup.cs:
.AddOpenIdConnect(options =>
{
    ...
    options.SaveTokens = true;
    ...
});
Assuming this configuration is in place, it is possible to retrieve the user’s access token as follows:
httpContext.GetTokenAsync("access_token");Poor mans delegation
The biggest advantage of this variant is that it is very easy to use. The only requirement is that all the API scopes that need to be used are included when the user’s access token is created. The downside of this solution is that if this access token falls into the wrong hands, it provides access to a larger attack surface than if it only gives access to a single API scope.
Typically, for this solution, you want to add the user’s access token to the requests made via HttpClient. A good way to handle this is to create a DelegatingHandler whose task is to do this, and configure HttpClient to use it. An implementation could look like this (available in IRM.Extensions.Http):
/// <summary>
/// A <see cref="HttpClient"/> handler that that adds a bearer token authentication header to the http request.
/// </summary>
public class BearerTokenAuthenticationHandler : DelegatingHandler
{
    private readonly IResolveBearerToken _resolveBearerToken;

    /// <summary>
    /// Creates a new instance of <see cref="BearerTokenAuthenticationHandler" />.
    /// </summary>
    /// <param name="resolveBearerToken">The <see cref="IResolveBearerToken"/> used to get a bearer token.</param>
    public BearerTokenAuthenticationHandler(IResolveBearerToken resolveBearerToken)
    {
        _resolveBearerToken = resolveBearerToken ?? throw new ArgumentNullException(nameof(resolveBearerToken));
    }

    /// <inheritdoc />
    protected override async Task<HttpResponseMessage> SendAsync(HttpRequestMessage request, CancellationToken cancellationToken)
    {
        request.Headers.Authorization = new AuthenticationHeaderValue("Bearer", await _resolveBearerToken.GetTokenAsync(request, cancellationToken).ConfigureAwait(false));
        return await base.SendAsync(request, cancellationToken).ConfigureAwait(false);
    }
}
The code above provides general support for adding a Bearer token and delegates the logic to retrieve the token itself to a class that implements IResolveBearerToken (also available in IRM.Extension.Http). For the “poor man’s delegation,” the implementation could look like this:
/// <summary>
/// Gets an access token from the current <see cref="HttpContext"/>.
/// </summary>
public class HttpContextBearerTokenResolver : IResolveBearerToken
{
    private readonly IHttpContextAccessor _httpContextAccessor;
    private readonly ILogger<HttpContextBearerTokenResolver> _logger;

    /// <summary>
    /// Creates a new instance of <see cref="HttpContextBearerTokenResolver" />.
    /// </summary>
    /// <param name="httpContextAccessor">The <see cref="IHttpContextAccessor"/> used to get the <see cref="HttpContext"/> where the access token is retrieved from.</param>
    /// <param name="logger"></param>
    public HttpContextBearerTokenResolver(IHttpContextAccessor httpContextAccessor, ILogger<HttpContextBearerTokenResolver> logger)
    {
        _httpContextAccessor = httpContextAccessor ?? throw new ArgumentNullException(nameof(httpContextAccessor));
        _logger = logger ?? throw new ArgumentNullException(nameof(logger));
    }

    /// <inheritdoc />
    public Task<string> GetTokenAsync(HttpRequestMessage request, CancellationToken cancellationToken)
    {
        var httpContext = _httpContextAccessor.HttpContext ?? throw new InvalidOperationException("There is no HttpContext available which is required for HttpContextBearerTokenResolver.");
        _logger.LogInformation("Resolves bearer token by getting the access token from Httpcontext.");
        return httpContext.GetTokenAsync("access_token");
    }
}
Token Exchange
The current version of Authway does not have complete support for Token Exchange, but it can be easily added. In conjunction with that, certain implementation details can be discussed based on the desired objectives.
Trusted Subssytem: System-to-system
To use Client Credentials, you need to configure either a regular client (Configure an Application)(../configure-authway/configure-an-application) or an external system (Configure an External System)(../configure-authway/configure-an-external-system).
OpenID Connect provides the Client Credentials flow, designed for situations where one system needs to call another system. Typically, you require a client ID and a client secret to obtain an access token using these credentials. This access token typically contains protocol-specific claims. Since it doesn’t represent a user, common claims like sub, email, name, or, in Authway’s case, perm or role, are not present. When implementing an API, significant work is required to handle this, as it differs significantly from when a user calls the API. For example, regular authorization controls don’t work, and if you want to log who made a change and save the name/ID of the person performing the change, that information is not available either. Authway supports something called External Systems to address this challenge.
External Systems are clients with support for Client Credentials. In the background, an associated user is created with the same ID (sub) as the client ID. This enables treating the calling system similarly to a user.
Example to retrieve an access token according to Client Credentials
In the same way as for a user above, we use the BearerTokenAuthenticationHandler, but with a different implementation to extract the access token. This code has dependencies on the IdentityModel NuGet package.
/// <summary>
/// Gets a client credentials access token from an identity server.
/// </summary>
public class ClientCredentialBearerTokenResolver : IResolveBearerToken
{
    private readonly ClientCredentialBearerTokenResolverOptions _options;
    private readonly HttpClient _httpClient;
    private IMemoryCache _cache;
    private readonly ILogger<ClientCredentialBearerTokenResolver> _logger;

    private const string _cacheKey = "IRM.Extensions.Http.ClientCredentialBearerTokenResolver.Token";

    /// <summary>
    /// Creates a new instance of <see cref="ClientCredentialBearerTokenResolver" />.
    /// </summary>
    /// <param name="httpClient"></param>
    /// <param name="optionsAccessor"></param>
    /// <param name="logger"></param>
    /// <param name="cache"></param>
    public ClientCredentialBearerTokenResolver(HttpClient httpClient, IOptions<ClientCredentialBearerTokenResolverOptions> optionsAccessor, ILogger<ClientCredentialBearerTokenResolver> logger, IMemoryCache cache = null)
    {
        _options = optionsAccessor?.Value ?? throw new ArgumentNullException(nameof(optionsAccessor));
        _httpClient = httpClient ?? throw new ArgumentNullException(nameof(httpClient));
        _logger = logger ?? throw new ArgumentNullException(nameof(logger));

        if (_options.CacheAccessToken && cache == null)
            throw new ArgumentNullException(nameof(cache));
        _cache = cache;
    }

    /// <inheritdoc />
    public async Task<string> GetTokenAsync(HttpRequestMessage request, CancellationToken cancellationToken)
    {
        if (_options.CacheAccessToken && _cache != null)
        {
            var cacheKey = $"{_cacheKey}:{_options.ClientId}";
            var token = await _cache.GetOrCreateAsync(cacheKey, async entry =>
            {
                var response = await GetTokenFromServerAsync(request, cancellationToken).ConfigureAwait(false);

                entry.AbsoluteExpiration = DateTimeOffset.Now.AddSeconds(response.ExpiresIn).AddSeconds(-20);
                return response.AccessToken;
            }).ConfigureAwait(false);

            return token;
        }
        else
        {
            var response = await GetTokenFromServerAsync(request, cancellationToken).ConfigureAwait(false);
            return response.AccessToken;
        }

    }

    private async Task<TokenResponse> GetTokenFromServerAsync(HttpRequestMessage request, CancellationToken cancellationToken)
    {
        var tokenUrl = await GetTokenUrl(_options.Authority).ConfigureAwait(false);

        var tokenRequest = new ClientCredentialsTokenRequest
        {
            Address = tokenUrl,
            ClientId = _options.ClientId,
            ClientSecret = _options.ClientSecret,
            Scope = _options.Scope
        };
        _logger.LogInformation("Tries to resolve bearer token by getting the access token from {tokenUrl} for client {clientId}.", tokenUrl, _options.ClientId);
        var response = await _httpClient.RequestClientCredentialsTokenAsync(tokenRequest, cancellationToken).ConfigureAwait(false);

        if (!response.IsError)
            return response;

        if (response.ErrorType == ResponseErrorType.Exception)
            ExceptionDispatchInfo.Capture(response.Exception).Throw();

        string error;
        if (response.ErrorType == ResponseErrorType.Http)
            error = response.HttpErrorReason;
        else
            error = $"Error: {response.Error}\nDescription: {response.ErrorDescription}";

        _logger.LogError(error);
        throw new Exception(error);
    }

    private async Task<string> GetTokenUrl(string authority)
    {
        var discovery = new DiscoveryCache(authority, () => _httpClient);
        var disco = await discovery.GetAsync().ConfigureAwait(false);
        if (disco.IsError)
        {
            if (disco.Exception != null)
                ExceptionDispatchInfo.Capture(disco.Exception).Throw();

            throw new InvalidOperationException($"Failed to get token url. Details: {disco.Error ?? disco.HttpErrorReason}.");
        }

        return disco.TokenEndpoint;
    }
}
External system
In a basic configuration of Authway, it is still the case that an access token in the client credentials flow does not contain any user claims such as sub, name, and perm because that’s how the standard is supposed to work. There is an option to extend Authway with support that ensures these claims are included even in client credentials, but this must be done by IRM.
Instead, we recommend that the API retrieves this additional information from the Auth module when calls to the API arrive, for example, in a ClaimsTransformation class. The advantage of this approach is that the API itself can control how fresh (updated) claims it wants by managing caching, compared to when all claims are packed in the access token with the same lifespan as the token. Additionally, the token becomes smaller, and there are other advantages that you can read about in Privacy and GDPR. The same documentation also includes code examples of how to retrieve more information."
Protect an API
To protect an API, you must have configured an API.
To secure the API, configure it to require an access token:
services.AddAuthentication(JwtBearerDefaults.AuthenticationScheme)
    .AddJwtBearer(JwtBearerDefaults.AuthenticationScheme, options =>
        {
            options.Authority = authority; //Base URL to Idp
            options.Audience = apiResource;

            options.TokenValidationParameters.ValidTypes = new[] { "at+jwt" };
            options.TokenValidationParameters.NameClaimType = JwtClaimTypes.Name;
            options.TokenValidationParameters.RoleClaimType = JwtClaimTypes.Role;

            // if token does not contain a dot, it is a reference token
            options.ForwardDefaultSelector = Selector.ForwardReferenceToken("introspection");
        })
    // reference tokens
    .AddOAuth2Introspection("introspection", options =>
    {
        options.Authority = authority;

        options.ClientId = apiResource;
        options.ClientSecret = apiSecret;
        options.EnableCaching = true;
        options.CacheDuration = TimeSpan.FromMinutes(20);
        options.NameClaimType = JwtClaimTypes.Name;
        options.RoleClaimType = JwtClaimTypes.Role;
    });
We have used the IdentityModel.AspNetCore.OAuth2Introspection NuGet package. Read more about ForwardDefaultSelector.
If you have API and web application in the same project, cookies are likely the default scheme used for authenticating requests. However, if you need to make pure API calls from, for example, a server application, you may encounter 401 errors. To address this, you can add a ForwardDefaultSelector to your Cookies configuration. This can be configured to check if the Authorization header starts with “Bearer” and, if so, set “Bearer” as the scheme to be used.
In IRM.AspNetCore.Authentication, there are ready-made extension methods to perform the typical configuration mentioned above.
Privacy and GDPR
All digital solutions must comply with privacy-related regulations such as GDPR. Therefor privacy design must be part of the implementation of Authway by IRM.
Examples of concerns that must be considered for a privacy design:
- Consent management: organisations must obtain explicit consents from individuals before collecting and processing data.
- Access control: great handling of users access and permissions.
- Data minimization: an organisation should limit the amount of personal data they collect and process to only what is necessary for a specific purpose.
- Data protection: an organisation is required to implement appropriate technical and organizational measures to protect personal data from unauthorized access, disclosure, alteration, or destruction.
Authway has a lot of support to fulfil a good privacy design, but it must also be correctly used by the applications. Below are things to consider to protect your users and their privacy.
Scopes
A scope represents a set of claims (user attributes) that an application is requesting when authenticating a user. Scopes provides a mechanism for applications (and APIs) to only receive the subset of user information that are necessary rather than receiving all of it.
Consider what claims is really needed and request just the scopes needed, so that the tokens will contain as little PII data as possible. Sometimes it is also worth re-configuring the scopes to contain fewer claims, in line with the user data your applications will use.
Authway also supports fetching additional scopes through a back-channel if necessary. There are several benefits with using a back-channel compared to request tokens with many claims:
- Size. The tokens will be smaller which is often good since they are passed around a lot.
- Security. The user data that is never put into the token can never be revealed.
- Freshness of information. Tokens can sometimes be long-lived, but if the application (or API) uses a back-channel to retrieve additional scopes it will always get the latest updates.
User data in tokens
A JSON Web token (JWT) is a structured token that typically contains claims (data) about the user and some extra metadata. They are self-contained, signed for integrity of its data and the format is well defined so that an API can easily decode and verify the token without calling any other APIs. Since the user data is sensitive and subject to regulations, such as GDPR, we recommend the use of Reference tokens, so that access tokens are only a random string and therefor can’t reveal any PII data. This requires the APIs to support both JWT and reference tokens, but it is usually not so much extra work. It is also possible to put the logic to exchange the reference token for a JWT token in an API Gateway, reverse proxy or any other middleware.
The reference tokens is exchanged for a JWT token by calling the Introspection endpoint of Authway. For performance reasons the exchanged token can be cached until it expires. This solution is fully compliant with OAuth 2 standard so no proprietary solutions is required for either the application or the API to use reference tokens.
Never send the token to a web browser
Store user cookies on the server
Application unique user identifiers
Export personal data
Authway has pre-build support for downloading a file with the personal data that exists in the service. This file can be reached from {auth domain}/identity/manage/download, but it requires a signed in user. The same information can exported from the Person admin API. If a more customized export is need, all information could be gathered by calling our different admin APIs to fully customize how the information is exposed to the user.
Delete personal data
We have several automized clean-up jobs that remove personal data that can be enabled and configured.
The automated jobs will not be enough in many situations and complementary tools are necessary. The admin UI of course supports a manual remove of persons and their data which also can be used directly by your end-customers. Everything that can be done in the UI can be automated by calling our admin APIs.
One challenge with a shared service for users, is that it can be hard to know when a user can/should be removed. An example could be a user that has access to system A, B and C. When system B decides that the user should be removed (could be build in or decided by a centralized rule engine) there is no way for system B to decide if the user should be removed from Authway. To handle this situation Authway have a specialized API where system B can request to remove all permissions to the system for a user. This together with the clean-up job to remove users that has no permissions can solve this challenge.
API to remove all permissions for a module
HTTP DELETE /api/users/{userId}/permissions/modules/{moduleName}
If userId is unknown it is possible to search for user by username. The API will remove the user from all groups that has permissions that belong to the module. It will also remove user specific permissions that belongs to the module.
Signing keys
Authway uses public-key cryptography to sign ID tokens, access tokens and SAML assertions, so that an application (client) that uses Authway to authenticate users can trust the result. A signing key is a JSON web key (JWK) that consists of a public and privat key pair. The private key is used by Authway to create a signature that can be verified with the well-known public key.
By default, Authway uses RSA keys for RS256 signing algorithm.
A JSON web key set (JWKS) is a set of keys containing the public keys used to verify the signature in your application. The set can contain one or more public keys:
{
    "keys": [
        {
            "kty": "RSA",
            "use": "sig",
            "kid": "NOT THE REAL VALUE",
            "e": "NOT THE REAL VALUE",
            "n": "NOT THE REAL VALUE",
            "alg": "RS256"
        }
    ]
}
The JWKS can be fetched from the Identity Server at the relative URL .well-known/openid-configuration/jwks, but the preferred way to retrieve the URL for the JWKS is to read the jwks_uri from the metadata document (found at .well-known/openid-configuration). Within the set there can be one or more keys for one or more signing algorithms (if more than one algorithm is configured).
How it works
When a user signs in, Authway typically creates tokens with information about the signed-in user. The tokens are signed with the private key, before they are send to your application. To verify that the the token you retrieve is valid and issued by the Identity Server, your application uses the public key.
It is important that you use the jwks_uri endpoint to get the keys dynamically since the keys can change over time. Of course the keys should be cached, but it is a good practices to refresh the cash once every day.
Note that validation of the signature is only one aspect of validating a JWT and expiration, issued time, audience and issuer are examples of more necessary validation. We recommend the use of platform support for token validation is used since it is a complex and security critical process to do correct.
Key rotation
Key rotation is an Enterprise feature of Authway, but since this can change (both what is included in different price levels, but also what version is used) we strongly recommend each application to implement support for key rotation. The keys can also be changed in the case of a security breach.
It is a good practice to rotate the keys regularly and Authway rotates them every 90 days (by default, but it can be configured). The new key is announced 14 days in advance, and retained for 14 days after it expires. The first key in the list is the default key:
{
    "keys": [
        {
            "kty": "RSA",
            "use": "sig",
            "kid": "NOT THE REAL VALUE",
            "e": "NOT THE REAL VALUE",
            "n": "NOT THE REAL VALUE",
            "alg": "RS256"
        },
        {
            "kty": "RSA",
            "use": "sig",
            "kid": "NOT THE REAL VALUE",
            "e": "NOT THE REAL VALUE",
            "n": "NOT THE REAL VALUE",
            "alg": "RS256"
        }
    ]
}
If the signature couldn’t be verified with the default key, you should try to verify the signature with the other key(s) for the same signing algorithm.
Signing algorithms
By default Authway uses RS256 signing algorithm, but it is possible to configure support for RS, PS and ES family of cryptographic signing algorithms. When multiple algorithms is supported is is possible to override the default on a per resource and client basis.
Standard and Custom OAuth 2.0 and OpenId Connect Endpoints
Authway supports the following standard and custom OAuth 2.0 and OpenId Connect endpoints:
| Endpoint | Description |
|---|---|
| Discovery | Exposes metadata about the OAuth 2.0 and OpenId Connect endpoints, capabilities and extensions. |
| JWK set | Get the published JSON Web Key (JWK) set to verify the signature of an issued token or to encrypt request objects that is passed to the server. |
| Authorization | Authenticate the end-user by sending their browser to the authorization endpoint. |
| Pushed Authorization Request (PAR) | Pass the request parameters in a backchannel directly to the server before sending the user’s browser to the authorization endpoint. |
| Token | Pass an OAuth 2.0 grant, such as code, refresh token or client credentials, to get an Id token and/or access token. |
| Token introspection | Validate and get the real access token for a reference token. |
| Token revocation | Revoke a refresh or access token. |
| UserInfo | Fetch user information that is not in the token. |
| Check Session iframe | Check the identity provider for changes of the end-user authentication. |
| Logout (end-session) | Sign-out the end-user by sending their browser to the logout endpoint. |
| Client Initiated Backchannel Authentication | Authenticate the end-user without redirecting their browser, so typicallu on another device. |
| Scope introspection | Custom endpoint that allows a client or API resource to fetch extra scopes for a user through a backchannel. |
Subsections of Standard and Custom OAuth 2.0 and OpenId Connect Endpoints
Discovery Endpoints
Overview
The Discovery Endpoint (also called the OpenID Provider Configuration Document) is defined in the OpenID Connect Discovery specification.
It provides a JSON document at a well-known location that describes the Identity Provider’s (IdP’s) capabilities and endpoints. Clients (RPs) can use this to automatically configure themselves instead of requiring manual configuration of URLs and supported features.
Endpoint
GET https://[BASE_URL]/.well-known/openid-configuration
Response
The response is a JSON object containing metadata about the IdP. Example:
{
   "issuer": "https://[BASE_URL]",
   "authorization_endpoint": "https://[BASE_URL]/connect/authorize",
   "token_endpoint": "https://[BASE_URL]/connect/token",
   "userinfo_endpoint": "https://[BASE_URL]/connect/userinfo",
   "end_session_endpoint": "https://[BASE_URL]/connect/endsession",
   "jwks_uri": "https://[BASE_URL]/.well-known/openid-configuration/jwks",
   "check_session_iframe": "https://[BASE_URL]/connect/checksession",
   "introspection_endpoint": "https://[BASE_URL]/connect/introspect",
   "revocation_endpoint": "https://[BASE_URL]/connect/revocation",
   "scopes_supported": ["openid", "profile", "email"],
   "response_types_supported": ["code", "id_token", "token id_token"],
   "grant_types_supported": ["authorization_code", "refresh_token", "client_credentials"],
   "subject_types_supported": ["public", "pairwise"],
   "id_token_signing_alg_values_supported": ["RS256"],
   "claims_supported": ["sub", "name", "email", "email_verified"]
}
Usage
-
Client retrieves configuration at startup:
HTTP GET https://[BASE_URL]/.well-known/openid-configuration -
Client dynamically discovers the necessary endpoints and metadata:
- Authorization Endpoint
- Token Endpoint
- UserInfo Endpoint
- End Session Endpoint
- Check Session IFrame
- Supported scopes, response types, and signing algorithms
- Client uses the JWKS URI (
jwks_uri) to fetch public keys for verifying ID Tokens.
Security Considerations
- Validate that the
issuerfield matches the expected IdP issuer. - Cache discovery results for efficiency, but refresh periodically to catch configuration changes.
Related Endpoints
- JWKS URI (
jwks_uri) – Provides JSON Web Key Set used for verifying tokens. - Authorization Endpoint – Obtained from discovery document.
- Token Endpoint – Obtained from discovery document.
JWK Set
Overview
The JSON Web Key Set (JWKS) URI provides the public keys used by the Identity Provider (IdP) to sign tokens (e.g., ID Tokens, Access Tokens if JWTs).
Clients (RPs) retrieve the JWKS document to validate signatures on tokens, ensuring authenticity and integrity.
Endpoint
The endpoint is advertised in the jwks_uri in the metadata exposed by the discovery endpoint and typically is:
GET https://[BASE_URL]/.well-known/openid-configuration/jwks
Response
The response is a JSON object containing an array of public keys. Example:
{
   "keys": [
     {
       "kty": "RSA",
       "kid": "1b94c",
       "use": "sig",
       "alg": "RS256",
       "n": "vrjOf...",
       "e": "AQAB"
     },
     {
       "kty": "EC",
       "kid": "5df2a",
       "use": "sig",
       "alg": "ES256",
       "crv": "P-256",
       "x": "f83OJ3...",
       "y": "x_FEzRu..."
     }
   ]
}
Usage
- Retrieve JWKS:
GET https://[BASE_URL]/.well-known/openid-configuration/jwks-
Select Key by
kid:
Tokens (e.g., JWTs) include akid(Key ID) in their header. The RP uses this value to find the correct key from the JWKS. -
Verify Signature:
The RP uses the key to validate the token’s signature and ensure it was issued by the IdP.
Security Considerations
- Validate that keys come from a trusted
jwks_uridiscovered via.well-known/openid-configuration. - Cache keys, but refresh periodically, since IdPs rotate signing keys.
Related Endpoints
- Discovery Endpoint – Provides the
jwks_uri. - Authorization Endpoint – Issues ID Tokens that must be verified.
- Token Endpoint – Returns tokens signed with keys in the JWKS.
Authorization Endpoint
Overview
The Authorization Endpoint is the starting point for OAuth 2.0 and OpenID Connect flows. It handles user authentication and authorization, and issues an authorization code, implicit tokens, or an ID Token, depending on the flow.
Clients redirect the user’s browser to this endpoint with the appropriate query parameters. After the user authenticates (and consents if required), the IdP redirects the browser back to the client with the authorization response.
Endpoint
The endpoint is advertised in the authorization_endpoint in the metadata exposed by the discovery endpoint and typically is:
GET https://[BASE_URL]/connect/authorize
Parameters
| Parameter | Required | Description |
|---|---|---|
response_type |
Yes | Defines which flow to use (code, id_token, token, or a combination). |
client_id |
Yes | The client identifier registered with the IdP. |
redirect_uri |
Yes | Where the user should be redirected after authentication. Must be pre-registered. |
scope |
Yes | Space-delimited list of scopes. Must include openid for OpenID Connect requests. |
state |
Recommended | Opaque value used to maintain request state and prevent CSRF. Returned unchanged in response. |
nonce |
Required for id_token |
String used to associate client session with ID Token to prevent replay attacks. |
All parameters are documented here.
Usage
- Redirect User:
The RP builds an authorization request and redirects the user’s browser to the IdP:
https://[BASE_URL]/connect/authorize?
   response_type=code&
   client_id=my-client-id&
   redirect_uri=https%3A%2F%2Frp.example.com%2Fcallback&
   scope=openid%20profile%20email&
   state=xyzABC123&
nonce=abc987-
User Authenticates:
The IdP authenticates the user. -
Redirect Back:
The IdP redirects the user’s browser back to the RP with an authorization response. Example (Authorization Code Flow):
https://rp.example.com/callback?code=SplxlOBeZQQYbYS6WxSbIA&state=xyzABC123Security Considerations
- Always validate
stateto protect against CSRF. - Always use
noncewhen requestingid_token. - Use
response_type=codewith PKCE for public clients (e.g., SPAs, mobile apps).
Related Endpoints
- Token Endpoint – To exchange authorization codes for tokens.
- Check Session iframe – To monitor the authenticated session.
- End Session Endpoint – To log the user out.
Pushed Authorization Request (PAR) Endpoint
Overview
The Pushed Authorization Request (PAR) Endpoint allows clients to securely push authorization request parameters directly to the Identity Provider (IdP) via a backchannel POST request.
Instead of sending all authorization parameters in the front-channel (via the browser), the client sends them to the IdP in advance. The IdP returns a short-lived request_uri reference. The client then uses this request_uri in the front-channel redirect to the Authorization Endpoint.
This improves security (no long query strings, prevents tampering) and reliability (handles large requests). The use of PAR is encouraged by the FAPI working group within the OpenID Foundation. For example, the FAPI2.0 Security Profile requires the use of PAR. This security profile is used by many of the groups working on open banking (primarily in Europe), in health care, and in other industries with high security requirements.
Endpoint
The endpoint is advertised in the pushed_authorization_request_endpoint in the metadata exposed by the discovery endpoint and typically is:
POST https://[BASE_URL]/connect/par
Parameters (form-encoded)
All parameters normally passed to the Authorization Endpoint (response_type, client_id, redirect_uri, scope, state, nonce, etc.) must be included in the PAR request.
| Parameter | Required | Description |
|---|---|---|
response_type |
Yes | Defines the flow (code, id_token, etc.). |
client_id |
Yes | The client identifier registered with the IdP. |
redirect_uri |
Yes | Must match a registered redirect URI. |
scope |
Yes | Scopes requested (openid required for OIDC). |
state |
Recommended | Opaque value for request correlation/CSRF protection. |
nonce |
Required for id_token requests |
Protects against replay attacks. |
Full documentation of all authorization parameters can be found here.
Authentication
- Confidential clients authenticate (e.g., HTTP Basic Auth or private_key_jwt).
- Public clients may use PKCE (Proof Key for Code Exchange).
Response
A successful response returns JSON with a request_uri and its lifetime (expires_in):
{
   "request_uri": "urn:ietf:params:oauth:request_uri:1a2b3c4d",
   "expires_in": 90
}
Usage Flow
- Push Authorization Request:
POST /par
Content-Type: application/x-www-form-urlencoded
Authorization: Basic base64(client_id:client_secret)

response_type=code& client_id=my-client-id&
    redirect_uri=https%3A%2F%2Frp.example.com%2Fcallback&
    scope=openid%20profile&
    state=xyz123&
nonce=abc987-
Receive
request_uri:
The IdP returns a short-livedrequest_uri. -
Redirect User to Authorization Endpoint:
Instead of passing full parameters, the RP redirects the user with only:
https://[BASE_URL]/connect/authorize?client_id=my-client-id&request_uri=urn:ietf:params:oauth:request_uri:1a2b3c4d
- IdP Resolves Request:
The IdP looks up the pushed request parameters, authenticates the user, and continues the flow as normal.
Security Considerations
- Prevents exposure of sensitive parameters in browser history, logs, or query strings.
- Ensures integrity of the authorization request (cannot be modified in transit).
- Short-lived
request_urivalues mitigate replay attacks. - Clients should never log or store
request_urivalues beyond their lifetime.
Related Endpoints
- Authorization Endpoint – Consumes the
request_uri. - Token Endpoint – Exchanges the code obtained after authorization.
Token Endpoint
Overview
The Token Endpoint is used by clients to exchange an authorization code, refresh tokens, or client credentials for OAuth 2.0 tokens (Access Token, Refresh Token, and optionally an ID Token).
It is typically called by back-end components (not the browser) using HTTPS POST requests.
Endpoint
The endpoint is advertised in the authorization_endpoint in the metadata exposed by the discovery endpoint and typically is:
POST https://[BASE_URL]/connect/token
Parameters (form-encoded)
| Parameter | Required | Description |
|---|---|---|
grant_type |
Yes | The grant type (authorization_code, refresh_token, client_credentials, etc.). |
code |
Required for authorization_code |
The authorization code received from the Authorization Endpoint. |
redirect_uri |
Required for authorization_code |
Must match the original redirect_uri used in the request. |
client_id |
Required (if not using client authentication header) | The client identifier. |
client_secret |
Required (for confidential clients) | The client’s secret. |
code_verifier |
Required for PKCE | The original code verifier for PKCE-enabled flows. |
refresh_token |
Required for refresh_token grant |
The refresh token issued earlier. |
Response
Successful responses are JSON objects containing issued tokens, for example:
{
   "access_token": "SlAV32hkKG",
   "token_type": "Bearer",
   "expires_in": 3600,
   "refresh_token": "8xLOxBtZp8",
   "id_token": "eyJhbGciOiJSUzI1..."
}
Usage (Authorization Code Flow with PKCE)
-
Obtain Authorization Code:
From the Authorization Endpoint. -
Send Token Request:
HTTP POST /connect/token
 Content-Type: application/x-www-form-urlencoded
 Authorization: Basic base64(client_id:client_secret)
 grant_type=authorization_code&
 code=SplxlOBeZQQYbYS6WxSbIA&
 redirect_uri=https%3A%2F%2Frp.example.com%2Fcallback&
code_verifier=abcdef123456- Receive Tokens:
The IdP responds with an Access Token, ID Token (if OIDC), and optionally a Refresh Token.
Security Considerations
- Never expose
client_secretin public clients (use PKCE instead). - Validate all tokens received (signature, expiration, audience, nonce).
Related Endpoints
- Authorization Endpoint – Provides authorization codes.
- End Session Endpoint – To terminate sessions.
- Introspection Endpoint – To validate Access Tokens.
Token Introspection Endpoint
Overview
The Introspection Endpoint is defined in RFC 7662. It allows APIs (or clients) to query the IdP about the active state of an OAuth 2.0 token (Access Token or Refresh Token). Refresh tokens can only be introspected by the client that requested them.
This endpoint is useful for APIs that need to validate whether a token is still valid, and to obtain metadata about the token (e.g., scope, expiration, subject).
Endpoint
The endpoint is advertised in the introspection_endpoint in the metadata exposed by the discovery endpoint and typically is:
POST https://[BASE_URL]/connect/introspect
Parameters (form-encoded)
| Parameter | Required | Description |
|---|---|---|
token |
Yes | The token to be introspected. |
token_type_hint |
Optional | A hint about the type of token (access_token or refresh_token). |
Authentication
The introspection endpoint requires authentication. Since the request to the introspection endpoint is typically done by an API, which is not an OAuth client, the ApiResource is used to configure credentials. For a client the configured credentials of the client is used.
Response
Successful responses are JSON objects. If the token is active:
{
   "active": true,
   "scope": "openid profile email",
   "client_id": "my-client-id",
   "username": "alice",
   "token_type": "access_token",
   "exp": 1699999999,
   "iat": 1699990000,
   "sub": "6b3d5b7b-867b-4e34-98df-f1c8a9af37b9",
   "aud": "api.example.com",
   "iss": "https://[BASE_URL]"
}
Unknown or expired tokens will be marked as inactive::
{
   "active": false
}
Usage Example
HTTP POST /introspect
Content-Type: application/x-www-form-urlencoded
Authorization: Basic base64(api_resource:api_resource_secret)

token=[token]&token_type_hint=access_token
Return JWT Instead of JSON
Authway supports RFC 9701 to return a JWT response from the introspection endpoint.
To return a JWT response, set the Accept header in the HTTP request to application/token-introspection+jwt:
HTTP POST /connect/introspect
Accept: application/token-introspection+jwtAuthorization:
Authorization: Basic base64(api_resource:api_resource_secret)

token=[token]
A successful response will return a status code of 200 and has a Content-Type: application/token-introspection+jwt header, indicating that the response body contains a raw JWT instead. The base64 decoded JWT will have a typ claim in the header with the value token-introspection+jwt. The token’s payload contains a token_introspection JSON object similar to the default response type:
{
  "alg": "RS256",
  "kid": "BE9D78519A8BBCB28A65FADEECF49CBC",
  "typ": "token-introspection+jwt"
}.{
  "iss": "https://localhost:5001",
  "iat": 1729599599,
  "aud": "api1",
  "token_introspection": {
    "iss": "https://localhost:5001",
    "nbf": 1729599599,
    "iat": 1729599599,
    "exp": 1729603199,
    "aud": [ "api1" ],
    "client_id": "client",
    "jti": "44FD2DE9E9F8E9F4DDD141CD7C244BE9",
    "active": true,
    "scope": "api1"
}}.[Signature]
Related Endpoints
- Token Endpoint – Issues tokens that may later be introspected.
- UserInfo Endpoint – Provides user claims associated with an Access Token.
Token Revocation Endpoint
Overview
The Revocation Endpoint is defined in RFC 7009. It allows clients to notify the IdP that a previously issued Refresh Token or Access Token is no longer needed.
Revocation helps ensure tokens cannot be misused if they are leaked or when a session ends.
Endpoint
The endpoint is advertised in the revocation_endpoint in the metadata exposed by the discovery endpoint and typically is:
POST https://[BASE_URL]/connect/revocation
Parameters (form-encoded)
| Parameter | Required | Description |
|---|---|---|
token |
Yes | The token to revoke (Access or Refresh Token). |
token_type_hint |
Optional | A hint about the type of token (access_token or refresh_token). |
Authentication
- The client must authenticate (e.g., Basic Auth with
client_idandclient_secret).
Response
- A successful revocation request returns HTTP 200 OK with an empty body.
- Even if the token is invalid or already revoked, the IdP returns
200 OK(to prevent token probing).
Usage Example
POST /connect/revocation
Content-Type: application/x-www-form-urlencoded
Authorization: Basic base64(client_id:client_secret)

token=8xLOxBtZp8&token_type_hint=refresh_token
Security Considerations
- RPs should clear local session data after revoking tokens.
Related Endpoints
- Token Endpoint – Issues the tokens that can be revoked.
- Introspection Endpoint – Can check token status after revocation.
- End Session Endpoint – Handles user logout (separate from token revocation).
UserInfo Endpoint
Overview
The UserInfo Endpoint is defined in the OpenID Connect Core specification. It returns claims about the authenticated end-user, given a valid Access Token obtained via OpenID Connect.
It allows clients to retrieve claims (e.g., sub, name, email).
Endpoint
The endpoint is advertised in the userinfo_endpoint in the metadata exposed by the discovery endpoint and typically is:
GET https://[BASE_URL]/connect/userinfo
Authentication
- Requires an Access Token issued for the
openidscope. - The token is sent in the
Authorizationheader:
Authorization: Bearer SlAV32hkKG
Response
A successful response is a JSON object containing user claims. Example:
{
   "sub": "6b3d5b7b-867b-4e34-98df-f1c8a9af37b9",
   "name": "Alice Adams",
   "given_name": "Alice",
   "family_name": "Adams",
   "preferred_username": "[email protected]",
   "email": "[email protected]",
   "email_verified": true
}
Usage Example
GET /connect/userinfo
Authorization: Bearer SlAV32hkKG
Security Considerations
- Clients should request only the scopes they need (
profile,email,phone,address) to avoid unnecessary data exposure.
Related Endpoints
- Authorization Endpoint – Grants an Access Token with
openidscope. - Token Endpoint – Exchanges authorization codes for Access Tokens.
Check Session iframe
Overview
The Check Session IFrame endpoint allows relying parties (RPs) to detect changes in the user’s authentication state at the Identity Provider (IdP). It is defined by the OpenID Connect Session Management specification.
RPs embed this endpoint in a hidden <iframe> within their application. The RP can then periodically send postMessage requests to the iframe to check whether the user’s session at the IdP is still valid.
Another option to silently check that a user is stilled signed in is by making an authentication request with prompt=none parameter. This will return a new ID token without user interaction, unless the user is no longer authenticated.
Endpoint
The endpoint is advertised in the check_session_iframe in the metadata exposed by the discovery endpoint and typically is:
GET https://[BASE_URL]/connect/checksession
Parameters
This endpoint does not accept query parameters directly. Instead, communication happens through HTML5 postMessage between the RP’s hidden iframe and the IdP’s check session iframe.
Usage
- Obtain session_state:
- When the RP receives an authorization response from the IdP, it will include a
session_statevalue. - The RP stores this value for use in session checking.
- Embed the iframe:
    <iframe id="op-iframe"
            src="https://[BASE_URL]/connect/checksession"
            style="display:none;">
</iframe>- Send Messages:
- The RP periodically (e.g., every few seconds) sends a message via
postMessageto the iframe in the form:
client_id session_state- Example in JavaScript:
var iframe = document.getElementById("op-iframe").contentWindow;
var clientId = "my-client-id";
var sessionState = "abc123xyz"; // from IdP authorization response
setInterval(function() {
     iframe.postMessage(clientId + " " + sessionState,
                        "https://[BASE_URL]");
}, 5000);- Receive Responses:
-
The IdP responds back to the RP window with one of the following values:
"unchanged"– The session is still valid."changed"– The session has changed (e.g., user logged out at IdP)."error"– Invalid message format or unrecognized client.
-
Example listener:
window.addEventListener("message", function(e) {
     if (e.origin !== "https://[BASE_URL]") return;
     if (e.data === "changed") {
         // Trigger RP logout or silent reauthentication
     }
}, false);
Security Considerations
- Always validate the
originof the postMessage to ensure it matches the IdP domain. - The iframe should never be visible to end users.
- Applications should define a clear flow for handling
"changed"responses (e.g., logout the user, refresh tokens, or re-initiate login).
Related Endpoints
- Authorization Endpoint – Provides the
session_state. - End Session Endpoint – For initiating logout.
Logout (End Session) Endpoint
Overview
The End Session Endpoint allows relying parties (RPs) to sign the user out of the Identity Provider (IdP) and, optionally, to perform Single Logout (SLO) across multiple clients.
The RP can redirect the user’s browser to this endpoint to terminate the IdP session. The IdP will then clear its authentication state and optionally redirect the user back to a specified post-logout URL.
Endpoint
The endpoint is advertised in the end_session_endpoint in the metadata exposed by the discovery endpoint and typically is:
GET https://[BASE_URL]/connect/endsession
Parameters
| Parameter | Required | Description |
|---|---|---|
id_token_hint |
Recommended | The ID Token previously issued by the IdP. Helps the IdP identify the RP and user session to sign out. |
post_logout_redirect_uri |
Optional | URL to which the IdP should redirect the user after logout. Must be pre-registered with the IdP. |
state |
Optional | Opaque value used by the RP to maintain state between the logout request and response. Returned to the RP in the redirect. |
Usage
-
Obtain id_token_hint:
When the RP authenticates the user via the Authorization Endpoint, it receives an ID Token. This token is typically passed as theid_token_hintwhen initiating logout. -
Redirect the User to Logout Endpoint:
Example redirect:
https://idp.example.com/logout?id_token_hint=eyJhbGciOi...&
   post_logout_redirect_uri=https%3A%2F%2Frp.example.com%2Flogout%2Fcallback&
state=abc123- IdP Terminates Session:
- The IdP clears its authentication session.
- If
post_logout_redirect_uriis provided and valid, the IdP redirects the user’s browser to that URI. - The
stateparameter (if provided) is appended to the redirect.
- RP Handles Post-Logout Redirect:
- The RP should validate the
statevalue if it was sent. - Example redirect URL received by the RP:
https://rp.example.com/logout/callback?state=abc123Security Considerations
post_logout_redirect_urimust be registered with the IdP to prevent open redirect attacks.- Passing
id_token_hinthelps ensure logout applies to the correct user and RP session. - The RP should clean up its own local session in addition to triggering IdP logout.
Related Endpoints
- Check Session iframe – To monitor session status before logout is needed.
- Authorization Endpoint – Provides the ID Token used as
id_token_hint.
CIBA Endpoint
Overview
The CIBA Endpoint allows a client to initiate an authentication request without redirecting the user’s browser. Instead, authentication is performed out-of-band on a separate device or channel (e.g., a mobile app, push notification, or secure device).
CIBA is particularly suited for:
- Decoupled authentication flows
- Devices without browsers (e.g., smart devices, kiosks)
- High-assurance or step-up authentication scenarios
Read more here.
CIBA Modes
| Mode | Supported | Description |
|---|---|---|
| Poll | Yes | Client polls the Token Endpoint until authentication completes. Do not poll more often than indicated in the response for the CIBA request. |
| Ping | Yes | Authway notifies client when authentication is complete. The standard still allows the client to also Poll, but it is better to wait for the notification. |
| Push | No | Tokens are pushed directly to the client. |
Endpoint
The endpoint is advertised in the backchannel_authentication_endpoint in the metadata exposed by the discovery endpoint and typically is:
GET https://[BASE_URL]/connect/ciba
Parameters
| Parameter | Required | Description |
|---|---|---|
client_id |
Yes | The client identifier registered with the IdP. |
scope |
Yes | Space-delimited list of scopes. Must include openid. |
acr_values |
No | Space seperated string with special requests from the client. See below. |
login_hint |
Conditional | Hint identifying the end user (unique identifier, username, email, social security number). If it is not the unique identifier it is recommended to also pass the tenant or the authentication might fail. |
login_hint_token |
Conditional | JWT issued by the client according to login hint token documentation. |
id_token_hint |
Conditional | Previously issued ID Token identifying the user. |
binding_message |
No | Message displayed to the user during authentication for request correlation. |
requested_expiry |
No | Desired lifetime (in seconds) of the authentication request. Can only shorten the lifetime configured on the client or in Authway. |
request |
No | Instead of providing all parameters as individual parameters, it is possible to provide a subset or all them as a JWT. |
request_uri |
No | URL of a pre-packaged JWT containing request parameters. |
ui_locales |
No | End-User’s preferred languages, represented as a space-separated list of language tag values, ordered by preference. For instance, the value “sv-SE en” represents a preference for Swedish as spoken in Sweden, then English (without a region designation). |
Note Exactly one of login_hint, login_hint_token, or id_token_hint must be provided to identify the user.
acr_values parameters
The acr_values parameters are passed as “parameter:value” and if multiple parameters are passed they should be seperated with a space. For example:
tenant:priv idp:bankid| Parameter | Description |
|---|---|
| idp | The unique identifier of the sign-in method to use. See Control authentication method from the client. |
| tenant | The unique identifier of an owner (tenant) that the user must belong to. See Only allow users from specific tenant |
Parameters for specific authentication methods
Swedish BankId
| Parameter | Required | Description |
|---|---|---|
binding_message |
No | Text displayed to the user during the authentication. Passed on to BankId without modification. |
bankid_user_visible_data_format |
No | The format of the text in binding_message parameter and can be plaintext (default) or simpleMarkdownV1. Passed on to BankId without modification. |
bankid_call_initiator |
No | Indicates if the user or your organization initiated the phone call (so only handled during a CIBA request). Valid values are user (default) or RP. Passed on to BankId without modification. |
Usage
- Client Initiates Backchannel Authentication:
The client builds a CIBA request and post it to the IdP:
https://[BASE_URL]/connect/ciba?
   scope=openid%20profile%20email&
   login_hint=e3b62a93-df39-4f8d-a6b4-f7a4a769fec4&
   binding_message=The%20company%20wants%20to%20identify%20you%20in%20your%20current%20phone%20call
The response from Authway is immediate and indicates how the client should proceed.
{
  "auth_req_id": "1c266114-a1be-4252-8ad1-04986c5b9ac1",
  "expires_in": 120,
  "interval": 5
}- Authway Triggers Out-of-Band Authentication
The user is notified or instructed somehow what to do. Excatly how this is done can vary depending on scenario and mechanism for authenticating the user. User will approve or deny the request.
- Client Retrieves Result (Token Endpoint)
The client polls (or is notified depending on mode) and exchanges
auth_req_idat the Token Endpoint:
HTTP POST /connect/token
 Content-Type: application/x-www-form-urlencoded
 Authorization: Basic base64(client_id:client_secret)
 grant_type=urn:openid:params:grant-type:ciba&
 auth_req_id=1c266114-a1be-4252-8ad1-04986c5b9ac1
There are more details in the Token Endpoint documentation.
Security Considerations
binding_messagehelps users detect phishing or unsolicited requests.- Authentication requests are short-lived and one-time use.
- Rate-limit polling to respect the interval value.
Related Endpoints
- Token Endpoint – To retrieve tokens after authentication.
- Discovery Endpoint – Provides metadata.
Custom Scope Introspection Endpoint
Overview
The scope introspection is a custom endpoint that Authway supports.
Tokens (both ID token and access token) can become large when they contain many claims and there are good reasons for keeping them small. For access tokens one solution is to use reference token.
Another challenge with tokens is that their content often is static after the creation. This can become a problem especially for long-lived tokens. For user permissions this is often not desirableand the change must take effect before the lifetime of the token has expired.
Authway therefor exposes the scope introspection endpoint that allows an API (or client) to fetch both updated and new claims from the IdP.
Endpoint
The endpoint is advertised in the scope_introspection_endpoint in the metadata exposed by the discovery endpoint and typically is:
GET https://[BASE_URL]/connect/scope/introspect
Parameters (form-encoded)
| Parameter | Required | Description |
|---|---|---|
sub |
Yes | The unique identity of the user sub. |
scope |
Optional | Space-delimited list of scopes. If not passed Authway will return claims for the perms scope. Only identity scopes are allowed and not API scopes. |
tid |
Optional | The unique identity of the tenant. |
Authentication
- The API (or client) must authenticate (e.g., Basic Auth or in the body, with Api resource and
api_resource_secretorclient_idandclient_secret).
Response
A successful response is a JSON object containing user claims. Example:
{
   "sub": "6b3d5b7b-867b-4e34-98df-f1c8a9af37b9",
   "name": "Alice Adams",
   "given_name": "Alice",
   "family_name": "Adams",
   "preferred_username": "[email protected]",
   "email": "[email protected]",
   "email_verified": true
}
Usage Example
GET /connect/scope/introspect
Authorization: Basic base64(api_resource:api_resource_secret)

sub=6b3d5b7b-867b-4e34-98df-f1c8a9af37b9&scope=profile perms
Security Considerations
- APIs and Clients should request only the scopes they need (
profile,email,phone,perms) to avoid unnecessary data exposure. - Only clients will have configuration for allowed scopes, which effectivly means that an API resource can request any scopes.
Related Endpoints
- Token Endpoint – Issues tokens that may later be introspected.
- UserInfo Endpoint – Provides user claims associated with an Access Token.
Tokens
There are primarily two types of tokens related to identity; ID tokens and Access tokens.
ID Tokens
ID tokens are JSON web tokens (JWT) that an application uses to retrieve information about a user. You shouldn’t use ID tokens when calling an API.
Access Tokens
Access tokens are used when calling an API to prove that the bearer of the token is allowed to call the API and what parts of the API is allowed to be used by the consumer.
Special Tokens
Refresh tokens is a special token, used to renew an access token without forcing the user to re-authenticate.
Subsections of Tokens
ID Tokens
The ID Token is conceptually the same as an identity card, with information about a user packaged as a JWT token. It is used by the application (client) to identify the user as a result of an authentication. ID Tokens can be returned as a result when an application makes an OpenId Connect (OIDC) authentication request to the Identity Provider. The statements (called claims) of an ID Token are packaged in a simple JSON object (this is the Body of the JWT token).
  {
   "iss": "https://instance.irmciam.se",
   "sub": "f404a4ff-6037-4097-afa7-24b397239009",
   "tid": "d10a1624-6de7-4b50-b662-0f1cc6733edf",
   "aud": "APPLICATION CLIENT ID",
   "nonce": "VALUE",
   "exp": 1311281970,
   "iat": 1311280970,
   "auth_time": 1311280969,
   "amr": "pwd"
  }
An ID Token has these features:
- Asserts the identity of the user, called subject in OIDC and represented with a
subclaim. - Asserts the identity of the tenant, represented with a
tidclaim. This is not standardized or required in the protocol, but a claim that Authway always issues. - Specifies the issuing authority, represented with a
issclaim. - Is generated for a specific application, called client in OIDC and represented with a
audclaim. - Has an issue (
iatclaim) and expiration time (expclaim). - May contain other protocol claims like
- A
noncethat associates a client session with the token, which is used to mitigate replay attacks. - One or more authentication method reference (
amrclaim) that represents how the user was authenticated. There are standardized values that Authway uses if it exists.
- A
- May contain other claims about the user, like
nameandemail, depending on what scopes was requested.
The ID token header, claims JSON and signature are encoded into a base 64 URL-safe string, so it can easily be passed around.
Considerations to make for ID Tokens
What claims end up in the ID Token is controlled by passing Scopes to the Authorization endpoint. The openid scope is required when requesting an ID Token, but other can be requested to retrieve more information about the user. In Authway the openid scope contains the sub and tid claims.
When requesting many scopes the returned ID Token will contain many claims, which can result in a large ID Token. The size of the token can effect how good it is to keep in a cookie or other state for the client application. It is good to keep the token as small as possible. It is possible to request more information about the user from the UserInfo endpoint instead. The downside of that alternative is that it results in more network requests which can affect the latency of the application during sign-in.
Access Tokens
The Access Token is conceptually the same as an entrance ticket, with information about a user or application packaged as a JWT token or just a random string. It is used by a resource server (API) to allow the call or not and it should not be used by the client at all. A client should not pass the ID Token to the resource server.
The access tokens created by Authway is passed as Bearer tokens to the resource server. Authway supports two different types of access tokens that are configured per client:
- JWT tokens
- Reference tokens, which is just a random string. This random string is exchanged for token claims when the resource server uses the introspection endpoint. The resource server must identify itself when calling the introspection endpoint.
  {
   "iss": "https://instance.irmciam.se",
   "nbf": 1311277370,
   "iat": 1311280970,
   "exp": 1311281970,
   "client_id": "client",
   "jti": "44CE5DT8B9F8E7F2DCB231ED6C546BE8",
   "scope": "api1",
   "token_type": "access_token",
   "active": true
  }
An Access Token has these features:
- Specifies the issuing authority, represented with a
issclaim. - Is generated for a specific application, called client in OIDC and represented with a
client_idclaim. - Has an issue (
iatclaim) and expiration time (expclaim) as well as a not before time (nbfclaim). - A unique identifier of the token, represented with the
jticlaim. - The scope that the access token is inteended for. The resource server should validate the scope to be sure that the access token is inteended to be used for this resource (or not).
- May contain other claims about the user and/or client, like
nameandemail, depending on what claims are configured to be part of the scope.
In the case of introspection the returned claims will also have these features:
- A value indicating if the token is still valid, represented with the
activeclaim. - The type of token.
Refresh Tokens
Refresh tokens are used to retrieve a new access token for a user without requiring the user to interactively authenticate again. A refresh token is typically long-lived (from days up to a month is common), but they enable the creation of short-lived (from minutes to hours) access tokens. This is good from security perspective since anyone that is in possession of an access token is allowed to call API:s that the token has access too and by giving them a short life-time the consequence of a stolen access token is less than if it is long-lived.
Get a refresh token
It is easy for the application to request a refresh token, since all that is necessary is to add the offline_access scope to the scope parameter list when making the authorization request.
Since it is a privileged operation to use a refresh token, the client must be configured to allow offline access. In client administration it is also possible to configure for how long a refresh token is valid and other settings.
Use a refresh token
The refresh token is used to retrieve a new access token (and/or ID token) for a user without re-authenticating the user. This should be done a short while before the access token expires (and not each time you need an access token) so that you always have an access token that are valid when calling the API.
To get a new access token, the refresh token is send to the token endpoint and the result is a token response containing a new access token, its expiration and potentially a new refresh token.
POST /connect/token
    client_id=client&
    client_secret=secret&
    grant_type=refresh_token&
    refresh_token=the_refresh_token
Security Consideration
Refresh tokens are extremally valuable (because they are long-lived) and must be carefully protected by the clients that are allowed to use them.
Refresh Token Rotation
By default Authway rotates the refresh token on each usage so that the refresh token only can be used once. This reduces the attack surface because there is a chance that a stolen token becomes unusable before the attacker have used it.
Since this is the default configuration for a client, it is important that the client takes this in consideration when using the refresh token. The client is responsible to synchronize the renewal between threads (so the refresh token isn’t used multiple times) and since the second use of a refresh token will result in a response with status code 400, it is a risk that the client invalidates the user session.
For .NET developers we recommend you to use Duende Access Token Management which has support for many token management tasks.
Revoke Tokens
The revocation endpoint can be used to revoke access tokens (reference tokens only) and refresh tokens.
POST /connect/revocation HTTP/1.1
Host: instance.irmciam.se
Content-Type: application/x-www-form-urlencoded
Authorization: Basic czZCaGRSa3F0MzpnWDFmQmF0M2JW

token=...&token_type_hint=refresh_token
Explanation of the request parameters in the example:
- token must contain the token to revoke and is a required parameter.
- token_type_hint is an optional parameter with either
access_tokenorrefresh_token
The revocation endpoint is one way to sign-out a user with a backchannel call, but to do a full sign-out of a user it is better to use the End session endpoint which uses the browser to do the sign-out.
Login Hint Tokens
A login hint token is very different from the other tokens because it is created by the client (application) and not by the Authway. This token can be used to identify a user in different Single-sign-on scenarios or during Client Initiated Backchannel Authentication. The purpose of this token is to uniquely identify a user by the client to allow the Authway to sign-in the user in a better way.
Create a Login Hint Token
The login hint token must fullfil these requirements:
- A valid JWT token.
- Use the HS256 algorithm to sign the token.
- Hash the shared client secret with SHA256 and use a base64 encoded hashed value as key when signing the token.
- The issuer must be the client id that creates the SSO token.
- Include an audience claim with the Identity Provider as audience.
- Include an issued at (iat) claim with the time when the client created the SSO token.
- Include a sub claim with the unique identifier of the user that should be signed in. If the identity is not knwon to the client (typically in CIBA) other identifiers such as e-mail, phone number or a social security number can be included.
- Optionally include a tid claim. This is useful if the unique identifier is not known and passing it in the login hint token is an option to pass it in
acr_values.
Sample token (without signature):
{
  "alg": "HS256",
  "typ": "JWT"
}.
{
  "sub": "FEFC9E8B-062B-DF44-FDF0-39FC52AE2B58",
  "iat": 1674050819,
  "iss": "TestTrustedApp",
  "aud": "https://tenant.irmciam.se"
}
C# example of creating a SSO token
var subClaim = new Claim("sub", "FEFC9E8B-062B-DF44-FDF0-39FC52AE2B58"); //Get claim value from signed-in user
var clientId = "TestTrustedApp";
var clientSecret = "W7k1i3EvpYSApLj6CW7pYGkYsFTGdwJ96m0uIh64";
var authority = "https://tenant.irmciam.se";
var key = Encoding.ASCII.GetBytes(clientSecret.Sha256()); //= Client secret

var credentials = new SigningCredentials(new SymmetricSecurityKey(key), SecurityAlgorithms.HmacSha256Signature);

var tokenDescriptor = new SecurityTokenDescriptor {
    Subject = new ClaimsIdentity(new Claim[] { subClaim }),
    Issuer = clientId,
    IssuedAt = DateTime.UtcNow,
    Audience = authority,
    SigningCredentials = credentials
};

var tokenHandler = new JwtSecurityTokenHandler();

var token = (JwtSecurityToken)tokenHandler.CreateToken(tokenDescriptor);

var serializedToken = tokenHandler.WriteToken(token);
public static string Sha256(this string input)
{
if (input.IsMissing()) return string.Empty;
using (var sha = SHA256.Create())
{
var bytes = Encoding.UTF8.GetBytes(input);
var hash = sha.ComputeHash(bytes);
return Convert.ToBase64String(hash);
}
}Python example of creating a login hint token
This sample is still not verified.
This example uses of PyJWT (https://pyjwt.readthedocs.io/en/latest/usage.html).
import jwt
import base64
from hashlib import sha256

sub = "FEFC9E8B-062B-DF44-FDF0-39FC52AE2B58"
clientId = "TestTrustedApp"
clientSecret = "W7k1i3EvpYSApLj6CW7pYGkYsFTGdwJ96m0uIh64"
authority = "https://tenant.irmciam.se"
key = sha256(clientSecret.encode("utf-8"))
base64_bytes = base64.b64encode(key)
key = base64_bytes.decode("ascii")

payload = {"sub": sub, "iss": clientId, "aud": authority, "iat": 1674050819}

serializedToken = jwt.encode(payload, key, algorithm="HS256")
Integrations
Guides on integrating Authway with third-party services or your own applications.
Subsections of Integrations
Admin APIs
Everything that can be done in Admin UI (and a little bit more) can also be done through API calls. This makes it possible to embed administration into other applications and completely customize the UI for administration.
Some of the APIs are limited to a single tenant, for example it is only possible to handle users for a single tenant. The following API:s are bound to a tenant:
- Person
- Users
- Groups
- External systems
- Organisations (depending on permissions)
For external systems and users that have the special permission (manage organisations) to configure tenants it is possible to control which tenant each API call should be handled for by passing the X-IRM-TenantId HTTP Header with the unique identity (UUID) as value.
Within the Users APIs there are special /me endpoints which requires an access token of an actual end-user to be used. Since they represent an actual user, there is no need to pass any Tenant Id.
All other APIs are configuration APIs and instead requires very specific permissions to be used.
Important information about the unique identifiers (GUID:s)
Many APIs allows you to pass a unique identifier in the form of a GUID (UUID), but we recommend you to not do that and instead let Authway create an optimized Id, which is returned in all responses to create APIs. If you need to pass the Id from your code we strongly recommend you to use an algorithm that creates identifiers optimized for the underlying database, or else the performance of the system will be negatively impacted. We can provide you with such algorithm for SQL Server.
Errors from the APIs
We try to use reasonable status codes for different situations in the API. When we return a body with error information, the body follows the Problem Details for HTTP APIs (RFC 7807) standard.
| Status Code | Description | Details |
|---|---|---|
| 400 | Errors in the provided data. | This will always have a problem details body with more information about the error. |
| 401 | Failed to authenticate the call. | |
| 403 | The user or client calling the API is missing the required permission. | |
| 404 | The URL is not matching any API or the id:s in the URL does not match any existing object. | This will often have a problem details body with more information about the error. |
| 500 | An internal server error. | Of course we make our best to not end up with a 500 error, but it could for example be a dead lock situation or that we for some reason couldn’t reach the database at all and so on. |
| 501 | Not implemented or supported. | Very uncommon, but there are scenarios where you can call the API with values that are not incorrect, but still not supported. Another situation is when trying to use an API for a feature that is not part of the bought service. In those cases, we have chosen to give a 501 instead of a 400. This could happen during development, but should never be a case in production if the consumption of the API have been tested correctly, but 400 errors could exist in production and be caused by end-user data. |
| 503 | Infrastructure problem. Most likely temporarily. |
Subsections of Admin APIs
Deprecated APIs
Below is a list of APIs that will be deleted in a future version together with suggestion what to do (if there are any).
2026-02-16
- api/users/picture, will not be supported in future versions.
2025-04-01
- api/users/{username}, use api/users/lookup?username={username} instead. The new operation is more flexible since it allows you to include multiple usernames to get up to 40 users in one call.
2024-10-05
- api/tenants/{tenantId}/modules/{moduleId}/buy is replaced with api/tenants/{tenantId}/modules/{moduleId}/activate
- api/users/{userId}/invitationlink resp. api/users/{userId}/resetlink will retire
{ "initationLink"="https://....." }respectively{ "resetLink"="https://....." }and instead now use a shared model:
{
    "link"="https://....."
    "validTime"="3.00:00:00"
}
2024-07-10 (removed from 1.2.139, 2024-10-16)
This is a breaking change and we have contacted each customer to ensure a quick timeline until this is fixed.
- api/persons will be bound to the current user tenant (or the tenant in HTTP header X-IRM-TenantId). Instead the CreatePersonViewModel contained a TenantId which is still there for compatibility reasons, but should not be used anymore.
2023-05-15 (removed from verison 1.2.110, 2024-09-23)
- api/tenants/{tenantId}/module is replaced with api/tenants/{tenantId}/modules
- api/group/* is replaced with api/groups/*
- api/groups/{groupId}/user is replaced with api/groups/{groupId}/users
OAS 3.0
Events API
Authway has events for many of the things that happens in the service. You can tap into these events and write your own logic by registering a webhook or by using our Event API. Note that webhook feature is only available in the Enterprise edition of the service.
Common Properties in all events
Each event payload also contains properties unique to the event. You can find the unique properties in the individual event documentation.
| Name | Type | Description |
|---|---|---|
| AggregateId | UUID | The unique identifier of the aggregate (information entity) that the event happended for. |
| OwnerId | UUID | The unique identifier of the owner (tenant) that the event belongs to. |
| EventId | UUID | The unique identifier for the event. Can be used for idempotency, logging and more. |
| Occured | DateTime | The date and time (in UTC) when the event occurred. |
| CausedByPersonId | UUID | The unique identifier of the user that caused the event (if any). |
| CausedBy | string | The name of the user that caused the event (if any). |
| TraceId | string | The trace id that can be used to trace different actions that is going on in a system. |
IpAddressLocation Properties
Depending on environment and configuration some events will include location information based on the IP address. Sources for this information can also be different when hosting your-self compared to Authway IDaaS.
| Name | Type | Description |
|---|---|---|
| CountryCode | string | The two-letter country code (3166-1) representing the country. |
| Country | string | The name of the country. |
| Region | string | The name of the region. |
| City | string | The name of the city. |
| Latitude | decimal | The latitude. |
| Longitude | decimal | The longitude. |
When an IpAddressLocaiton exist in the event, we garuantee that the CountryCode and Country is set, but the other properties will depend on information availability in the source.
Available Events
Organisation Events
To retrieve all organisation events you use the topic “organisation”.
- OrganisationCreated
- OrganisationUpdated
- OrganisationDeleted
- OrganisationClaimAdded
- OrganisationClaimRemoved
- TrustedDomainAdded
- TrustedDomainRemoved
Person Events
To retrieve all organisation events you use the topic “person”.
User Events
To retrieve all organisation events you use the topic “user”.
- UserCreated
- UserUpdated
- UserDeleted
- UserInvited
- UserLoginAdded
- UserLoginRemoved
- UserUsernameChanged
- UserPasswordChanged
- UserPasswordRemoved
- UserRoleAdded
- UserRoleRemoved
- UserSignInAssociated
- UserSignedIn
- UserSignedOut
- UserSignInFailed
- UserLockedout
- UserUnlocked
- UserConfirmedEmail
- UserConfirmedPhoneNumber
- UserClaimAdded
- UserClaimRemoved
Organisation module Events
To retrieve all organisation module events you use the topic “organisationmodule”.
- ModuleActivatedForOrganisation
- ModuleInactivatedForOrganisation
- ModulePayedForOrganisation
- ModuleUnpayedForOrganisation
Module Events
To retrieve all module events you use the topic “module”.
Subsections of Events API
Organisation Events
Subsections of Organisation Events
OrganisationClaimAdded
An organisation got an organisation claim added. To retrieve only this event you use the topic “organisation/irm.aspnetcore.identity.events.organisationclaimadded”.
| Name | Type | Description |
|---|---|---|
| AggregateId | UUID | The unique identifier of the organisation. |
| ClaimType | string | The type of claim. |
| ClaimValue | string | The claim value. |
OrganisationClaimRemoved
An organisation got an organisation claim removed. To retrieve only this event you use the topic “organisation/irm.aspnetcore.identity.events.organisationclaimremoved”.
| Name | Type | Description |
|---|---|---|
| AggregateId | UUID | The unique identifier of the organisation. |
| ClaimType | string | The type of claim. |
| ClaimValue | string | The claim value. |
OrganisationCreated
An organisation is created. It is a new tenant if the ParendId does not have any value (and GroupMotherId and AggregateId is equal). To retrieve only this event you use the topic “organisation/irm.aspnetcore.identity.events.organisationcreated”.
| Name | Type | Description |
|---|---|---|
| AggregateId | UUID | The unique identifier of the organisation. |
| GroupMotherId | UUID | The id of the group mother (root organisation) in the organisation tree. For the group mother, this value will be the same as Id. |
| ParentId | UUID | The identity of this tenants parent, if any. |
| Name | string | The name of the organisation |
| IdentityNumber | string | The identity number for the organisation. |
TrustedDomainRemoved
An organisation got a trusted domain removed. To retrieve only this event you use the topic “organisation/irm.aspnetcore.identity.events.trusteddomainremoved”.
| Name | Type | Description |
|---|---|---|
| AggregateId | UUID | The unique identifier of the organisation. |
| Domain | string | The domain that was removed. |
TrustedDomainAdded
An organisation got a trusted domain added. To retrieve only this event you use the topic “organisation/irm.aspnetcore.identity.events.trusteddomainadded”.
| Name | Type | Description |
|---|---|---|
| AggregateId | UUID | The unique identifier of the organisation. |
| Domain | string | The domain that was added. |
OrganisationUpdated
An organisation is updated. To retrieve only this event you use the topic “organisation/irm.aspnetcore.identity.events.organisationupdated”.
| Name | Type | Description |
|---|---|---|
| AggregateId | UUID | The unique identifier of the organisation. |
| Name | string | The name of the organisation |
| IdentityNumber | string | The identity number for the organisation. |
OrganisationDeleted
An organisation is deleted. To retrieve only this event you use the topic “organisation/irm.aspnetcore.identity.events.organisationdeleted”.
| Name | Type | Description |
|---|---|---|
| AggregateId | UUID | The unique identifier of the organisation. |
Person Events
Subsections of Person Events
PersonCreated
A person is created. It is common for UserCreated to be created at the same time, but it is possible to create a person who are not a user. To retrieve only this event you use the topic “person/irm.aspnetcore.identity.events.personcreated”.
| Name | Type | Description |
|---|---|---|
| AggregateId | UUID | The unique identifier of the person. |
| OrganisationId | UUID | The id of the organisation that the person is added to. |
| FirstName | string | The first (given) name of the person. |
| LastName | string | The last (family) name of the person. |
| string | The email for the person. This can be a different email than the username and/or user email. |
PersonDeleted
A person is deleted. When a person is deleted, so is all user and person events for that person. The metadata is preserved, but no payload data will be available again. To retrieve only this event you use the topic “person/irm.aspnetcore.identity.events.persondeleted”.
| Name | Type | Description |
|---|---|---|
| AggregateId | UUID | The unique identifier of the person. |
PersonUpdated
A person is updated. To retrieve only this event you use the topic “person/irm.aspnetcore.identity.events.personupdated”.
| Name | Type | Description |
|---|---|---|
| AggregateId | UUID | The unique identifier of the person. |
| OrganisationId | UUID | The id of the organisation that the person belongs to. |
| FirstName | string | The first (given) name of the person. |
| LastName | string | The last (family) name of the person. |
| string | The email for the person. This can be a different email than the username and/or user email. |
User Events
- UserCreated
- UserActivated
- UserUpdated
- UserUsernameChanged
- UserDeleted
- UserDeviceAdded
- UserDeviceCountryAdded
- UserInvited
- UserLoginAdded
- UserLoginRemoved
- UserPasswordAdded
- UserPasswordChanged
- UserPasswordRemoved
- UserRoleAdded
- UserRoleRemoved
- UserSignInAssociated
- UserSignedIn
- UserSignedOut
- UserSignInFailed
- UserLockedout
- UserUnlocked
- UserDeactivated
- UserReactivated
- UserConfirmedEmail
- UserConfirmedPhoneNumber
Subsections of User Events
UserCreated
A user is created. This can happen multiple times for the same user id, since it is possible to delete only the user and then re-create the user. To retrieve only this event you use the topic “user/irm.aspnetcore.identity.events.usercreated”.
| Name | Type | Description |
|---|---|---|
| AggregateId | UUID | The unique identifier of the user (always the same as the person id for end-users). |
| Username | string | The username which is unique within the tenant, but can exists for multiple tenants. |
| string | The email address of the user. This is typically the same as Username, but the service can be configured to use PhoneNumber or any username and in thoose cases it can differ. | |
| EmailConfirmed | bool | True if the email is confirmed; otherwise false. |
| PhoneNumber | string | The phone number of the user. In a default configuration phone number is not visible and collected, so it is common for this to be null. |
| PhoneNumberConfirmed | string | True if the phone number is confirmed; otherwise false. |
| ValidFrom | DateTime | The date and time (in UTC) when the user is valid (aka the earliest point in time when the user is allowed to sign-in). |
| ValidTo | DateTime | The date and time (in UTC) when the user is valid (aka the latest point in time when the user is allowed to sign-in). Commonly null. |
| IsSystemUser | bool | True if this user represents a system (aka an external system); otherwise false. |
| SendInvitation | bool | True if an invitation will be send to the user; otherwise false. |
| AdditionalInvitationParameters | string | Additional parameters that should be added to the invitation link. Typically it can contain for example a client id to brand the create account page for a specific client. |
| FromIpAddress | string | The IP Address of the user (or service) that caused the event. |
| IpAddressLocation | IpAddressLocation | Ip address information if available. |
| UserAgent | string | The user agent string from the browser (or service) that caused the event. |
| Metadata | dynamic | A dynamic object with additional data for the event. |
UserActivated
A user account have been activated, which can be immediately or at Valid from. To retrieve only this event you use the topic “user/irm.aspnetcore.identity.events.useractivated”.
| Name | Type | Description |
|---|---|---|
| AggregateId | UUID | The unique identifier of the user (always the same as the person id for end-users). |
Note that there can be a delay until the event is pushed, but it will always be pushed in correct order.
UserUpdated
A user is updated. To retrieve only this event you use the topic “user/irm.aspnetcore.identity.events.userupdated”.
| Name | Type | Description |
|---|---|---|
| AggregateId | UUID | The unique identifier of the user (always the same as the person id for end-users). |
| Username | string | Obsolete.Use UserUsernameChanged event to handle changes of the username instead. |
| string | The email address of the user. This is typically the same as Username, but the service can be configured to use PhoneNumber or any username and in thoose cases it can differ. | |
| EmailConfirmed | bool | True if the email is confirmed; otherwise false. |
| PhoneNumber | string | The phone number of the user. In a default configuration phone number is not visible and collected, so it is common for this to be null. |
| PhoneNumberConfirmed | string | True if the phone number is confirmed; otherwise false. |
| ValidFrom | DateTime | The date and time (in UTC) when the user is valid (aka the earliest point in time when the user is allowed to sign-in). |
| ValidTo | DateTime | The date and time (in UTC) when the user is valid (aka the latest point in time when the user is allowed to sign-in). Commonly null. |
| FromIpAddress | string | The IP Address of the user (or service) that caused the event. |
| IpAddressLocation | IpAddressLocation | Ip address information if available. |
| UserAgent | string | The user agent string from the browser (or service) that caused the event. |
| Metadata | dynamic | A dynamic object with additional data for the event. |
UserUsernameChanged
The username of a user is changed. To retrieve only this event you use the topic “user/irm.aspnetcore.identity.events.userusernamechanged”.
| Name | Type | Description |
|---|---|---|
| AggregateId | UUID | The unique identifier of the user (always the same as the person id for end-users). |
| Username | string | The username which is unique within the tenant, but can exists for multiple tenants. |
| FromIpAddress | string | The IP Address of the user (or service) that caused the event. |
| IpAddressLocation | IpAddressLocation | Ip address information if available. |
| UserAgent | string | The user agent string from the browser (or service) that caused the event. |
| Metadata | dynamic | A dynamic object with additional data for the event. |
UserDeleted
A user is deleted. The user can be deleted, without deleting the person, which also results in that it is possible to re-create the user with the same id. To retrieve only this event you use the topic “user/irm.aspnetcore.identity.events.userdeleted”.
| Name | Type | Description |
|---|---|---|
| AggregateId | UUID | The unique identifier of the user (always the same as the person id for end-users). |
UserDeviceAdded
An user signed in from a new device. To retrieve only this event you use the topic “user/irm.aspnetcore.identity.events.userdeviceadded”.
| Name | Type | Description |
|---|---|---|
| AggregateId | UUID | The unique identifier of the user (always the same as the person id for end-users). |
| DeviceId | string | The unique identifier of the device. |
| FromIpAddress | string | The IP Address of the user that caused the event. |
| IpAddressLocation | IpAddressLocation | Ip address information if available. |
UserDeviceCountryAdded
An user signed in from a known device, but a new country. To retrieve only this event you use the topic “user/irm.aspnetcore.identity.events.userdevicecountryadded”.
| Name | Type | Description |
|---|---|---|
| AggregateId | UUID | The unique identifier of the user (always the same as the person id for end-users). |
| DeviceId | string | The unique identifier of the device. |
| FromIpAddress | string | The IP Address of the user that caused the event. |
| IpAddressLocation | IpAddressLocation | Ip address information if available. |
UserInvited
A user is invited to create an account. To retrieve only this event you use the topic “user/irm.aspnetcore.identity.events.userinvited”.
| Name | Type | Description |
|---|---|---|
| AggregateId | UUID | The unique identifier of the user (always the same as the person id for end-users). |
| FromIpAddress | string | The IP Address of the user (or service) that caused the event. |
| IpAddressLocation | IpAddressLocation | Ip address information if available. |
| UserAgent | string | The user agent string from the browser (or service) that caused the event. |
| Metadata | dynamic | A dynamic object with additional data for the event. |
UserLoginAdded
An user added an external login to the account. To retrieve only this event you use the topic “user/irm.aspnetcore.identity.events.userloginadded”.
| Name | Type | Description |
|---|---|---|
| AggregateId | UUID | The unique identifier of the user (always the same as the person id for end-users). |
| LoginProvider | string | The login provider added. |
| FromIpAddress | string | The IP Address of the user (or service) that caused the event. |
| IpAddressLocation | IpAddressLocation | Ip address information if available. |
| UserAgent | string | The user agent string from the browser (or service) that caused the event. |
| Metadata | dynamic | A dynamic object with additional data for the event. |
UserLoginRemoved
An user removed an external login from the account. To retrieve only this event you use the topic “user/irm.aspnetcore.identity.events.userloginremoved”.
| Name | Type | Description |
|---|---|---|
| AggregateId | UUID | The unique identifier of the user (always the same as the person id for end-users). |
| LoginProvider | string | The login provider removed. |
| FromIpAddress | string | The IP Address of the user (or service) that caused the event. |
| IpAddressLocation | IpAddressLocation | Ip address information if available. |
| UserAgent | string | The user agent string from the browser (or service) that caused the event. |
| Metadata | dynamic | A dynamic object with additional data for the event. |
UserPasswordAdded
An user added a password. To retrieve only this event you use the topic “user/irm.aspnetcore.identity.events.userpasswordadded”.
| Name | Type | Description |
|---|---|---|
| AggregateId | UUID | The unique identifier of the user (always the same as the person id for end-users). |
| FromIpAddress | string | The IP Address of the user (or service) that caused the event. |
| IpAddressLocation | IpAddressLocation | Ip address information if available. |
| UserAgent | string | The user agent string from the browser (or service) that caused the event. |
| Metadata | dynamic | A dynamic object with additional data for the event. |
UserPasswordChanged
An user changed the password. To retrieve only this event you use the topic “user/irm.aspnetcore.identity.events.userpasswordchanged”.
| Name | Type | Description |
|---|---|---|
| AggregateId | UUID | The unique identifier of the user (always the same as the person id for end-users). |
| FromIpAddress | string | The IP Address of the user (or service) that caused the event. |
| IpAddressLocation | IpAddressLocation | Ip address information if available. |
| UserAgent | string | The user agent string from the browser (or service) that caused the event. |
| Metadata | dynamic | A dynamic object with additional data for the event. |
UserPasswordRemoved
An user removed the password from the account. To retrieve only this event you use the topic “user/irm.aspnetcore.identity.events.userpasswordremoved”.
| Name | Type | Description |
|---|---|---|
| AggregateId | UUID | The unique identifier of the user (always the same as the person id for end-users). |
| FromIpAddress | string | The IP Address of the user (or service) that caused the event. |
| IpAddressLocation | IpAddressLocation | Ip address information if available. |
| UserAgent | string | The user agent string from the browser (or service) that caused the event. |
| Metadata | dynamic | A dynamic object with additional data for the event. |
UserRoleAdded
A user is added to a role. To retrieve only this event you use the topic “user/irm.aspnetcore.identity.events.userroleadded”.
| Name | Type | Description |
|---|---|---|
| AggregateId | UUID | The unique identifier of the user (always the same as the person id for end-users). |
| NormalizedRoleName | string | The unique and normalized role name that the user was added to. |
| FromIpAddress | string | The IP Address of the user (or service) that caused the event. |
| IpAddressLocation | IpAddressLocation | Ip address information if available. |
| UserAgent | string | The user agent string from the browser (or service) that caused the event. |
| Metadata | dynamic | A dynamic object with additional data for the event. |
UserRoleRemoved
A user is removed from a role. To retrieve only this event you use the topic “user/irm.aspnetcore.identity.events.userroleremoved”.
| Name | Type | Description |
|---|---|---|
| AggregateId | UUID | The unique identifier of the user (always the same as the person id for end-users). |
| NormalizedRoleName | string | The unique and normalized role name that the user was removed from. |
| FromIpAddress | string | The IP Address of the user (or service) that caused the event. |
| IpAddressLocation | IpAddressLocation | Ip address information if available. |
| UserAgent | string | The user agent string from the browser (or service) that caused the event. |
| Metadata | dynamic | A dynamic object with additional data for the event. |
UserSignInAssociated
A user has associated a sign-in from an invitation to create an account. This also means that the email address is confirmed. To retrieve only this event you use the topic “user/irm.aspnetcore.identity.events.usersigninassociated”.
| Name | Type | Description |
|---|---|---|
| AggregateId | UUID | The unique identifier of the user (always the same as the person id for end-users). |
| AuthenticationMethod | string | The type of authentication that the user used when associating an authentication method. |
| FromIpAddress | string | The IP Address of the user (or service) that caused the event. |
| IpAddressLocation | IpAddressLocation | Ip address information if available. |
| UserAgent | string | The user agent string from the browser (or service) that caused the event. |
| Metadata | dynamic | A dynamic object with additional data for the event. |
UserSignedIn
A user signed in. To retrieve only this event you use the topic “user/irm.aspnetcore.identity.events.usersignedin”.
| Name | Type | Description |
|---|---|---|
| AggregateId | UUID | The unique identifier of the user (always the same as the person id for end-users). |
| Kind | int | Indicates what kind of situation that caused the event. Can be one of these values: 0. Interactive sign-in where user is fully aware; 1. Automatic sign-in where the user is signed-in automatically by single-sign-on; 2. Refresh where an application uses a refresh token to re-new the user sign-in; 3. Impersonate which is when another user impersonates the user. |
| AuthenticationRequirement | string | The requirment of the authentication process for the user, for example “1FA” or “2FA”. This will only be set when Kind is 0 or 3. |
| AuthenticationMethod | string | The type of authentication that the user used when signing in. This will only be set when Kind os 0 or 3. |
| FromIpAddress | string | The IP Address of the user (or service) that caused the event. When kind is 2 (Refresh) this will be the IP Address of the server, not the user, since it is performed over a backchannel. |
| IpAddressLocation | IpAddressLocation | Ip address information if available. |
| UserAgent | string | The user agent string from the browser (or service) that caused the event. Will be the user’s web browser user agent for all Kind except when Kind = 2 (Refresh) which happens in a backchannel. |
| Metadata | dynamic | A dynamic object with additional data for the event. |
More about Metadata
Metadata is a dynamic object that can contain different extra properties that might vary on Kind, protocol used or other factors.
When the event occurs as a result of using OpenId Connect it will include these:
| Name | Type | Description |
|---|---|---|
| ClientId | string | The unique identifier of the client that asked to sign-in the user. |
| ClientName | string | The name of the client that asked to sign-in the user. |
The JSON will be like this:
{
   ...
   metadata: {
      clientId: "UniqueClientId",
      clientName: "The perfect client"
   }
}
When the event occurs as a result of a user impersonating another user it will include these:
| Name | Type | Description |
|---|---|---|
| ImpersonatedByUserId | UUID | The unique identity of the user impersonating the user. |
The JSON will be like this:
{
   ...
   metadata: {
      impersonatedByUserId: "UniqueUserId",
   }
}
UserSignedOut
An user signed out. This event only happens when a user activly signs out, and not because of a timeout of a valid sign-in. To retrieve only this event you use the topic “user/irm.aspnetcore.identity.events.usersignedout”.
| Name | Type | Description |
|---|---|---|
| AggregateId | UUID | The unique identifier of the user (always the same as the person id for end-users). |
| FromIpAddress | string | The IP Address of the user (or service) that caused the event. |
| IpAddressLocation | IpAddressLocation | Ip address information if available. |
| UserAgent | string | The user agent string from the browser (or service) that caused the event. |
| Metadata | dynamic | A dynamic object with additional data for the event. |
UserSignInFailed
An user failed to sign in. To retrieve only this event you use the topic “user/irm.aspnetcore.identity.events.usersigninfailed”.
| Name | Type | Description |
|---|---|---|
| AggregateId | UUID | The unique identifier of the user (always the same as the person id for end-users). |
| FromIpAddress | string | The IP Address of the user (or service) that caused the event. |
| IpAddressLocation | IpAddressLocation | Ip address information if available. |
| UserAgent | string | The user agent string from the browser (or service) that caused the event. |
| Metadata | dynamic | A dynamic object with additional data for the event. |
| Reason | numeric | One of the following values indicating the reason to why the sign-in failed: 0. Invalid credentials, 1. Locked-out user, 2. Inactive user, 3. Impossible travel, 4. Module not activated for tenant or 5. Module is offline. |
| BreachedPasswordUsed | bool | true if a breached password have been used for this failed sign-in; otherwise false. If password wasn’t used or if breach detection is not configured this will be null. |
UserLockedout
A user account have been locked (commonly because to many sing-in attempts). To retrieve only this event you use the topic “user/irm.aspnetcore.identity.events.userlockedout”.
| Name | Type | Description |
|---|---|---|
| AggregateId | UUID | The unique identifier of the user (always the same as the person id for end-users). |
| FromIpAddress | string | The IP Address of the user (or service) that caused the event. |
| IpAddressLocation | IpAddressLocation | Ip address information if available. |
| UserAgent | string | The user agent string from the browser (or service) that caused the event. |
| Metadata | dynamic | A dynamic object with additional data for the event. |
UserUnlocked
A user account have been un-locked. To retrieve only this event you use the topic “user/irm.aspnetcore.identity.events.userunlocked”.
| Name | Type | Description |
|---|---|---|
| AggregateId | UUID | The unique identifier of the user (always the same as the person id for end-users). |
| FromIpAddress | string | The IP Address of the user (or service) that caused the event. |
| IpAddressLocation | IpAddressLocation | Ip address information if available. |
| UserAgent | string | The user agent string from the browser (or service) that caused the event. |
| Metadata | dynamic | A dynamic object with additional data for the event. |
UserDeactivated
A user account have been de-activated, which is at Valid to. To retrieve only this event you use the topic “user/irm.aspnetcore.identity.events.userdeactivated”.
| Name | Type | Description |
|---|---|---|
| AggregateId | UUID | The unique identifier of the user (always the same as the person id for end-users). |
Note that there can be a delay until the event is pushed, but it will always be pushed in correct order.
UserReactivated
A user account have been activated again after beeing de-activated, which can be immediately or at Valid from. To retrieve only this event you use the topic “user/irm.aspnetcore.identity.events.userreactivated”.
| Name | Type | Description |
|---|---|---|
| AggregateId | UUID | The unique identifier of the user (always the same as the person id for end-users). |
Note that there can be a delay until the event is pushed, but it will always be pushed in correct order.
UserConfirmedEmail
An user confirmed the email address. To retrieve only this event you use the topic “user/irm.aspnetcore.identity.events.userconfirmedemail”.
| Name | Type | Description |
|---|---|---|
| AggregateId | UUID | The unique identifier of the user (always the same as the person id for end-users). |
| FromIpAddress | string | The IP Address of the user (or service) that caused the event. |
| IpAddressLocation | IpAddressLocation | Ip address information if available. |
| UserAgent | string | The user agent string from the browser (or service) that caused the event. |
| Metadata | dynamic | A dynamic object with additional data for the event. |
UserConfirmedPhoneNumber
An user confirmed the phone number. To retrieve only this event you use the topic “user/irm.aspnetcore.identity.events.userconfirmedphonenumber”.
| Name | Type | Description |
|---|---|---|
| AggregateId | UUID | The unique identifier of the user (always the same as the person id for end-users). |
| FromIpAddress | string | The IP Address of the user (or service) that caused the event. |
| IpAddressLocation | IpAddressLocation | Ip address information if available. |
| UserAgent | string | The user agent string from the browser (or service) that caused the event. |
| Metadata | dynamic | A dynamic object with additional data for the event. |
Organisation module Events
Subsections of Organisation module Events
ModuleActivatedForOrganisation
An organisation got a module activated. To retrieve only this event you use the topic “organisation/irm.aspnetcore.identity.events.moduleactivatedfororganisation”.
| Name | Type | Description |
|---|---|---|
| AggregateId | UUID | The unique identifier of the activated module and organisation combination. |
| OwnerId | UUID | The unique identifier of the organisation. |
| ModuleId | UUID | The unique identifier of the module. |
ModuleInactivatedForOrganisation
An organisation got a module in-activated. To retrieve only this event you use the topic “organisation/irm.aspnetcore.identity.events.moduleinactivatedfororganisation”.
| Name | Type | Description |
|---|---|---|
| AggregateId | UUID | The unique identifier of the in-activated module and organisation combination. |
| OwnerId | UUID | The unique identifier of the organisation. |
| ModuleId | UUID | The unique identifier of the module. |
ModulePayedForOrganisation
An organisation got a module set as payed (after beeing unpayed). To retrieve only this event you use the topic “organisation/irm.aspnetcore.identity.events.modulepayedfororganisation”.
| Name | Type | Description |
|---|---|---|
| AggregateId | UUID | The unique identifier of the payed module and organisation combination. |
| OwnerId | UUID | The unique identifier of the organisation. |
| ModuleId | UUID | The unique identifier of the module. |
ModuleUnpayedForOrganisation
An organisation got a module set as un-payed (the effect is that users from that organisation can’t sign-in until set as payed again). To retrieve only this event you use the topic “organisation/irm.aspnetcore.identity.events.moduleunpayedfororganisation”.
| Name | Type | Description |
|---|---|---|
| AggregateId | UUID | The unique identifier of the unpayed module and organisation combination. |
| OwnerId | UUID | The unique identifier of the organisation. |
| ModuleId | UUID | The unique identifier of the module. |
Module Events
Subsections of Module Events
ModuleWentOffline
A module went offline. To retrieve only this event you use the topic “module/irm.aspnetcore.identity.events.modulewentoffline”.
| Name | Type | Description |
|---|---|---|
| AggregateId | UUID | The unique identifier of the module. |
ModuleWentOnLine
A module went online. To retrieve only this event you use the topic “module/irm.aspnetcore.identity.events.modulewentonline”.
| Name | Type | Description |
|---|---|---|
| AggregateId | UUID | The unique identifier of the module. |
FunctionalityDeleted
A functionality is deleted. When a functionality is deleted, the permission is also deleted from Group templates, Groups and External Systems. To retrieve only this event you use the topic “module/irm.aspnetcore.identity.events.functionalitydeleted”.
| Name | Type | Description |
|---|---|---|
| AggregateId | UUID | The unique identifier of the module. |
| FunctionalityId | UUID | The unique identifier of the funcitonality. |
| Permission | string | The unique identifier of the permission. |
Webhooks
Authway uses webhooks to automatically notify your application any time certain changes happens in Authway.
Webhooks can be set up per event stream, where a stream is responding to a major information object for examples person, user or organisation. It is possible to set up multiple webhooks for a single stream and naturally it is possible to set up webhooks for different streams. The webhooks are grouped in a webhook system. The webhook system will typically be one for the consuming application. If one webhook is failing for a system, all webhooks for that system is stopped, which can affect how you choose to group your webhooks.
By default you will only be able to receive events that is owned by the same tenant as the Webhook is registered for.
Handling events
Choose event to recieve
When configuring a webhook, you can use the API to choose which events will send you payloads. This is done by setting a topic to the stream or a specific event. Only subscribing to the specific events you plan on handling limits the number of HTTP requests to your application. You can also subscribe to all current and future events. By default, webhooks are only subscribed to the future events. You can change the topic at any time, but for an existing webhook, it will only affect future events.
Advanced Topics
A topic is flexible and you can combine more than one “thing” in a topic by separating each identifier with “,”. For example:
| Topic | Description |
|---|---|
| person, user/irm.aspnetcore.identity.events.usersignedin | All events for person and UserSignedIn event. |
| user/irm.aspnetcore.identity.events.usersignedin, user/irm.aspnetcore.identity.events.usersignedout, user/irm.aspnetcore.identity.events.usersigninfailed | The three events UserSignedIn, UserSignedOut and UserSigninFailed. |
| person, user | All events for both person and user. |
Respond immediately to events
When receiving an event to your webhook, it is strongly recommended to respond with a 200 Ok (or another 2XX status code) as quickly as possible. Failing to do so might trigger re-tries which can increase the load of your application more than necessary.
A common pattern to handle webhook events effectivly is to add the event body on a message queue and immediately respond with a success status code. The internal queue can then be processed by a background worker.
Re-tries of failed events
For a configured webhook we guarantee that subscribed events are delivered at least once and in correct order (per webhook). If we get a timeout, a network failure or if we receive a response with status code 408 or any 5XX we’ll retry to send the payload again. Authway uses an exponential backoff scheme when doing re-tries and if all re-tries fails the webhook system will stopped. When this happens we will notify you by the registered e-mail address. It is your responsibility to re-start a stopped webhook system when your application is ready to handle the events again.
If Authway is causing the failure, we will also re-start the webhook system after we have corrected the issue.
Ignoring duplicate events
It is possible to receive the same event more than once, so we recommends that you handle webhook events using idempotent operations. One way of doing this is logging the EventId of the events that you have processed and ignoring subsequent requests with the same EventId.
Order of events
Authway guarantees that events within a webhook is delivered in the same sequence that they are happening. Between webhooks there are no guarantees of ordering, so your logic should handle cases where events are delivered out of order. If you create separate webhook systems, the ordering of the events between these systems is also not guaranteed.
Securing webhooks
Validating events are from Authway
Since the webhook receiver is available on the public Internet it is very important that you validate the incoming request before processing it. We recommend that you start by checking that all three custom HTTP headers are available. From security perspective the X-IRM-Signature header is the important one. Use your secret (that you used during registration) to calculate a HMAC-SHA256 signature of the received body.
C#:
using System;
using System.Security.Cryptography;
using System.Text;

class WebhookSignature
{
   public static string ComputeSignature(string data, string secret)
   {
       HMACSHA256 hmac = new HMACSHA256(Encoding.UTF8.GetBytes(secret));
       byte[] stringBytes = Encoding.UTF8.GetBytes(data);
       byte[] hashedValue = hmac.ComputeHash(stringBytes);
       return Convert.ToBase64String(hashedValue);
   }

   public static void Main (string[] args)
   {
       Console.WriteLine(ComputeSignature("messageBody", "apikey"));
   }
}
PHP:
function compute_signature($data, $secret) {
    return base64_encode(hash_hmac('sha256', $data, $secret, true));
}

echo(compute_signature('messageBody','apikey'));
Require authentication
Authway supports Basic authentication when calling your webhook. You provide the username and password when registering the webhook.
Obfuscating webhook URL
A minor improvment in the security of webhooks is to make the endpoints harder to guess. This can be done by adding a series of random numbers and letters to your endpoint URL. For example https://api.yourapplication.com/webhooks/j490smlkfs034jld94jlae045 is harder to guess than https://api.yourapplication.com/webhooks.
Testing Webhooks
It is not necessary for you to immediately create och deploy a service that can receive webhook payloads. Instead we recommend you to start with ay of the service on Internet that allows you to receive HTTP POST calls, for example https://webhook.site/. That service makes it really easy to get something up and running, and you can easily see the webhook payload directly in your browser.
To start receiving webhooks you must first start (activate) the webhook system by calling api/systems/{systemId}/start. Trigger some events in the source system and you should soon see POST arriving in the browser.
You can also stop the pushing of new events by calling api/systems/{systemId}/stop. If you want to simulate that the system have been stopped because of a failure you can use the same API. Use the source system to create some more events and then start the system again, and you should see all events be posted until it catches up to the last existing event.
You can also get information about the last date/time and event id that have been successfully posted to your webhook by making a get request to api/systems/{systemId}.
Exposing your Local Machine to the Internet
Since all webhooks are pushed over Internet, you’ll have to expose your local machine somehow, if you want to receive webhooks during development. We recommend that you use for example Ultrahook or ngrok to do that.
After configuring a service you’ll have to reconfigure your webhook system to receive payloads on your new URL.
Subsections of Webhooks
Webhook Events and Payload
Webhook Events and Payload
Webhook Common Properties in the Payload
Each webhook event payload also contains properties unique to the event. You can find the unique properties in the individual event documentation.
| Name | Type | Description |
|---|---|---|
| AggregateId | UUID | The unique identifier of the aggregate (information entity) that the event happended for. |
| OwnerId | UUID | The unique identifier of the owner (tenant) that the event belongs to. |
| EventId | UUID | The unique identifier for the event. Can be used for idempotency, logging and more. |
| Occured | DateTime | The date and time (in UTC) when the event occurred. |
| CausedByPersonId | UUID | The unique identifier of the user that caused the event (if any). |
| CausedBy | string | The name of the user that caused the event (if any). |
| TraceId | string | The trace id that can be used to trace different actions that is going on in a system. |
Delivery Headers
The HTTP POST payloads send to your webhook’s configured URL endpoint will contain the following custom HTTP headers:
| Header | Description |
|---|---|
| X-IRM-Signature | A base64 encoded HMAC-SHA256 signature of the body, signed with your API key (secret). |
| X-IRM-Topic | The topic that you registered for this webhook encoded as base64 (UTF8). |
| X-IRM-EventType | A base64 (UTF8) encoded full name of the event, guaranteed to be unique. |
Also, the User-Agent for the requests will be IRM-Webhook.
Migration
Subsections of Migration
Migration of Users With Passwords
We support migrations of users and their passwords if we can implement the same hash algorithm that is currently used for creation and validation of their passwords. After an old/migrated password is validated the password will be re-hashed to use our modern hashing solution to protect the passwords.
If the hashing alorithm is unknown or is not possible to implement, users can still be migrated and an e-mail can be send to all users with a link where they can create a new password (or use another sign-in alternative). We can also implement more customized migration strategies based on you requirements.
Existing hash algorithm support
We currently have existing support for MembershipHasher (if you are migrating from ASP.NET Membership) and SimpleMembershipHasher (if you are migrating from ASP.NET Simple Membership).
Other migration support
If you have admin UI:s that uses ASP.NET Roles, we have a custom AuthwayRoleProvider that can be used with small modifications on existing code to talk to our admin API:s. Just let us know and we’re happy to share this with you.
The changes needed is likely to handle the fact that Authway is multi-tenant, but Roles (and Membership) have no concept of multi-tenancy. This might force code changes to use are extended methods to pass in the TenantId that should currently be handled or configure a single TenantId that the existing admin UI should work against.