Each Authway instance have at least Username/password and Microsoft Authentication configured, but there can also be more authentication methods such as social logins, verified identities such as Swedish BankId, One-time Password and others. All instance configured authentication methods can be turned off for a specific tenant if it shouldn’t be allowed. It is also possible to add tenant specific authentication methods for OpenId Connect or SAML protocols.
Tenant specific authentication is possible to configure after registering a unique identifier for the tenant that will be part of the URLs during sign-in flow. Use tenant name of an abbreviation of the name.
Auto-provisioning
Auto-provisiong is the concept of automatically handle the complete life-cycle of users in their home catalog (realm). It has the following benefits:
- Single-sign-on with their existing business accounts.
- During sign-in all information about the user, such as name and e-mail, is updated from the information provided by their home catalog.
- Automatic synchronization of user permissions. This is done by synchronizing the Authway groups the user should belong to by matching the external groups with the groups/roles that the user belongs too in their home catalog.
- Automatic creation of new users and assignment of groups in the same way as above. This can be done by registering trusted domain(s) for the tenant. The trusted domain should match everything after the “@” character in the e-mail address that the user enters when signing in.
For auto-provisioning to work at least one of the allowed authentication methods on the tenant must be configured to allow auto-provision and also one or more trusted domains must be configured.
Auto-linking
Auto-linking is very similar to auto-provisioning, with the difference that a user can’t be automatically created. Instead the user must be created by the administrator or through API calls. Auto-linking does not require any trusted domains to be configured for the tenant.
The benefits of using auto-linking is very similar to auto-provision except for initial creation of users.
Social Sign-in Methods
When using social sign-in methods, such as Microsoft, Google, Apple and other, we recommend that the privacy policy includes information about this. For some of them, for example Google, it is required. The information we suggest is included can be something like this:
"
When you use a social login, such as Microsoft, Google [include the ones used], we collect a unique identifier, your name and e-mail address from the service.
"
Google
We have somewhat limited possibilities to configure Google authentication, because of the requirements set by Google. Our only possibility is to administrate the simplest form of integration, without brand recognition. If you want to display your logo and/or a specific application name, the configuration must be done with from Google accounts that has access to Google Search Console where your domain is verified (which means this also requires a custom domain for you Authway instance). We can of course help and guide in the process, or be invited with enough permissions to your Google Console.
Subsections of Configure Authentication Methods for a Tenant
It is possible to configure stronger (but not weaker) password requirements for a tenant, than the Authway instance is configured with. For example if the instance is confugred to require a password length of at least 6 charachters, it is possible to require the password to be at least 8 charachters in a specific tenant. Choose the “Local” authentication method to configure password requirements.
We recommend all organisations that uses Microsoft Entra ID (former Azure AD) to use it for their users. The process of using Microsoft Entra ID is very simple:
- Register the tenant id for your Microsoft Entra ID. This is displayed on the Overview page of Microsoft Entra ID administration. If you don’t have administrativ priviliges in Entra ID, please ask you administrator.
- Approve our pre-configured Microsoft Entra application in your Entra ID instance. The configuration page for Microsoft authentication method has a link to consent the application for your convenience.
After thoose simple steps all your users can use their existing business accounts to sign-in. To synchronize permissions from your Microsoft Entra ID to the applications that uses Authway you follow theses steps:
- Navigate to Groups in Authway admin.
- Choose an existing group or create a new group.
- Set the group to be external and set the external name to be the Object ID of the Microsoft Entra ID group. Object ID is displayed both in the listning of all groups and on the Overview page of the specific group.
Use your own Microsoft Entra application
Some organisations wants to provide their own Microsoft Entra application to use for their users. One reason for doing this could be to filter the groups exposed. To create an application to use in Authway do this (some of the steps are equal to Configure OpenId Connect for a Tenant):
- Navigate to the organisation in Authway admin portal.
- Choose “Settings” and then “Add” -> “OpenId Connect”.
- Edit the settings for the newly created OpenId Connect authentication method, typically named the same as you organisation name.
- Set “Authority” to
https://login.microsoftonline.com/[Your Microsoft Entra Tenant Id]/v2.0/.
- Copy the redirect URL.
- Open Microsoft Entra ID administration portal
- Choose “App registrations” in the left pane and click “New registration”.
- Give your application a suitable name and let the default “Accounts in this organizational directory only” be selected for “Supported account types”.
- Under “Redirect URI”, choose “Web” as platform and paste the copied redirect URL (from above in the Authway admin portal).
- Copy the application id (client id) from Microsoft Entra portal and paste it as Client Id in Authway.
- Create a client secret in Microsoft Entra portal and copy the secret value so you can paste it as Client Secret in Authway. It is also possible to create a certificate in the tenant specific authentication in Authway, which means that you can download that certificate and upload to Entra instead of using a shared secret.
- Enable and save the tenant specific authentication in Authway. It can take up to five minutes before it becomes available as a sign-in alternative.
- To get an Entra application that handles everything the pre-configured application does, you also need to add some optional claims under “Token configuration”. Click “Add optional claim”, choose “ID” as Token type and select
family_name plus given_name. Click “Add” and accept that the “Microsoft graph profile permission” is required. This configuration ensures that Authway will get and can synhronize its first and last name properties. Finally, to flow permssions, you also need to “Add groups claim”. Mark “Security groups” and optionally do additional configuration, but the pre-configured client uses Group ID (which will be the Object ID of the group). sAMAccoountName can be used when Entra is synhronized with an on-prem AD and will in that case emit the name of the group instead of Object ID, which is more readable as the external group name in Authway.
Filter the Groups Exposed to Authway
A common reason to creat a custom Entra application is to filter the groups exposed to Authway. One way to do this is during “Add group claim” above, but if you for example want to expose all groups that has a group name that starts with “authwayTest” you can do this:
- On the App configuration, click on “Manifest” in Microsoft Entra portal and set
"acceptMappedClaims" to true. Save the application.
- Make sure to consent the application configured above.
- Click on “Enterprise applications” in Microsoft Entra ID admin portal and search for your newly created application.
- On the deatils for the application, select “Single sign-on”.
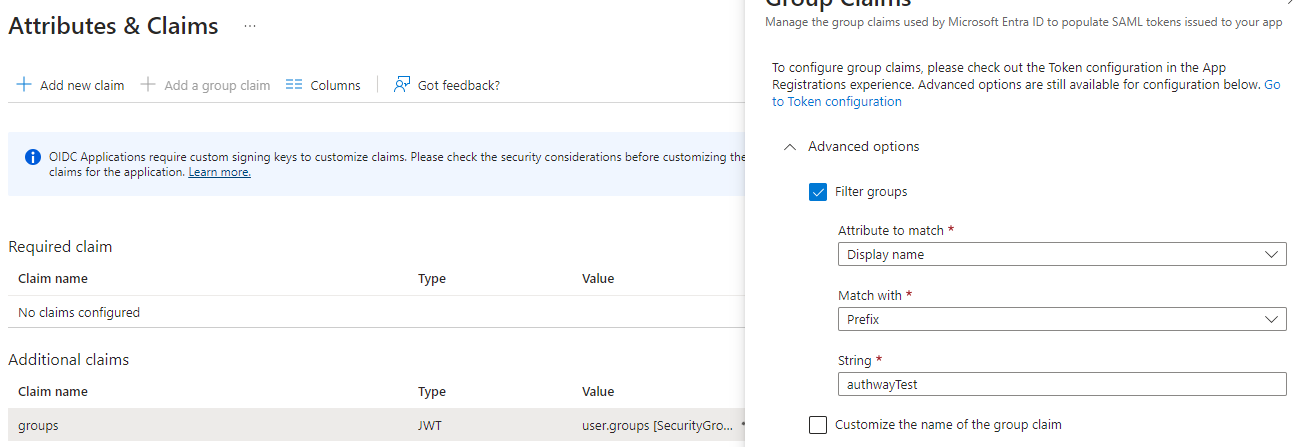
- Click “Edit” in the “Attribute & Claims” section.
- Click on the
groups claim (under “Additional claims”). In the window that opens, it is possible to choose “Filter groups”. Do that, choose “Display name” as attribute, “Prefix” for “Match with” and finally enter the prefix, for example “authwayTest”.