Subsections of System Administrator Guide
Privacy and GDPR
Introduction
All digital solutions must comply with privacy-related regulations such as GDPR. Therefor privacy design must be part of the implementation of Authway by IRM.
Examples of concerns that must be considered for a privacy design:
- Consent management: organisations must obtain explicit consents from individuals before collecting and processing data.
- Access control: great handling of users access and permissions.
- Data minimization: an organisation should limit the amount of personal data they collect and process to only what is necessary for a specific purpose.
- Data protection: an organisation is required to implement appropriate technical and organizational measures to protect personal data from unauthorized access, disclosure, alteration, or destruction.
There are many parts to this design, for example how applications use PII data from Authway (outlined in Developer guide) and below is description of built-in clean up tasks that are run automatically if turned on. Consider which of these tasks that would be good to use for your situation.
Remove user audit information
This task is always active in all Authway instances and by default audit information older than 365 days are removed. We can configure for how many days the audit information should be kept.
Remove inactive organisations
The task will remove an inactive organisations which is necessary for GDPR reasons since some organisations can include personal information.
An inactive organisation is defines as an organisation that:
- does not have any users
- does not have any persons
- does not have any subsidaries
The following options can be configured for this task:
- Minimum age: The number of days that should pass before a newly created organisation is evaluated as inactive.
- Kind of organisation: can be only subsidiaries, group mothers (tenants) or both.
Remove inactive users
The task will remove an inactive user since GDPR does not allow an organisation to keep PII data longer than necessary.
The following options can be configured for this task:
- Maximum number of days since last sign-in. Default 365 days.
- Type of organisations to search for inactive users. Can be Private persons, Organisations or Both.
- Import date: can be used to not remove users that are created before an import date.
Remove users that have never signed-in
The task will remove a user that has never signed-in. This is especially useful to remove users that have created accounts but never verified e-mail/phone number and therefor haven’t been able to sign-in (when verification is required). In those situations the user account should be removed earlier than the user is considered inactive.
The following options can be configured for this task:
- Minimum age: The number of days that should pass before a newly created user will be removed.
- Type of organisations to search for inactive users. Can be Private persons, Organisations or Both.
- Import date: can be used to not remove users that are created before an import date.
Remove users without any permissions (belong to any group)
The task will remove a user that does not belong to any group and therefor does not have any permission to access anything.
The following options can be configured for this task:
- Maximum number of days since last sign-in. Default 365 days.
- Type of organisations to search for inactive users. Can be Private persons, Organisations or Both.
- Import date: can be used to not remove users that are created before an import date.
Linked users
Linked users are users in different tenants that all will emit the same unique identifier in the sub claim. The concept can be used in situations where you want to treat different users as a single user no matter which tenant the user signing in belongs too.
Imaging an organisation that have private persons (consumers) as their primary customer. Some of this users also needs to be able to verify that they belong to an organisation to get access to specific applications/services that are oriented towards organisations (and not consumers). Even when the users sign in to an organisation, they still want to be able to get data about the user in their common consumer role. An example could be a sports club where a private person buys tickets and does other interaction in their consumer role, but some of them also sponsors the sport club with their company. As a sponsor the user might be entitled to special applications/services that only sponsors are allowed to use. In this situation the user must be able to prove that they belong to the organisation sponsoring, but it is likely that the user also want easy access to their tickets and other information belonging to their private person profile. This is situations that linked users can help solve.
Linked users will always see all sign-in alternatives for all their users, no matter which username was used to start the sign-in flow. If the same sign-in alternative is used on all users, they will have to choose in which context/tenant they want to sign-in. This can be automatically be done, for example if an application passes tenant information.
Sign-in flow for linked users
For linked users it is likely that one or the other has access to the module the user is signing in to. Authway will try to automatically pick the user with access and also try to switch user if already signed in to the one missing access. The following rules are applied during sign-in:
- Sign-in alternatives are limited to the user that has access to the module
- If no user (with the supplied username) have access to the module, the sign-in flow will continue until we display that access is missing (which leaves the possibility to change username).
Limitations of linked users
Linked users comes with the following limitations (or rules):
- The users that should be linked, must belong to different tenants.
- If linked user is created with same credentials as parent, all credential changes will be applied on both accounts.
- It is not possible to link users in hierarchies.
- The parent user can not be deleted until all linked users are deleted.
- System users (external systems) can’t be used in linking.
- If a sign-in is matching two users in the same tenant, the sign-in will always be done with the one where the username matches. For example if a user have the username [email protected] in both Private persons tenant and in Company A tenant, but also have a [email protected] user that is linked to [email protected] in Private person. The scenario also requires that exactly the same password is used on all three users. When signing in into Company A the service will match two users and to select which one to actually sign-in a new match on the username will be performed.
Lägga till inloggning med Microsoft Entra ID (eller Microsoft-konto)
Det finns AddMicrosoftEntraID-metod som sätter upp ett antal inställningar som vi av erfarenhet är bra för att inloggningen ska fungera bra med IRM.AspNetCore.Identity, t.ex. en felhantering som gör att användaren får veta varför det blev problem. Alla dessa inställningar går att göra om i en egen konfiguration av options, plus att det finns en del nödvändiga inställningar som måste göras, som att ange ClientId och ClientSecret.
services.AddAuthentication()
        .AddMicrosoftAzureAd(options =>
        {
             options.ClientId = "ClientId from portal";
             options.ClientSecret = "Secret from portal";

             //The Prompt property can be used to force a login, or the consent screen. Per specification, “none”, “login”, “consent”,
             //“select_account” values can be used here. If the login is not forced, the user will automatically be logged in, if only one
             //account is active.
             //options.Prompt = "select_account";
         });
Synkronisera användarnas grupper från Entra ID med externa grupper
Vi har inbyggt stöd för att synkronisera de säkerhetgrupper som en användare tillhör i Entra ID med de grupper som är konfigurerade som externa i grupp-administrationen. För att man ska få med grupperna måste följande konfiguration görs under App Registreringen i Azure Portal:
- Öppna konfigurationen för din app som identifieras av det client id som du använt ovan.
- Klicka på “Token Configuration”
- Klicka på “Add groups claim”
- Välj “Security groups”.
- Under ID token väljer du Group ID och kryssar i “Emit groups as role claims”.
Nu kommer användarens Entra ID säkerhetsgrupper komma med i form av det objekt id de har i Entra ID. Det innebär att när du konfigurerar en Extern grupp ska du ange objekt id som det externa gruppnamnet.
Configure Authentication Methods for a Tenant
Each Authway instance have at least Username/password and Microsoft Authentication configured, but there can also be more authentication methods such as social logins, verified identities such as Swedish BankId, One-time Password and others. All instance configured authentication methods can be turned off for a specific tenant if it shouldn’t be allowed. It is also possible to add tenant specific authentication methods for OpenId Connect or SAML protocols.
Tenant specific authentication is possible to configure after registering a unique identifier for the tenant that will be part of the URLs during sign-in flow. Use tenant name of an abbreviation of the name.
Auto-provisioning
Auto-provisiong is the concept of automatically handle the complete life-cycle of users in their home catalog (realm). It has the following benefits:
- Single-sign-on with their existing business accounts.
- During sign-in all information about the user, such as name and e-mail, is updated from the information provided by their home catalog.
- Automatic synchronization of user permissions. This is done by synchronizing the Authway groups the user should belong to by matching the external groups with the groups/roles that the user belongs too in their home catalog.
- Automatic creation of new users and assignment of groups in the same way as above. This can be done by registering trusted domain(s) for the tenant. The trusted domain should match everything after the “@” character in the e-mail address that the user enters when signing in.
For auto-provisioning to work at least one of the allowed authentication methods on the tenant must be configured to allow auto-provision and also one or more trusted domains must be configured.
Auto-linking
Auto-linking is very similar to auto-provisioning, with the difference that a user can’t be automatically created. Instead the user must be created by the administrator or through API calls. Auto-linking does not require any trusted domains to be configured for the tenant.
The benefits of using auto-linking is very similar to auto-provision except for initial creation of users.
Social Sign-in Methods
When using social sign-in methods, such as Microsoft, Google, Apple and other, we recommend that the privacy policy includes information about this. For some of them, for example Google, it is required. The information we suggest is included can be something like this:
" When you use a social login, such as Microsoft, Google [include the ones used], we collect a unique identifier, your name and e-mail address from the service. "
We have somewhat limited possibilities to configure Google authentication, because of the requirements set by Google. Our only possibility is to administrate the simplest form of integration, without brand recognition. If you want to display your logo and/or a specific application name, the configuration must be done with from Google accounts that has access to Google Search Console where your domain is verified (which means this also requires a custom domain for you Authway instance). We can of course help and guide in the process, or be invited with enough permissions to your Google Console.
Subsections of Configure Authentication Methods for a Tenant
Configure Password Requirements for a Tenant
It is possible to configure stronger (but not weaker) password requirements for a tenant, than the Authway instance is configured with. For example if the instance is confugred to require a password length of at least 6 charachters, it is possible to require the password to be at least 8 charachters in a specific tenant. Choose the “Local” authentication method to configure password requirements.
Configure Microsoft Entra ID for a Tenant
We recommend all organisations that uses Microsoft Entra ID (former Azure AD) to use it for their users. The process of using Microsoft Entra ID is very simple:
- Register the tenant id for your Microsoft Entra ID. This is displayed on the Overview page of Microsoft Entra ID administration. If you don’t have administrativ priviliges in Entra ID, please ask you administrator.
- Approve our pre-configured Microsoft Entra application in your Entra ID instance. The configuration page for Microsoft authentication method has a link to consent the application for your convenience.
After thoose simple steps all your users can use their existing business accounts to sign-in. To synchronize permissions from your Microsoft Entra ID to the applications that uses Authway you follow theses steps:
- Navigate to Groups in Authway admin.
- Choose an existing group or create a new group.
- Set the group to be external and set the external name to be the Object ID of the Microsoft Entra ID group. Object ID is displayed both in the listning of all groups and on the Overview page of the specific group.
Use your own Microsoft Entra application
Some organisations wants to provide their own Microsoft Entra application to use for their users. One reason for doing this could be to filter the groups exposed. To create an application to use in Authway do this (some of the steps are equal to Configure OpenId Connect for a Tenant):
- Navigate to the organisation in Authway admin portal.
- Choose “Settings” and then “Add” -> “OpenId Connect”.
- Edit the settings for the newly created OpenId Connect authentication method, typically named the same as you organisation name.
- Set “Authority” to
https://login.microsoftonline.com/[Your Microsoft Entra Tenant Id]/v2.0/. - Copy the redirect URL.
- Open Microsoft Entra ID administration portal
- Choose “App registrations” in the left pane and click “New registration”.
- Give your application a suitable name and let the default “Accounts in this organizational directory only” be selected for “Supported account types”.
- Under “Redirect URI”, choose “Web” as platform and paste the copied redirect URL (from above in the Authway admin portal).
- Copy the application id (client id) from Microsoft Entra portal and paste it as Client Id in Authway.
- Create a client secret in Microsoft Entra portal and copy the secret value so you can paste it as Client Secret in Authway. It is also possible to create a certificate in the tenant specific authentication in Authway, which means that you can download that certificate and upload to Entra instead of using a shared secret.
- Enable and save the tenant specific authentication in Authway. It can take up to five minutes before it becomes available as a sign-in alternative.
- To get an Entra application that handles everything the pre-configured application does, you also need to add some optional claims under “Token configuration”. Click “Add optional claim”, choose “ID” as Token type and select
family_nameplusgiven_name. Click “Add” and accept that the “Microsoft graph profile permission” is required. This configuration ensures that Authway will get and can synhronize its first and last name properties. Finally, to flow permssions, you also need to “Add groups claim”. Mark “Security groups” and optionally do additional configuration, but the pre-configured client uses Group ID (which will be the Object ID of the group).sAMAccoountNamecan be used when Entra is synhronized with an on-prem AD and will in that case emit the name of the group instead of Object ID, which is more readable as the external group name in Authway.
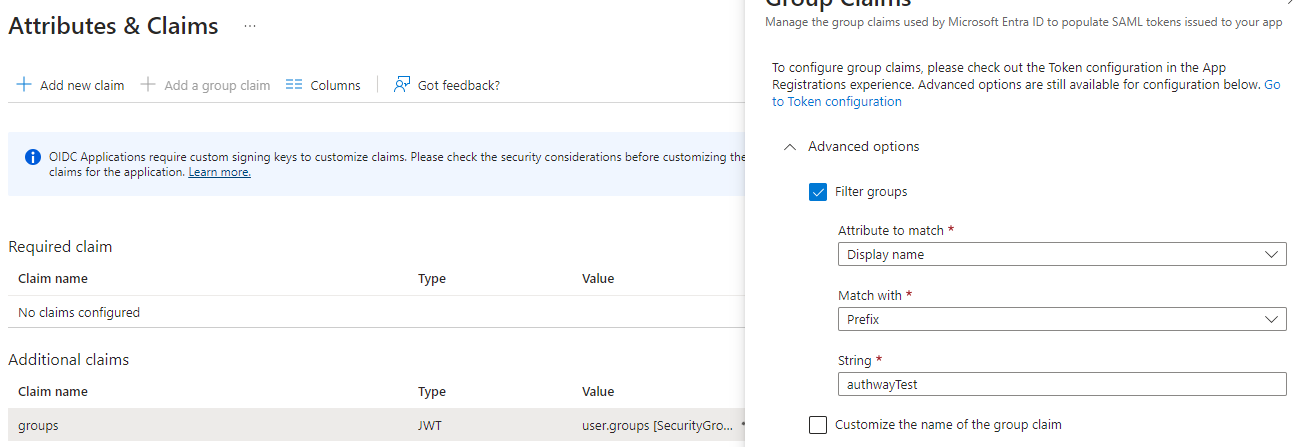
Filter the Groups Exposed to Authway
A common reason to creat a custom Entra application is to filter the groups exposed to Authway. One way to do this is during “Add group claim” above, but if you for example want to expose all groups that has a group name that starts with “authwayTest” you can do this:
- On the App configuration, click on “Manifest” in Microsoft Entra portal and set
"acceptMappedClaims"totrue. Save the application. - Make sure to consent the application configured above.
- Click on “Enterprise applications” in Microsoft Entra ID admin portal and search for your newly created application.
- On the deatils for the application, select “Single sign-on”.
- Click “Edit” in the “Attribute & Claims” section.
- Click on the
groupsclaim (under “Additional claims”). In the window that opens, it is possible to choose “Filter groups”. Do that, choose “Display name” as attribute, “Prefix” for “Match with” and finally enter the prefix, for example “authwayTest”.