Configure Microsoft Entra ID for a Tenant
We recommend all organisations that uses Microsoft Entra ID (former Azure AD) to use it for their users. The process of using Microsoft Entra ID is very simple:
- Register the tenant id for your Microsoft Entra ID. This is displayed on the Overview page of Microsoft Entra ID administration. If you don’t have administrativ priviliges in Entra ID, please ask you administrator.
- Approve our pre-configured Microsoft Entra application in your Entra ID instance. The configuration page for Microsoft authentication method has a link to consent the application for your convenience.
After thoose simple steps all your users can use their existing business accounts to sign-in. To synchronize permissions from your Microsoft Entra ID to the applications that uses Authway you follow theses steps:
- Navigate to Groups in Authway admin.
- Choose an existing group or create a new group.
- Set the group to be external and set the external name to be the Object ID of the Microsoft Entra ID group. Object ID is displayed both in the listning of all groups and on the Overview page of the specific group.
Use your own Microsoft Entra application
Some organisations wants to provide their own Microsoft Entra application to use for their users. One reason for doing this could be to filter the groups exposed. To create an application to use in Authway do this (some of the steps are equal to Configure OpenId Connect for a Tenant):
- Navigate to the organisation in Authway admin portal.
- Choose “Settings” and then “Add” -> “OpenId Connect”.
- Edit the settings for the newly created OpenId Connect authentication method, typically named the same as you organisation name.
- Set “Authority” to
https://login.microsoftonline.com/[Your Microsoft Entra Tenant Id]/v2.0/. - Copy the redirect URL.
- Open Microsoft Entra ID administration portal
- Choose “App registrations” in the left pane and click “New registration”.
- Give your application a suitable name and let the default “Accounts in this organizational directory only” be selected for “Supported account types”.
- Under “Redirect URI”, choose “Web” as platform and paste the copied redirect URL (from above in the Authway admin portal).
- Copy the application id (client id) from Microsoft Entra portal and paste it as Client Id in Authway.
- Create a client secret in Microsoft Entra portal and copy the secret value so you can paste it as Client Secret in Authway. It is also possible to create a certificate in the tenant specific authentication in Authway, which means that you can download that certificate and upload to Entra instead of using a shared secret.
- Enable and save the tenant specific authentication in Authway. It can take up to five minutes before it becomes available as a sign-in alternative.
- To get an Entra application that handles everything the pre-configured application does, you also need to add some optional claims under “Token configuration”. Click “Add optional claim”, choose “ID” as Token type and select
family_nameplusgiven_name. Click “Add” and accept that the “Microsoft graph profile permission” is required. This configuration ensures that Authway will get and can synhronize its first and last name properties. Finally, to flow permssions, you also need to “Add groups claim”. Mark “Security groups” and optionally do additional configuration, but the pre-configured client uses Group ID (which will be the Object ID of the group).sAMAccoountNamecan be used when Entra is synhronized with an on-prem AD and will in that case emit the name of the group instead of Object ID, which is more readable as the external group name in Authway.
Filter the Groups Exposed to Authway
A common reason to creat a custom Entra application is to filter the groups exposed to Authway. One way to do this is during “Add group claim” above, but if you for example want to expose all groups that has a group name that starts with “authwayTest” you can do this:
- On the App configuration, click on “Manifest” in Microsoft Entra portal and set
"acceptMappedClaims"totrue. Save the application. - Make sure to consent the application configured above.
- Click on “Enterprise applications” in Microsoft Entra ID admin portal and search for your newly created application.
- On the deatils for the application, select “Single sign-on”.
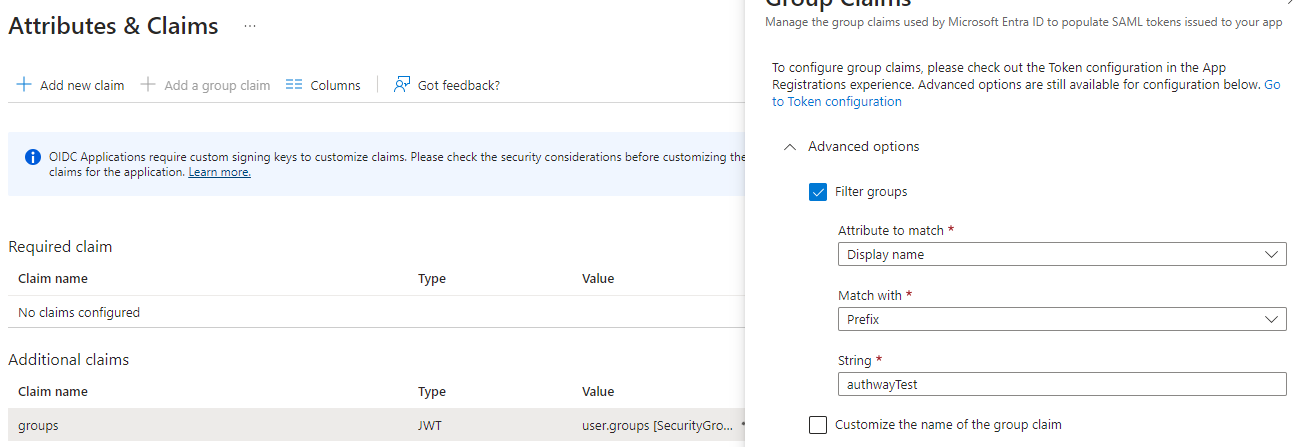
- Click “Edit” in the “Attribute & Claims” section.
- Click on the
groupsclaim (under “Additional claims”). In the window that opens, it is possible to choose “Filter groups”. Do that, choose “Display name” as attribute, “Prefix” for “Match with” and finally enter the prefix, for example “authwayTest”.